
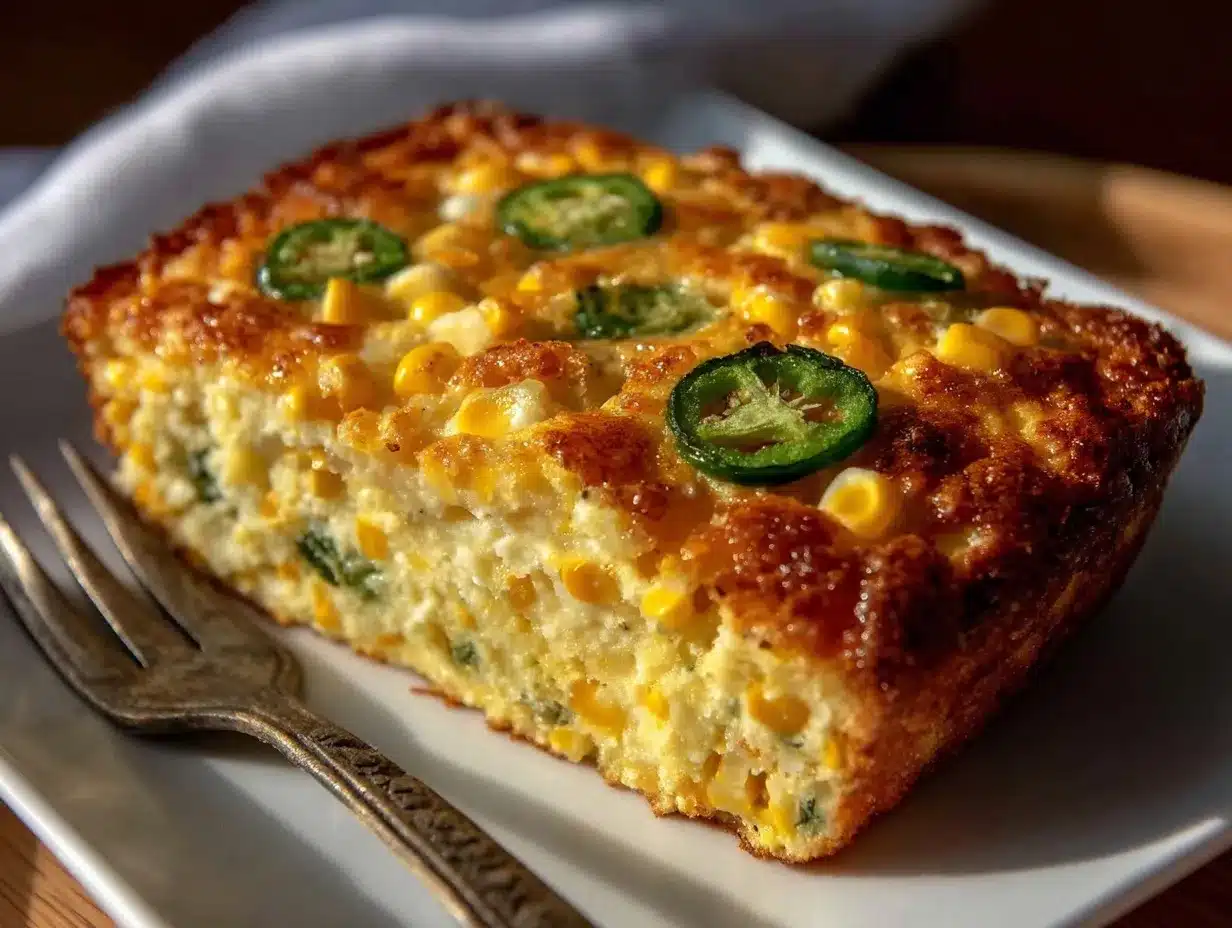
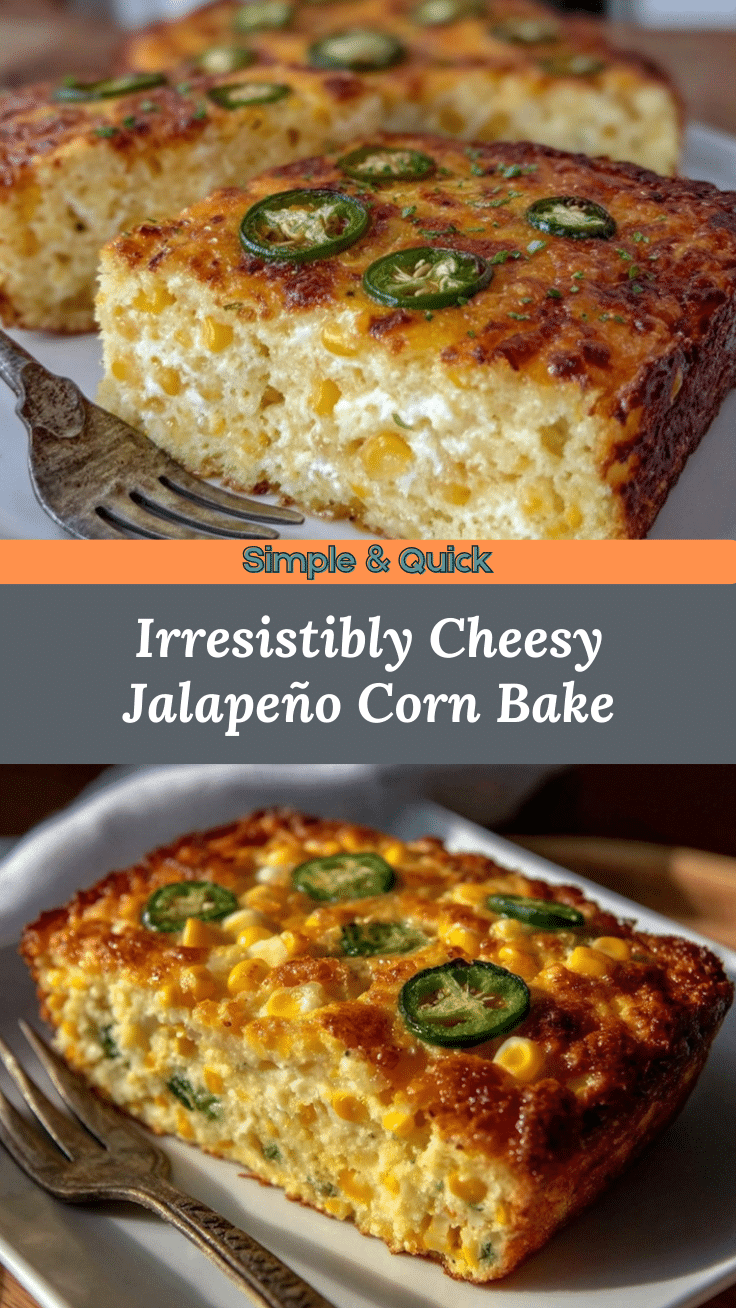
Let me set the scene: The kitchen’s full of laughter, the oven’s humming, and the air is thick with the scent of sweet corn and roasted jalapeños. That creamy, savory aroma? It’s downright impossible to ignore. The first time I pulled my Creamy Cheesy Jalapeño Corn Pudding Bake from the oven, those golden, bubbly edges had everyone circling the kitchen like hungry cats. I took a forkful—still steaming, the cheese stretching just enough—and honestly, I paused. You know that moment when everything feels right? This was it. The warmth, the gentle heat from the jalapeños, the sweet pops of corn, all blanketed in melty cheese and velvety custard. It was the kind of moment where you pause, take a deep breath, and just smile because you know you’re onto something truly special.
This recipe’s got roots. My grandma used to whip up a classic corn pudding for every holiday, but let’s face it—I needed a little more zing. Years ago, knee-high to a grasshopper, I remember sneaking extra cheese into her bowl (she caught me every time). Fast forward to a rainy weekend, and I found myself craving that same cozy comfort, but with a punchier flavor. Enter jalapeños and a double helping of cheese. My family couldn’t stop sneaking forkfuls off the cooling rack (and I can’t really blame them). Even my picky uncle, who swears he hates “spicy food,” polished off a generous slice.
Honestly, this Creamy Cheesy Jalapeño Corn Pudding Bake is dangerously easy—pure, nostalgic comfort with a modern twist. Perfect for potlucks, a sweet treat for your kids, or just brightening up your Pinterest board with those gorgeous golden edges. I’ve tested this recipe more times than I care to admit (in the name of research, of course), and it’s become a staple for family gatherings and gifting. It feels like a warm hug on a plate, and you’re going to want to bookmark this one—you’ll thank me later!
Why You’ll Love This Creamy Cheesy Jalapeño Corn Pudding Bake
If you’ve been searching for a corn pudding bake that truly stands out, you’re about to meet your new favorite. I’ve made this recipe so many times—tweaking, tasting, even messing up the bake once or twice (burnt edges, anyone?)—and let me tell you, this version is the one I keep coming back to.
- Quick & Easy: Comes together in under an hour, perfect for busy weeknights or last-minute cravings.
- Simple Ingredients: No fancy grocery trips required; you likely already have everything you need in your kitchen.
- Perfect for Any Occasion: Great for brunch, potlucks, cozy dinners, or holiday mornings.
- Crowd-Pleaser: Always gets rave reviews from kids and adults alike.
- Unbelievably Delicious: The creamy custard, pops of sweet corn, and melty cheese make for next-level comfort food.
So what makes this Creamy Cheesy Jalapeño Corn Pudding Bake different? For starters, it’s the way the jalapeños are diced finely (so you get a gentle heat, not a fiery surprise). The cheese isn’t just sprinkled on top—it’s folded right in, making every bite rich and satisfying. I use a blend of sharp cheddar and creamy Monterey Jack, which melts beautifully and brings out the best in the corn.
This isn’t just another corn casserole—it’s the kind of dish that makes you close your eyes after the first bite. It’s comfort food reimagined: quicker, easier, and just a little bit bolder. Whether you’re hosting friends or just turning a simple meal into something memorable, you’ll love how effortlessly impressive—and reliably delicious—this recipe is.
What Ingredients You Will Need
This Creamy Cheesy Jalapeño Corn Pudding Bake uses simple, wholesome ingredients to deliver bold flavor and that signature golden edge without any fuss. Most of these are pantry staples or easy to grab at the store. Here’s what you’ll need:
- For the pudding base:
- 2 cups (340g) fresh or frozen corn kernels (thawed if frozen; sweet corn works best)
- 1 cup (240ml) whole milk (for creaminess; use 2% if preferred)
- 1/2 cup (120ml) heavy cream (adds richness and a velvety texture)
- 3 large eggs (room temperature for smooth blending)
- 1/4 cup (60g) unsalted butter, melted (I love using Kerry Gold for extra flavor)
- 1/4 cup (32g) all-purpose flour (for structure; swap with gluten-free flour if needed)
- 1/4 cup (50g) granulated sugar (balances the savory and spicy notes)
- 1 tsp baking powder (for a little lift)
- 1/2 tsp salt (Diamond Crystal is my go-to)
- 1/4 tsp black pepper (freshly ground—trust me, it makes a difference)
- For the cheesy jalapeño layer:
- 1 1/2 cups (170g) shredded sharp cheddar cheese (I recommend Tillamook or Cabot)
- 1 cup (110g) shredded Monterey Jack cheese (for meltiness)
- 2 medium jalapeños, seeded and finely diced (about 1/4 cup; adjust for heat preference)
- Optional add-ins/toppings:
- 1/2 cup (60g) scallions, sliced (adds color and mild onion flavor)
- 1/2 cup (120ml) sour cream (for extra tang—mix into the batter or dollop on top)
- Fresh cilantro or parsley, chopped (for garnish)
Ingredient selection tips: Look for firm, sweet corn—fresh in summer or good-quality frozen during winter. If you want less heat, use just one jalapeño or swap for canned mild green chilies. For a gluten-free version, use a 1:1 gluten-free flour blend. For dairy-free, substitute plant-based milk and cheese (I’ve tried Violife and it works pretty well!).
Substitution guidance: Almond flour works as a low-carb swap (though the texture is softer). Greek yogurt can replace sour cream for tang. If you’re out of Monterey Jack, mozzarella is a decent stand-in, but I find it less flavorful. In summer, toss in fresh herbs or charred corn for a smoky twist!
Equipment Needed
You won’t need anything fancy to make this Creamy Cheesy Jalapeño Corn Pudding Bake, which is part of its charm. Here’s what you’ll want to grab:
- 1 large mixing bowl (stainless steel or glass; easy for whisking custard ingredients)
- Whisk (a balloon whisk works best for smooth blending)
- Flexible spatula (for folding in cheese and corn)
- 8×8-inch (20x20cm) or 9×9-inch (23x23cm) baking dish (ceramic or glass gives the best golden edges)
- Measuring cups and spoons (accurate measurements = perfect pudding texture)
- Box grater (for shredding cheese fresh—trust me, it melts better than pre-shredded)
- Small knife and cutting board (for dicing jalapeños and herbs)
If you don’t have a square baking dish, use a round 9-inch (23cm) cake pan or even a deep pie dish. I’ve baked this in disposable aluminum pans for potlucks—just reduce baking time by a few minutes since they heat up faster. For cleaning up, soak the baking dish right after serving; cheese can cling to the sides.
Budget-friendly tip: If you’re short on mixing bowls, rinse and reuse between steps. I started out with a plastic bowl and a single whisk, and honestly, it works just fine!
Preparation Method
- Preheat & Prep: Set your oven to 350°F (175°C). Grease your baking dish lightly with butter or nonstick spray—this will help those edges crisp up beautifully.
- Mix the Custard Base: In a large bowl, whisk together the eggs, milk, heavy cream, and melted butter until the mixture is smooth and pale yellow. This should take about 2 minutes. (Tip: Room temperature eggs blend better for a silky texture.)
- Add Dry Ingredients: Sprinkle in the flour, sugar, baking powder, salt, and pepper. Whisk gently until just combined—don’t overmix, or the pudding can turn dense.
- Fold in Corn: Add the corn kernels to the bowl. Use a spatula to fold them in, ensuring even distribution. You’ll notice the batter thickening slightly, which is perfect.
- Cheese & Jalapeños: Fold in the shredded cheddar, Monterey Jack, and diced jalapeños. Mix until the cheese is evenly distributed and the jalapeños are speckled throughout. (Warning: If you touch jalapeños, wash your hands—learned the hard way!)
- Optional Add-ins: If using scallions or sour cream, fold them in now. I often add a handful of scallions for extra color and flavor.
- Transfer & Smooth: Pour the batter into the prepared baking dish. Use a spatula to smooth the top. Sprinkle extra cheese and herbs on top if desired.
- Bake: Place the dish in the center of the oven. Bake for 40-45 minutes, or until the edges are deeply golden and the center is mostly set (it should jiggle slightly). If you notice the edges browning too fast, tent loosely with foil for the last 10 minutes.
- Check for Doneness: Insert a knife in the center—it should come out clean, but the pudding will still be soft. Let it cool for 10-15 minutes before cutting (it firms up as it cools).
- Serve: Cut into squares and serve warm. The cheese will be gooey, and the edges crispy. (Tip: Run a knife around the pan for easy release.)
Troubleshooting: If your pudding is too runny, bake an extra 5 minutes. For dry pudding, check oven temperature accuracy—sometimes running hot can overcook. If the top is pale, broil for 1-2 minutes at the end, but watch closely!
Efficiency tip: Prep all your ingredients before you start mixing. I’ve rushed and forgotten the baking powder once—didn’t rise as much, but still tasted great. Take your time, and you’ll nail those perfect golden edges every time.
Cooking Tips & Techniques
Here are some tricks and lessons learned from making this Creamy Cheesy Jalapeño Corn Pudding Bake more times than I can count:
- Room Temperature Ingredients: Let eggs and milk sit out for 20 minutes. The custard comes together smoother and bakes more evenly.
- Cheese Matters: Shred your cheese from a block instead of using pre-shredded. Pre-shredded cheese often contains anti-caking agents that prevent melting.
- Jalapeño Safety: Always wear gloves or wash hands after chopping jalapeños. I’ve rubbed my eyes once (never again!).
- Mixing Technique: Don’t overmix—too much whisking can make the pudding tough. Fold gently for the best texture.
- Baking Dish Choice: Glass or ceramic dishes provide the crispiest edges. Metal pans cook faster but can brown unevenly.
- Golden Edges: For extra crispy edges, let the pudding cool for 5 minutes in the oven after turning it off. The residual heat works magic!
- Troubleshooting: If the center is too wobbly, let it bake for 5-10 extra minutes. If the top browns too quickly, tent with foil halfway through.
Personal lesson: I once tried baking this in a deep casserole dish, and the center stayed raw while the edges crisped up. Stick to a shallow dish for even baking. Timing is everything—set a timer and check early to avoid overbaking.
Multitasking tip: Prep your garnishes and sides while the pudding bakes. It makes serving feel effortless, and you’ll have more time to enjoy that first bite!
Variations & Adaptations
This Creamy Cheesy Jalapeño Corn Pudding Bake is endlessly customizable. Here are a few of my favorite twists:
- Dietary: For a gluten-free version, swap all-purpose flour with a 1:1 gluten-free blend. Dairy-free? Use coconut milk and plant-based cheese (the flavor is a bit different, but still delicious).
- Seasonal: In summer, toss in grilled or charred corn for a smoky flavor. In winter, add diced roasted red peppers for color and sweetness.
- Flavor: Add crumbled bacon or cooked chorizo for a hearty, savory boost. Smoked paprika sprinkled on top adds depth.
Different cooking methods: You can bake mini puddings in muffin tins for individual servings (reduce bake time to 20-25 minutes). For a crust, line the dish with crushed buttery crackers before pouring in the batter.
Allergen substitutions: Swap eggs with a flaxseed egg mixture for an egg-free version (texture will be slightly different). Nut-based milks work if you’re avoiding dairy, but stick to unsweetened for best results.
I’ve tried a version with diced green chilies instead of jalapeños—less heat, more tang. My kids actually prefer this milder twist, so don’t be afraid to tweak for your crowd!
Serving & Storage Suggestions
This Creamy Cheesy Jalapeño Corn Pudding Bake tastes best served warm, straight from the oven. Let it rest for 10-15 minutes before slicing—this helps the custard set up and makes it easier to cut those perfect squares.
- Serving temperature: Warm or at room temp; leftovers are still delicious cold.
- Presentation: Garnish with fresh cilantro, sliced jalapeños, or a dollop of sour cream. It looks stunning on a colorful platter.
- Pairings: Serve alongside grilled chicken, barbecue ribs, or a simple green salad. I love it with iced tea or citrusy lemonade.
- Storage: Refrigerate leftovers in an airtight container for up to 4 days. The flavors deepen overnight, making it even tastier the next day.
- Freezing: Cut into squares, wrap tightly, and freeze for up to 2 months. Thaw overnight and reheat gently in the oven at 300°F (150°C) until warmed through.
Reheating tips: Microwave individual portions for 30 seconds, or reheat the whole bake covered with foil in the oven. If it seems dry, add a splash of milk before reheating—it works wonders.
Over time, the flavors meld and the pudding becomes even richer. I sometimes make it a day ahead just for this reason!
Nutritional Information & Benefits
Here’s a quick look at the nutrition for one generous serving (about 1/8th of the bake):
- Calories: ~320
- Protein: 11g
- Fat: 21g
- Carbohydrates: 23g
- Sugar: 5g
- Fiber: 2g
Health benefits: Corn is a good source of fiber and vitamins (especially B vitamins). Jalapeños provide a boost of vitamin C and a little metabolism kick. The cheeses add protein and calcium—though yes, a bit of indulgence never hurt anyone!
Dietary notes: Easily adaptable for gluten-free or vegetarian diets. Contains dairy and eggs (potential allergens). If you’re watching carbs, swap flour for almond flour and use less sugar for a lower-carb option.
Personally, I love knowing this dish has real, whole ingredients. It’s filling, satisfying, and makes a great side for any meal—without feeling too heavy.
Conclusion
If you’re ready for a side dish that’s anything but boring, this Creamy Cheesy Jalapeño Corn Pudding Bake is just what you need. It’s comforting, a little spicy, and those golden edges are absolute perfection. You can tweak it to suit your tastes, make it ahead for easy entertaining, or just enjoy a big slice on a quiet night in.
I love how this recipe brings people together—honestly, it’s become my go-to for family dinners and potlucks. The best part? It’s easy enough for anyone to whip up, but special enough to steal the show. If you try it, let me know how you make it your own! Drop a comment below, share your photo on Pinterest, or tell me your favorite variation. Happy baking—and may your edges always be golden!
Frequently Asked Questions
Can I use canned corn instead of fresh or frozen?
Yes, canned corn works just fine! Drain it well before adding. The flavor is a bit sweeter, but the texture holds up nicely in this pudding bake.
How spicy is this Creamy Cheesy Jalapeño Corn Pudding Bake?
It’s got a gentle warmth, not a fiery kick. If you want less heat, use just one jalapeño or swap for mild green chilies. For extra spice, leave in some seeds!
Can I make this corn pudding bake ahead of time?
Definitely. Bake it up to a day in advance, cool, and refrigerate. Reheat in the oven at 300°F (150°C) covered with foil until warmed through.
What’s the best way to reheat leftovers?
Microwave individual slices for 30 seconds or reheat the whole dish in the oven. Add a splash of milk if it seems dry—that helps bring back the creamy texture.
Is this recipe gluten-free?
It can be! Just swap the all-purpose flour for a gluten-free blend. Everything else in the recipe is naturally gluten-free (just check your baking powder label to be sure).
Pin This Recipe!
Creamy Cheesy Jalapeño Corn Pudding Bake

A creamy, cheesy corn pudding bake with golden edges, gentle jalapeño heat, and sweet pops of corn. Perfect for potlucks, brunch, or cozy dinners—comfort food with a modern twist.
- Prep Time: 15 minutes
- Cook Time: 45 minutes
- Total Time: 1 hour
- Yield: 8 servings 1x
- Category: Side Dish
- Cuisine: American
Ingredients
- 2 cups fresh or frozen corn kernels (thawed if frozen; sweet corn works best)
- 1 cup whole milk
- 1/2 cup heavy cream
- 3 large eggs (room temperature)
- 1/4 cup unsalted butter, melted
- 1/4 cup all-purpose flour (swap with gluten-free flour if needed)
- 1/4 cup granulated sugar
- 1 tsp baking powder
- 1/2 tsp salt
- 1/4 tsp black pepper
- 1 1/2 cups shredded sharp cheddar cheese
- 1 cup shredded Monterey Jack cheese
- 2 medium jalapeños, seeded and finely diced (about 1/4 cup; adjust for heat preference)
- 1/2 cup scallions, sliced (optional)
- 1/2 cup sour cream (optional, for extra tang)
- Fresh cilantro or parsley, chopped (for garnish)
Instructions
- Preheat oven to 350°F (175°C). Grease an 8×8-inch or 9×9-inch baking dish with butter or nonstick spray.
- In a large bowl, whisk together eggs, milk, heavy cream, and melted butter until smooth and pale yellow (about 2 minutes).
- Sprinkle in flour, sugar, baking powder, salt, and pepper. Whisk gently until just combined.
- Fold in corn kernels with a spatula until evenly distributed.
- Fold in shredded cheddar, Monterey Jack, and diced jalapeños until evenly mixed.
- If using scallions or sour cream, fold them in now.
- Pour batter into prepared baking dish and smooth the top. Sprinkle extra cheese and herbs on top if desired.
- Bake for 40-45 minutes, or until edges are golden and center is mostly set (should jiggle slightly). Tent with foil if edges brown too quickly.
- Check doneness by inserting a knife in the center—it should come out clean but pudding will be soft. Let cool for 10-15 minutes before cutting.
- Cut into squares and serve warm. Garnish with cilantro, sliced jalapeños, or sour cream if desired.
Notes
For gluten-free, use a 1:1 gluten-free flour blend. For less heat, use one jalapeño or swap for mild green chilies. Shred cheese from a block for best melting. Let pudding cool before slicing for clean squares. Store leftovers in an airtight container up to 4 days or freeze up to 2 months. Reheat with a splash of milk for creaminess.
Nutrition
- Serving Size: 1/8th of the bake
- Calories: 320
- Sugar: 5
- Sodium: 480
- Fat: 21
- Saturated Fat: 12
- Carbohydrates: 23
- Fiber: 2
- Protein: 11
Keywords: corn pudding, cheesy corn bake, jalapeño corn casserole, comfort food, potluck recipe, golden edges, easy side dish, creamy corn pudding


