Let’s set the scene—imagine walking into a room where the sweet, creamy aroma of cheesecake desserts floats through the air, mingling with laughter and the clinking of glasses. The first time I made my signature creamy cheesecake for a party, I remember pausing just to soak in the moment (the kind where you take a deep breath and grin because, honestly, you know you’ve struck gold). That golden, velvety layer was so smooth, it practically shimmered under the kitchen lights, and I could barely wait for the first bite.
My grandma used to say, “A good dessert brings everyone to the table,” and she was right. Back when I was knee-high to a grasshopper, she’d let me sneak a spoonful of her cheesecake filling before it ever hit the crust. Years ago, I tried recreating that same nostalgic comfort for my own family, and let’s face it—there’s nothing quite like watching your loved ones circle the kitchen, waiting for the first slice to cool. My kids are notorious for stealing the corner pieces (and I’m not even mad, because I do the same!).
I stumbled on my dreamy cheesecake recipe after a rainy weekend spent tinkering with leftover cream cheese and fresh eggs, determined to create something worthy of a Pinterest board. Let me tell you, this recipe is dangerously easy and perfect for those moments when you want to impress without stress. Whether you’re planning a potluck, a birthday bash, or just need a sweet treat for your next book club, creamy cheesecake desserts really do bring pure comfort and delight. I tested this recipe more times than I care to admit (in the name of research, of course), and now it’s a staple for every family gathering and gifting occasion. It feels like a warm hug in food form—bookmark this one, because you’ll want to make it again and again!
Why You’ll Love This Creamy Cheesecake & Desserts Recipe
Having baked more cheesecakes than I can count—some cracked, some perfect, all delicious—I can confidently say this creamy cheesecake dessert is a stand-out. Years of tinkering, taste-testing, and even a few accidental “cheesecake fails” have led to a foolproof recipe that’s always party-ready. Here’s why you’ll adore it (and why folks keep asking for seconds):
- Quick & Easy: Comes together in under 15 minutes of prep, so you’re not stuck in the kitchen while everyone else is having fun.
- Simple Ingredients: You probably have everything on hand—no wild goose chases to specialty stores required.
- Perfect for Parties: Whether it’s a holiday brunch, birthday, or backyard BBQ, this cheesecake is always a hit.
- Crowd-Pleaser: Kids love it, adults rave about it, and there’s never a slice left behind.
- Unbelievably Delicious: The texture is silky and rich, with just the right balance of tang and sweetness.
What makes this creamy cheesecake dessert different? For starters, blending the filling until ultra-smooth means zero lumps (trust me, it’s a game-changer). The crust is buttery and crisp, providing the perfect contrast to the creamy topping. I’ve tried all sorts of tweaks—using Greek yogurt for a lighter texture, adding citrus zest for brightness, swapping in gluten-free graham crackers—and every version shines in its own way.
Beyond just taste, this recipe is comfort food at its finest. It’s the kind of dessert that makes you close your eyes after the first bite, savoring every creamy moment. Guests always ask for the recipe (and sometimes a second slice before they leave). If you want a show-stopping, stress-free dessert for your next heavenly delight party, this creamy cheesecake is the ticket. You’ll be proud to serve it, and even happier to sneak a midnight slice.
What Ingredients You Will Need for Creamy Cheesecake & Desserts
This recipe uses simple, wholesome ingredients to deliver bold flavor and a satisfyingly creamy texture—no fuss, no fancy tricks. Most are pantry staples, and there’s plenty of room for swaps if you need them. Here’s what you’ll need:
- For the crust:
- Graham cracker crumbs (200g / about 2 cups)—classic flavor and crunch
- Unsalted butter, melted (60g / 1/4 cup)—binds the crumbs for a crisp base
- Sugar (25g / 2 tbsp)—adds a hint of sweetness
- Optional: cinnamon (1/2 tsp)—for cozy depth
- For the creamy cheesecake filling:
- Cream cheese, softened (450g / 16 oz)—use full-fat for ultra-creamy results; I love Philadelphia brand for consistency
- Sour cream (120g / 1/2 cup)—for tangy richness
- Granulated sugar (150g / 3/4 cup)—sweetens the filling without overpowering
- Large eggs, room temperature (2)—bind and add structure
- Vanilla extract (2 tsp)—pure comfort in a bottle
- Lemon zest (from 1 lemon)—adds brightness and cuts through the richness
- Optional: heavy cream (60ml / 1/4 cup)—for extra silkiness, especially if you want a softer set
- For the topping:
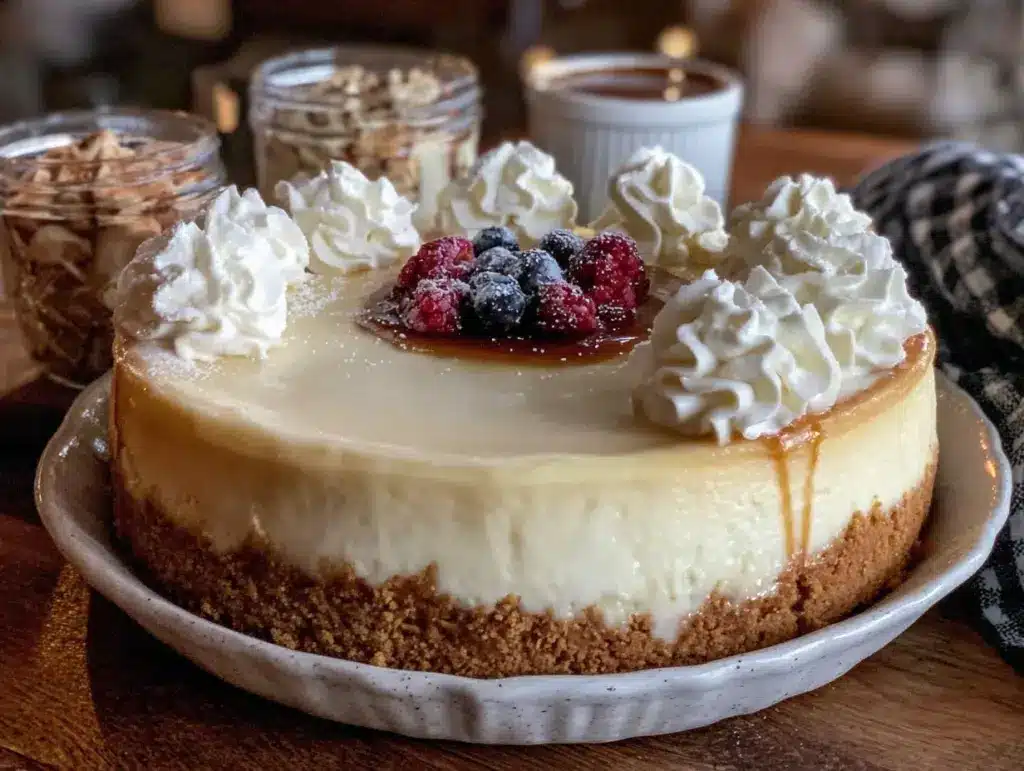
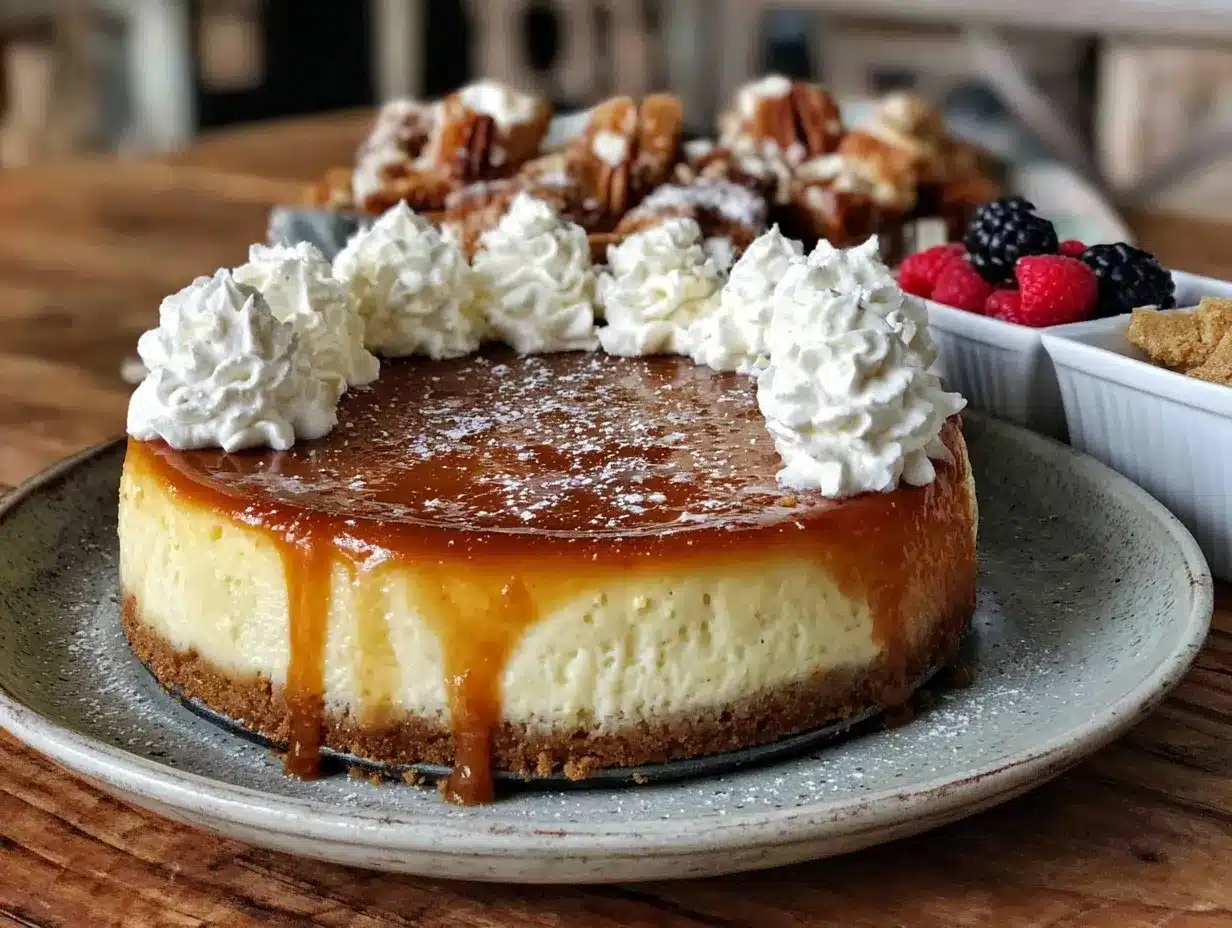
- Fresh berries or berry compote (1 cup / 150g)—for a burst of color and flavor
- Powdered sugar (2 tbsp)—a dusting for a pretty finish
Ingredient tips: Look for firm, block-style cream cheese (avoid whipped varieties—they’ll throw off the texture). If you’re out of graham crackers, digestive biscuits work well. No sour cream? Greek yogurt is a fine swap. Dairy-free? Use coconut cream cheese and plant-based yogurt—tested, approved, and still creamy. In summer, I like using fresh strawberries and blueberries for the topping. In winter, spiced apple compote is just as magical. You can always substitute gluten-free crackers for the crust and adjust sugar to taste.
Honestly, don’t stress if you’re missing one or two things—this creamy cheesecake dessert is forgiving. The main players are cream cheese, eggs, and a little love (okay, and maybe a pinch of lemon zest). I’ve tried budget-friendly brands and premium ones; both work, but the texture is always best with a reliable cream cheese. If you want to get fancy, add a swirl of caramel or a drizzle of chocolate—Pinterest-worthy and utterly delicious!
Equipment Needed
You won’t need a ton of gadgets for this creamy cheesecake dessert (music to my ears!). Here’s what’s essential and a few alternatives if you’re working with a basic kitchen:
- 9-inch (23cm) springform pan—classic for cheesecakes; a deep pie dish works in a pinch, though unmolding is trickier
- Mixing bowls—at least two, preferably glass or stainless steel
- Electric mixer or stand mixer—makes for a lump-free, creamy filling; hand whisk works if you’re feeling energetic
- Rubber spatula—great for scraping every bit of filling (don’t waste the good stuff!)
- Measuring cups and spoons—accuracy is key for cheesecake
- Baking sheet—if you want to set the pan on a tray for easy oven transfer
If you don’t have a springform pan, you can use a regular cake pan lined with parchment and a generous overhang for lifting. I’ve baked cheesecakes in Pyrex dishes, too—just be gentle when serving. For mixers, I’ve used both budget hand beaters and fancy stand mixers, and honestly, both do the job. Maintenance tip: always wipe down your springform pan after each use and check the clasp for any looseness. If you’re just starting out, thrift stores often have affordable pans and utensils that work perfectly.
Preparation Method
Here’s how to make your creamy cheesecake dessert for heavenly delight parties. I’ve broken it down step by step, with tips from years of trial and error. Get ready for a smooth, dreamy cheesecake that’ll make your party unforgettable!
- Prepare the crust:
- Mix 200g (2 cups) graham cracker crumbs, 60g (1/4 cup) melted butter, 25g (2 tbsp) sugar, and 1/2 tsp cinnamon (optional) in a bowl until evenly combined.
- Press mixture firmly into the bottom of your 9-inch (23cm) springform pan. Use the bottom of a glass or measuring cup for an even layer. The crust should feel slightly tacky and hold together—if crumbly, add a touch more melted butter.
- Bake crust at 350°F (175°C) for 10 minutes. Let cool completely while you prep the filling.
- Make the creamy filling:
- In a large bowl, beat 450g (16 oz) softened cream cheese until smooth and fluffy—about 2 minutes with a mixer. Scrape sides to avoid lumps.
- Add 120g (1/2 cup) sour cream, 150g (3/4 cup) sugar, 2 eggs, 2 tsp vanilla extract, and lemon zest from 1 lemon. Blend on medium speed until just combined (don’t overmix or the cheesecake may crack).
- If using, blend in 60ml (1/4 cup) heavy cream for extra silkiness.
- Batter should be glossy, thick, and have a faint lemon aroma. If you spot lumps, keep mixing—patience pays off!
- Pour and smooth:
- Pour filling over cooled crust. Use a spatula to smooth the top. Tap the pan gently on the counter to release air bubbles—this helps avoid cracks.
- Bake:
- Bake at 325°F (160°C) for 45-50 minutes. The edges should be set, but the center will still jiggle slightly (like set Jell-O). If it browns too quickly, tent loosely with foil.
- Turn off oven and let cheesecake cool inside for 1 hour—this gentle cooling helps prevent cracks.
- Chill:
- Remove from oven, cool to room temperature, then refrigerate for at least 4 hours (overnight is best). Don’t rush—creamy cheesecake needs time to set and develop flavor.
- Add toppings:
- Top chilled cheesecake with fresh berries or compote. Dust with 2 tbsp powdered sugar for a Pinterest-perfect finish.
- Serve:
- Run a thin knife around the edge before unclasping the pan. Slice with a clean, sharp knife for neat pieces—wipe between cuts for best presentation.
Troubleshooting: If your cheesecake cracks, don’t worry! Just cover with fruit or whipped cream. If it seems too soft, chill a bit longer. For extra creamy results, always use room-temperature ingredients. One last tip: I always set my pan on a baking sheet to catch leaks (learned that lesson the hard way!).
Cooking Tips & Techniques
Cheesecake may look fancy, but with a few tricks up your sleeve, you’ll get perfect results every time. Here’s what I’ve learned after plenty of practice (and a few cheesecake mishaps):
- Room Temperature Ingredients: Always bring cream cheese and eggs to room temp before mixing—cold ingredients lead to lumps.
- Don’t Overmix: Too much air makes the filling puff and crack. Mix just until smooth and creamy—no marathon beating sessions!
- Gentle Baking: A moderate oven (325°F/160°C) and slow cooling prevent cracks. I even leave the cheesecake in the turned-off oven for an hour so it sets gently.
- Water Bath: For ultra-creamy texture, try baking your cheesecake in a water bath—just wrap the pan in foil and place in a larger pan filled with hot water. It’s not strictly necessary, but it really does help (especially if you want zero cracks).
- Multitasking: While the crust bakes, prep your filling—saves time and keeps you organized.
- Consistency: Scrape the bowl often. Any bits of unmixed cream cheese will show up in your finished dessert.
- Topping Timing: Only add fruit or compote after the cheesecake is fully chilled. Warm toppings can melt the filling and make slicing tricky.
Honestly, I’ve had my share of cracked cheesecakes, grainy textures, and soggy crusts. My biggest lesson? Patience is key—don’t rush the cooling or chilling process. If your cheesecake cracks, cover it with fruit and call it “rustic.” Most people won’t care; they’ll be too busy grabbing seconds. For parties, I like making mini cheesecakes in muffin tins—cute, portable, and no slicing drama. And if you’re short on time, you can prep the crust and filling a day ahead for a stress-free party day.
Variations & Adaptations
Creamy cheesecake desserts are endlessly adaptable, so don’t be afraid to make them your own. Here are a few tried-and-true variations I love for different occasions and dietary needs:
- Gluten-Free: Swap graham cracker crumbs for gluten-free cookies or almond flour. I’ve used both—texture stays crisp, and nobody misses the wheat.
- Dairy-Free: Use plant-based cream cheese and coconut yogurt. For the crust, use vegan butter. My cousin is dairy-sensitive, and she swears by this version.
- Seasonal Flavors: Add pumpkin puree and pumpkin spice for autumn parties (about 1/2 cup pumpkin + 1 tsp spice in the filling). In spring, swirl in raspberry jam before baking.
- Chocolate Lovers: Mix 100g (1/2 cup) melted dark chocolate into the filling for a rich, decadent twist. Top with chocolate shavings or ganache for extra flair.
- Low-Carb: Use almond flour crust and sugar substitute (like erythritol or stevia) in the filling. It’s not exactly health food, but it’s lighter and still creamy.
For different cooking methods, you can make cheesecake bars in a sheet pan—easier to serve at big parties. For mini desserts, use muffin tins with paper liners; bake for 18-20 minutes. I tried a Nutella swirl once, and it was an instant hit with my kids (messy, but worth it!).
Allergen swaps are simple: use egg replacer for egg-free versions, or almond milk yogurt for nut allergies. Honestly, there’s no wrong way to enjoy creamy cheesecake desserts—just tweak to suit your tastes or pantry. If you discover a new combo, let me know in the comments—sharing is half the fun!
Serving & Storage Suggestions
Creamy cheesecake desserts shine brightest when served cold, straight from the fridge. For parties, I like to slice just before serving and arrange on a pretty platter (garnish with fresh mint leaves or extra berries for that Pinterest-worthy look).
Pair with fresh coffee, a berry punch, or sparkling lemonade—something fruity and light balances the richness perfectly. If you want to get fancy, drizzle each slice with caramel sauce or melted chocolate. For a full dessert table, creamy cheesecake works great alongside lemon bars or chocolate mousse.
To store leftovers (if you have any!), cover the cheesecake tightly in plastic wrap or an airtight container and refrigerate for up to 5 days. For longer storage, freeze individual slices wrapped in foil—thaw overnight in the fridge before serving. Reheating isn’t recommended (it’ll melt!), but you can let slices sit at room temperature for 10-15 minutes if you prefer a softer bite.
Over time, the flavors deepen and the texture gets even silkier—sometimes, day-two cheesecake is my favorite! If you’re prepping for a party, make the cheesecake a day ahead and add toppings just before serving for best results.
Nutritional Information & Benefits
Each slice of creamy cheesecake (1/12 of a 9-inch cake) delivers roughly:
- Calories: 320
- Fat: 20g (mostly from dairy and butter)
- Carbs: 28g
- Protein: 6g
- Sugar: 20g
Health benefits: Cream cheese and eggs provide protein and calcium. Lemon zest adds vitamin C and a fresh, natural flavor. If you use Greek yogurt or substitute nuts in the crust, you’ll get a boost of probiotics and healthy fats. Gluten-free and low-carb options make this dessert accessible to more folks, and fresh berries on top add antioxidants.
Potential allergens include dairy, eggs, and gluten (unless swapped). Always check ingredient labels, especially for store-bought cream cheese and crackers, if you’re cooking for guests with sensitivities. From my wellness perspective, creamy cheesecake desserts are best enjoyed as a treat—comforting, satisfying, and sure to make any party a little more delightful.
Conclusion
Creamy cheesecake desserts are pure party magic—easy to make, endlessly customizable, and always a crowd-pleaser. They’re the kind of recipe you’ll want to keep in your back pocket for birthdays, holidays, and every celebration in between. Whether you follow my classic version or try your own twist, the creamy texture and dreamy flavor will keep everyone coming back for more.
Don’t be afraid to experiment—swap toppings, change the crust, or make minis for fun. My love for this recipe comes from the smiles it brings to my family and friends (and the occasional midnight snack I sneak from the fridge). If you try it, let me know how it goes! Drop your questions, share your favorite adaptations, or tag me on Pinterest—I’d love to see your party-ready creations.
Here’s to desserts that bring people together, one creamy slice at a time. Bake, share, and enjoy every delicious moment!
Frequently Asked Questions
How do I prevent my creamy cheesecake dessert from cracking?
Use room-temperature ingredients and avoid overmixing. Let the cheesecake cool gradually in the oven, then chill thoroughly. If it cracks, just cover with fruit or whipped cream—it’ll still taste amazing!
Can I make creamy cheesecake desserts ahead of time?
Absolutely! Make the cheesecake a day in advance and add toppings right before serving. The flavor and texture actually improve after chilling overnight.
What’s the best way to slice cheesecake neatly?
Use a sharp knife dipped in hot water, wiping between cuts. This helps get clean, pretty slices—especially important for party presentations.
Are there gluten-free options for the crust?
Yes, swap graham crackers for gluten-free cookies or almond flour. Both stay crisp and taste delicious.
Can I freeze creamy cheesecake desserts?
Yes! Freeze individual slices wrapped in foil for up to 2 months. Thaw overnight in the fridge before serving for best texture.
Pin This Recipe!
Creamy Cheesecake Desserts: Best Easy Recipes for Heavenly Party Delight
This creamy cheesecake dessert is a party-ready classic with a buttery graham cracker crust, silky smooth filling, and fresh berry topping. Easy to make, endlessly customizable, and always a crowd-pleaser for any celebration.
- Prep Time: 15 minutes
- Cook Time: 55 minutes
- Total Time: 5 hours 10 minutes
- Yield: 12 servings 1x
- Category: Dessert
- Cuisine: American
Ingredients
- 2 cups graham cracker crumbs (200g)
- 1/4 cup unsalted butter, melted (60g)
- 2 tablespoons sugar (25g)
- 1/2 teaspoon cinnamon (optional)
- 16 oz cream cheese, softened (450g)
- 1/2 cup sour cream (120g)
- 3/4 cup granulated sugar (150g)
- 2 large eggs, room temperature
- 2 teaspoons vanilla extract
- Zest from 1 lemon
- 1/4 cup heavy cream (optional, 60ml)
- 1 cup fresh berries or berry compote (150g)
- 2 tablespoons powdered sugar
Instructions
- Preheat oven to 350°F (175°C).
- Mix graham cracker crumbs, melted butter, sugar, and cinnamon (if using) in a bowl until evenly combined.
- Press mixture firmly into the bottom of a 9-inch springform pan. Use the bottom of a glass or measuring cup for an even layer.
- Bake crust for 10 minutes. Let cool completely.
- Reduce oven temperature to 325°F (160°C).
- In a large bowl, beat softened cream cheese until smooth and fluffy (about 2 minutes). Scrape sides to avoid lumps.
- Add sour cream, granulated sugar, eggs, vanilla extract, and lemon zest. Blend on medium speed until just combined. Do not overmix.
- If using, blend in heavy cream for extra silkiness.
- Pour filling over cooled crust. Smooth the top with a spatula and tap the pan gently to release air bubbles.
- Bake at 325°F (160°C) for 45-50 minutes. Edges should be set, center will jiggle slightly.
- Turn off oven and let cheesecake cool inside for 1 hour.
- Remove from oven, cool to room temperature, then refrigerate for at least 4 hours (overnight is best).
- Top chilled cheesecake with fresh berries or compote. Dust with powdered sugar.
- Run a thin knife around the edge before unclasping the pan. Slice with a clean, sharp knife, wiping between cuts.
Notes
For best results, use room-temperature ingredients and avoid overmixing. Chill thoroughly before serving. Gluten-free and dairy-free adaptations are possible. If cracks appear, cover with fruit or whipped cream. Make ahead for parties and add toppings just before serving.
Nutrition
- Serving Size: 1 slice (1/12 of 9-i
- Calories: 320
- Sugar: 20
- Sodium: 220
- Fat: 20
- Saturated Fat: 12
- Carbohydrates: 28
- Fiber: 1
- Protein: 6
Keywords: cheesecake, creamy cheesecake, party dessert, easy cheesecake, classic cheesecake, berry cheesecake, holiday dessert, birthday dessert, crowd-pleaser, comfort food


