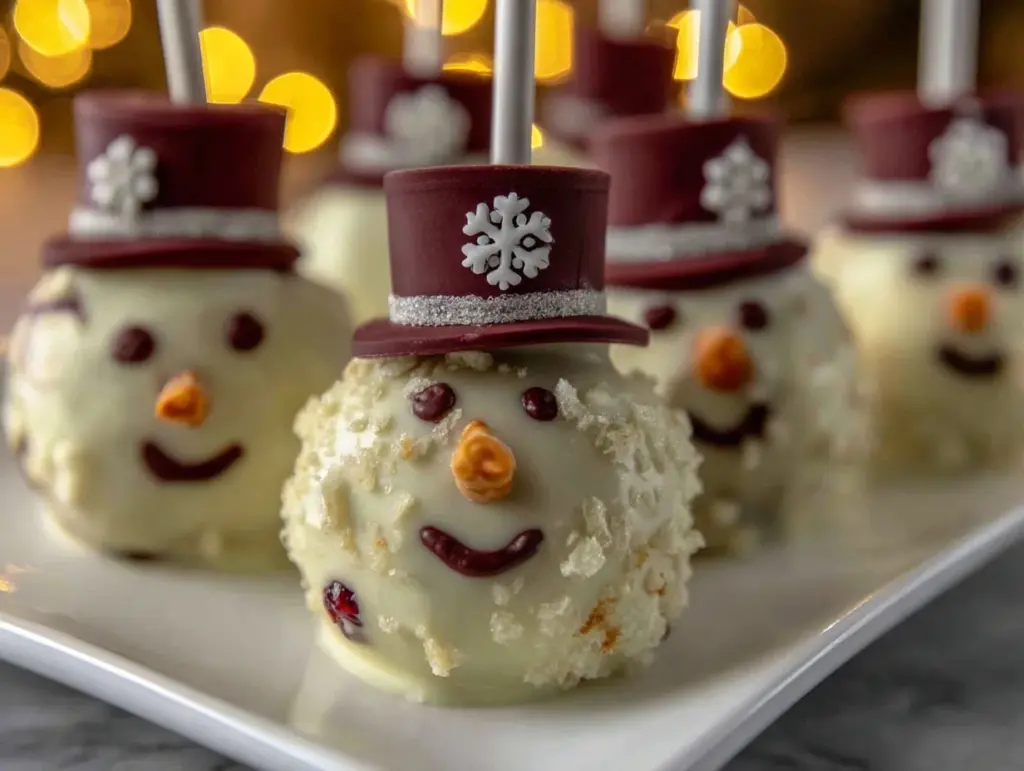
If you’ve ever walked into a kitchen and been greeted by the sweet scent of vanilla cake mingling with melting white chocolate, you know it’s the kind of thing that instantly lifts your spirits. That’s exactly what happened the first time I decided to make these Snowman Cake Pops for a winter wonderland party. The aroma alone was enough to draw my kids from their bedrooms (and let’s face it, getting teenagers excited about anything other than their phones is a small miracle). As the little cake balls cooled on the counter, I just stood there and took a deep breath—it was one of those moments where you pause and realize you’re onto something truly special.
This recipe didn’t come from a fancy pastry book; it started when I was knee-high to a grasshopper, watching my grandma make her famous holiday treats. Years ago, I tried to replicate her snowman cookies, but they always ended up looking more like melting monsters than jolly snowmen. Fast-forward to a snowy Saturday afternoon, armed with cake crumbs and lollipop sticks, and everything just clicked. I wish I’d stumbled upon this dangerously easy method sooner—seriously, these cake pops are pure, nostalgic comfort wrapped in a white chocolate shell.
My family couldn’t stop sneaking the little snowmen off the rack (and honestly, I can’t blame them). The giggles, the sticky fingers, the way everyone’s eyes lit up—these tiny treats bring out the kid in everyone. Whether you’re planning a Pinterest-perfect winter wonderland party, looking for a sweet treat for your kids’ holiday gathering, or just want something adorable for gifting, these snowman cake pops fit the bill. I’ve tested every step (in the name of research, of course), and they’ve become a staple for family gatherings, school bake sales, and snowy afternoons. They feel like a warm hug, and you’re going to want to bookmark this one for every winter celebration!
Why You’ll Love This Recipe
I’ve spent years perfecting these Snowman Cake Pops, and let me tell you, they’re more than just cute treats—they’re a whole vibe. Here’s why you’ll love making them for your winter wonderland party, and why they’ve earned rave reviews from friends, family, and even picky eaters.
- Quick & Easy: You can whip these up in under an hour, even if you’ve never made cake pops before. Perfect for busy weeknights or last-minute party prep.
- Simple Ingredients: No need to run to specialty stores—most ingredients are probably already sitting in your pantry or fridge.
- Perfect for Parties: These snowman cake pops are a show-stopper at winter gatherings, school events, holiday brunches, and cozy family nights by the fireplace.
- Crowd-Pleaser: Kids love their adorable faces and bite-sized shape, while adults appreciate the rich, moist cake center (and the nostalgia).
- Unbelievably Delicious: The texture is moist and tender, wrapped in a creamy chocolate shell—each bite is comfort food at its best.
So what sets my snowman cake pop recipe apart? I use a blend of classic vanilla cake and a touch of cream cheese frosting, which gives the inside a melt-in-your-mouth texture. Plus, the candy coating is smooth, not gritty, thanks to a trick I learned from a pastry chef friend—double-dipping the pops for extra coverage. The faces are easy to decorate, even for little hands, making this recipe truly family-friendly.
Honestly, these cake pops are more than just a treat—they’re a mini celebration in every bite. It’s the kind of dessert that makes you close your eyes after the first bite and just smile. They’re perfect for impressing guests without breaking a sweat, and they turn a simple party into a magical winter wonderland. If you want a recipe that’s reliable, adorable, and totally delicious, you’ve found your new favorite.
What Ingredients You Will Need
This snowman cake pops recipe keeps it simple, using classic ingredients to create a treat that’s both flavorful and easy to make. Most of these are pantry staples, and you can tweak them to suit your preferences or dietary needs. Here’s what goes into the magic:
- For the Cake:
- 1 box vanilla cake mix (or homemade vanilla sponge, about 400g)
- 3 large eggs (room temperature)
- 1/2 cup vegetable oil (120ml)
- 1 cup water (240ml)
- For the Frosting:
- 1/2 cup cream cheese, softened (120g)
- 1/3 cup unsalted butter, softened (75g)
- 1 1/2 cups powdered sugar (180g)
- 1 tsp vanilla extract
- For the Coating & Decoration:
- 2 cups white chocolate chips or candy melts (340g)
- 1 tbsp coconut oil (optional, for smoother coating)
- Mini chocolate chips (for eyes and buttons)
- Orange sprinkles or colored icing (for the nose)
- Black decorating gel or edible marker (for mouth)
- Assorted sprinkles, colored sugar, or mini scarves (for accessories)
- Lollipop sticks (about 20)
If you need a gluten-free option, swap the cake mix for a certified gluten-free blend. Dairy-free? Use vegan cream cheese and butter. I’ve tried all the major brands, but honestly, Pillsbury cake mix and Philadelphia cream cheese give the best texture. If you’re feeling adventurous, you can use red velvet or chocolate cake for a different flavor twist—the snowman will look just as adorable with a surprise inside.
Seasonal bonus: In summer, swap the vanilla for lemon cake and add some zest for a bright flavor. For a healthier twist, try coconut sugar in the frosting or Greek yogurt instead of cream cheese. If you’re missing an ingredient, don’t panic—this recipe is forgiving. Just remember, the goal is moist cake and a creamy, spreadable frosting that holds together well. You’ll be rolling snowballs in no time!
Equipment Needed
You don’t need fancy gadgets to make snowman cake pops, but a few trusty tools make the process smoother (and less messy). Here’s what I use every time:
- Mixing bowls (at least 2, one for cake and one for frosting)
- Electric mixer or hand whisk (for smooth batter and frosting)
- Baking pan (9×13-inch or 23x33cm works well for boxed cake mix)
- Baking parchment or silicone mat (to prevent sticking)
- Lollipop sticks (20 count)
- Microwave-safe bowl (for melting chocolate)
- Styrofoam block or cake pop stand (for drying the pops upright)
- Small spatula or spoon (for mixing and shaping)
- Toothpicks (for fine details)
If you don’t have a stand, you can poke holes in a sturdy cardboard box (works in a pinch—trust me, I’ve tried all sorts of DIY solutions). For melting chocolate, a double boiler is nice, but the microwave works just fine if you stir often. Maintenance tip: Clean your lollipop sticks and spatulas right away—white chocolate hardens fast and can be a pain to scrub off. If you’re on a budget, most supplies are available at dollar stores or big-box retailers. Honestly, sometimes the simplest tools work best!
Preparation Method
Ready to make your own snowman cake pops? Follow these steps for perfect results every time. I’ve included tips and troubleshooting notes so you’ll feel confident, even if it’s your first time.
- Bake the Cake (35 minutes)
- Preheat your oven to 350°F (175°C). Grease a 9×13-inch (23x33cm) baking pan and line with parchment paper.
- Prepare the cake mix: In a large mixing bowl, combine the vanilla cake mix, eggs, oil, and water. Beat on medium speed for 2 minutes until smooth.
- Pour batter into the prepared pan and bake for 30-35 minutes, or until a toothpick inserted in the center comes out clean.
- Let the cake cool completely—don’t rush, or your cake pops could turn mushy.
- Make the Frosting (5 minutes)
- In a separate bowl, beat the cream cheese and butter until fluffy.
- Add powdered sugar and vanilla extract; mix until smooth and creamy.
- Tip: Frosting should be spreadable but not runny. If it’s too thick, add a splash of milk; too thin, more powdered sugar.
- Form the Cake Balls (15 minutes)
- Crumble the cooled cake into fine crumbs (I use clean hands for this—kids love to help!).
- Add 1/2 to 3/4 cup frosting to the crumbs and mix until the mixture holds together like playdough.
- Roll mixture into 40 balls—20 large (1-inch/2.5cm) for bodies and 20 small (3/4-inch/2cm) for heads.
- Place on a parchment-lined tray and chill in the freezer for 10-15 minutes. This helps them firm up for dipping.
- Assemble the Snowmen (10 minutes)
- Take one large and one small ball for each snowman. Gently press together to form a two-tiered snowman shape.
- Insert a lollipop stick from the bottom, pushing gently until secure.
- If balls crack, add a touch more frosting and re-roll.
- Coat with Chocolate (10 minutes)
- Melt white chocolate chips with coconut oil in a microwave-safe bowl, stirring every 30 seconds until smooth.
- Dip each snowman into the melted chocolate, swirling to cover completely. Let excess drip off.
- Stick pops into a stand to dry—if chocolate drips, use a toothpick to tidy up the edges.
- Double-dip for a thicker coating (my secret for flawless snowmen!).
- Decorate the Faces (10 minutes)
- Press mini chocolate chips in for eyes and buttons while the coating is still soft.
- Use orange sprinkles or colored icing for the nose, and black decorating gel for the mouth.
- Add scarves or hats with colored sugar, sprinkles, or edible accessories.
- Let pops set for 20 minutes before serving or storing.
Preparation notes: If your coating cracks, the cake balls might be too cold—let them sit for a few minutes before dipping. If pops slide off the sticks, press the cake mixture a bit firmer. And don’t worry if your snowmen aren’t perfect—quirky faces just add charm!
Cooking Tips & Techniques
Over the years, I’ve learned a few tricks (and made plenty of mistakes) with snowman cake pops. Here are my best tips for success:
- Keep Cake Pops Cold: Chilling the cake balls before dipping is key. If they’re too warm, they’ll fall apart. But don’t freeze them solid—just 10-15 minutes in the freezer does the trick.
- Melt Chocolate Slowly: Microwave chocolate in short bursts and stir well. Overheating can cause it to seize or turn grainy. If that happens, add a teaspoon of coconut oil and stir gently.
- Double-Dipping: For a smooth finish, dip each snowman twice. Let the first layer set, then dip again. This covers cracks and gives a professional look.
- Decorating Details: Use toothpicks for tiny features, and edible markers for precise mouths. If you mess up, just wipe off and try again—nobody’s perfect!
- Multi-Tasking: While the first batch chills, prep your decorations or melt your chocolate. It saves time and keeps the workflow smooth.
- Consistency Matters: Use the same amount of frosting for every batch. Too much makes cake pops mushy, too little makes them crumbly. I’ve messed this up more times than I’d like to admit!
- Test a Pop: Before you dip the whole batch, test one snowman. Make sure the coating sets and the stick holds firm. Adjust as needed—this saves a lot of frustration.
Honestly, the most important tip is to have fun. Snowman cake pops are meant to be whimsical, so don’t stress over perfection. Every batch gets easier, and soon you’ll be whipping them up like a pro!
Variations & Adaptations
Snowman cake pops are endlessly customizable—here are a few ways to make them your own:
- Dietary Options: For gluten-free snowman cake pops, use a gluten-free cake mix and dairy-free cream cheese. Vegan alternatives work well too (try almond milk and vegan butter).
- Seasonal Flavors: Swap vanilla cake for chocolate, red velvet, or spice cake. In summer, lemon cake with a hint of zest is refreshing. For Valentine’s Day, add pink sprinkles and heart candies.
- Different Coatings: Use milk or dark chocolate instead of white for a unique look. Match the accessories to your party theme—think blue scarves for a Frozen-themed bash, or rainbow sprinkles for birthday snowmen.
- Allergen Substitutions: For nut allergies, confirm all ingredients are nut-free. Use sunflower seed butter in place of cream cheese if needed.
One of my favorite personal twists: I once made snowman cake pops with pumpkin spice cake and orange hats for a fall-themed party. They were a hit with both adults and kids, and the flavor was a total surprise. Don’t be afraid to experiment—these little pops are forgiving and fun!
Serving & Storage Suggestions
Snowman cake pops are best served at room temperature, arranged upright in a festive stand or nestled into a wintry display with fake snow (or shredded coconut for a tasty touch). They look adorable on holiday dessert tables, in gift boxes, or as party favors tied with ribbon.
Pair them with hot cocoa, mulled cider, or a sparkling punch for the ultimate winter treat. If you’re making them ahead, store in an airtight container in the fridge for up to 5 days. For longer storage, freeze the undipped cake balls for up to a month—just thaw and dip before decorating.
To reheat, let pops sit at room temperature for 30 minutes. Don’t microwave, or the chocolate shell can crack. Flavors tend to develop and mellow overnight, so they’re often even better the next day. If you’re gifting, wrap each pop in cellophane and tie with a cute ribbon—they travel well and keep kids (and adults) smiling.
Nutritional Information & Benefits
Here’s an estimate for a single snowman cake pop (including frosting and chocolate coating):
- Calories: ~120
- Fat: ~6g
- Carbohydrates: ~16g
- Protein: ~2g
- Sugar: ~13g
Key ingredients like cream cheese provide a touch of calcium and protein, while using coconut oil in the coating adds healthy fats. For a lower-sugar option, use sugar-free cake mix and frosting. These pops can be gluten-free or dairy-free if you substitute accordingly—just check all labels for allergens.
From a wellness perspective, snowman cake pops are a fun way to enjoy a sweet treat in moderation—they’re small, portion-controlled, and perfect for sharing. I always remind myself that balance is key: a little indulgence, especially when shared with loved ones, is good for the soul!
Conclusion
If you’re looking for a winter wonderland party treat that’s adorable, delicious, and totally doable, these snowman cake pops should be at the top of your list. They’re easy enough for beginners yet impressive enough for Pinterest-worthy spreads, and they bring a heartfelt, nostalgic touch to any celebration.
Feel free to tweak the flavors, decorations, and shapes to fit your style—honestly, the best part is making them your own. I love this recipe because it brings my whole family together, sparks laughter, and creates memories that last long after the party’s over.
Give these snowman cake pops a try, and let me know how they turn out! Drop a comment below with your favorite variations, share your photos, or tell me about your own winter party traditions. Wishing you snowy days, sweet treats, and lots of smiles!
Frequently Asked Questions
How far in advance can I make snowman cake pops?
You can make them up to 5 days ahead. Store in an airtight container in the fridge, and decorate just before serving for the freshest look.
Can I freeze cake pops?
Yes! You can freeze the undipped cake balls for up to a month. Thaw in the fridge, then dip and decorate as usual.
What’s the best way to melt white chocolate for coating?
Use a microwave-safe bowl and heat in 30-second bursts, stirring each time. Add a little coconut oil for a smoother texture.
How do I prevent cake pops from falling off the sticks?
Make sure the cake mixture is firm and chill the pops before dipping. Press the balls tightly together and dip the stick in melted chocolate before inserting for extra hold.
Can I use homemade cake instead of box mix?
Absolutely! Just use a moist vanilla sponge (about 400g baked weight). Homemade cake adds a personal touch and works just as well.
Pin This Recipe!
Snowman Cake Pops Recipe Easy Winter Wonderland Party Treats

These adorable snowman cake pops feature moist vanilla cake and creamy cream cheese frosting, all wrapped in a smooth white chocolate shell. Perfect for winter wonderland parties, holiday gatherings, or festive gifting, they’re easy to make and guaranteed to delight kids and adults alike.
- Prep Time: 25 minutes
- Cook Time: 35 minutes
- Total Time: 1 hour
- Yield: 20 snowman cake pops 1x
- Category: Dessert
- Cuisine: American
Ingredients
- 1 box vanilla cake mix (or 400g homemade vanilla sponge)
- 3 large eggs (room temperature)
- 1/2 cup vegetable oil (120ml)
- 1 cup water (240ml)
- 1/2 cup cream cheese, softened (120g)
- 1/3 cup unsalted butter, softened (75g)
- 1 1/2 cups powdered sugar (180g)
- 1 tsp vanilla extract
- 2 cups white chocolate chips or candy melts (340g)
- 1 tbsp coconut oil (optional, for smoother coating)
- Mini chocolate chips (for eyes and buttons)
- Orange sprinkles or colored icing (for the nose)
- Black decorating gel or edible marker (for mouth)
- Assorted sprinkles, colored sugar, or mini scarves (for accessories)
- Lollipop sticks (about 20)
Instructions
- Preheat oven to 350°F (175°C). Grease a 9×13-inch baking pan and line with parchment paper.
- In a large mixing bowl, combine vanilla cake mix, eggs, oil, and water. Beat on medium speed for 2 minutes until smooth.
- Pour batter into prepared pan and bake for 30-35 minutes, or until a toothpick inserted in the center comes out clean.
- Let cake cool completely.
- In a separate bowl, beat cream cheese and butter until fluffy. Add powdered sugar and vanilla extract; mix until smooth and creamy.
- Crumble cooled cake into fine crumbs. Add 1/2 to 3/4 cup frosting to crumbs and mix until mixture holds together like playdough.
- Roll mixture into 40 balls—20 large (1-inch) for bodies and 20 small (3/4-inch) for heads.
- Place balls on parchment-lined tray and chill in freezer for 10-15 minutes.
- Press together one large and one small ball for each snowman. Insert a lollipop stick from the bottom until secure.
- Melt white chocolate chips with coconut oil in a microwave-safe bowl, stirring every 30 seconds until smooth.
- Dip each snowman into melted chocolate, swirling to cover completely. Let excess drip off. Stick pops into a stand to dry.
- Double-dip for a thicker coating if desired.
- Decorate faces: press mini chocolate chips for eyes and buttons, use orange sprinkles or colored icing for nose, and black decorating gel for mouth. Add scarves or hats with colored sugar, sprinkles, or edible accessories.
- Let pops set for 20 minutes before serving or storing.
Notes
Chill cake balls before dipping for best results. Double-dip for a smooth, professional finish. Use toothpicks for decorating details. Pops can be made gluten-free or dairy-free with substitutions. Store in airtight container in fridge for up to 5 days, or freeze undipped cake balls for up to a month.
Nutrition
- Serving Size: 1 snowman cake pop
- Calories: 120
- Sugar: 13
- Sodium: 90
- Fat: 6
- Saturated Fat: 3
- Carbohydrates: 16
- Protein: 2
Keywords: snowman cake pops, winter party treats, holiday dessert, cake pops, easy cake pops, Christmas treats, kid-friendly dessert, party favors, vanilla cake pops, white chocolate cake pops


