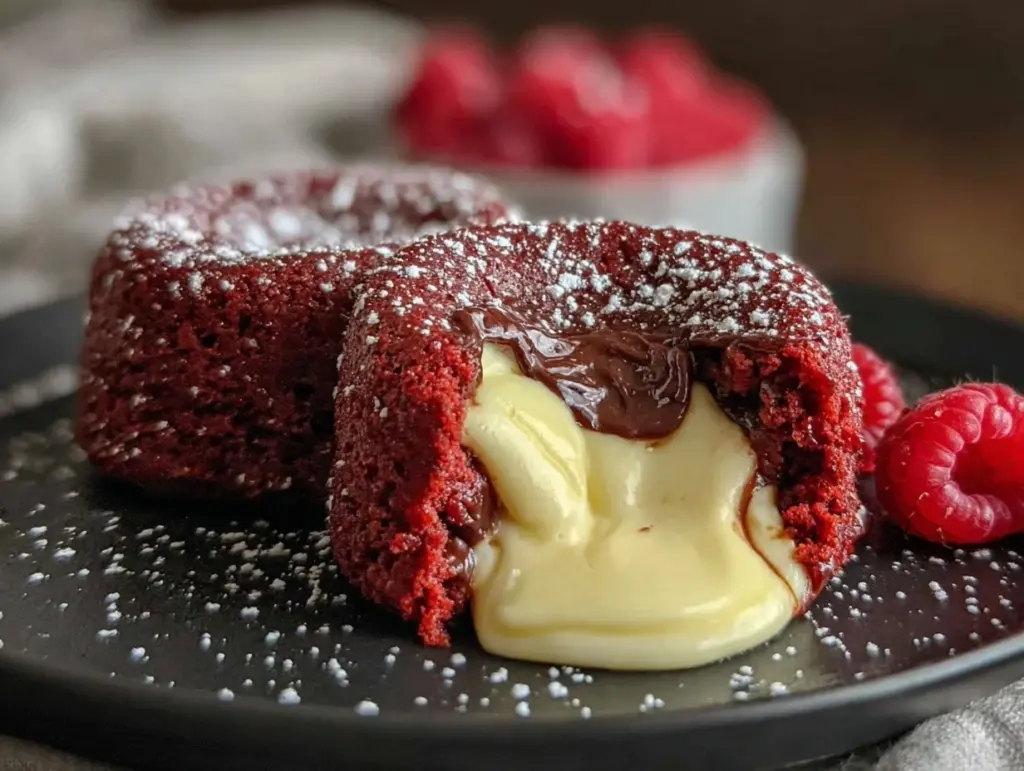
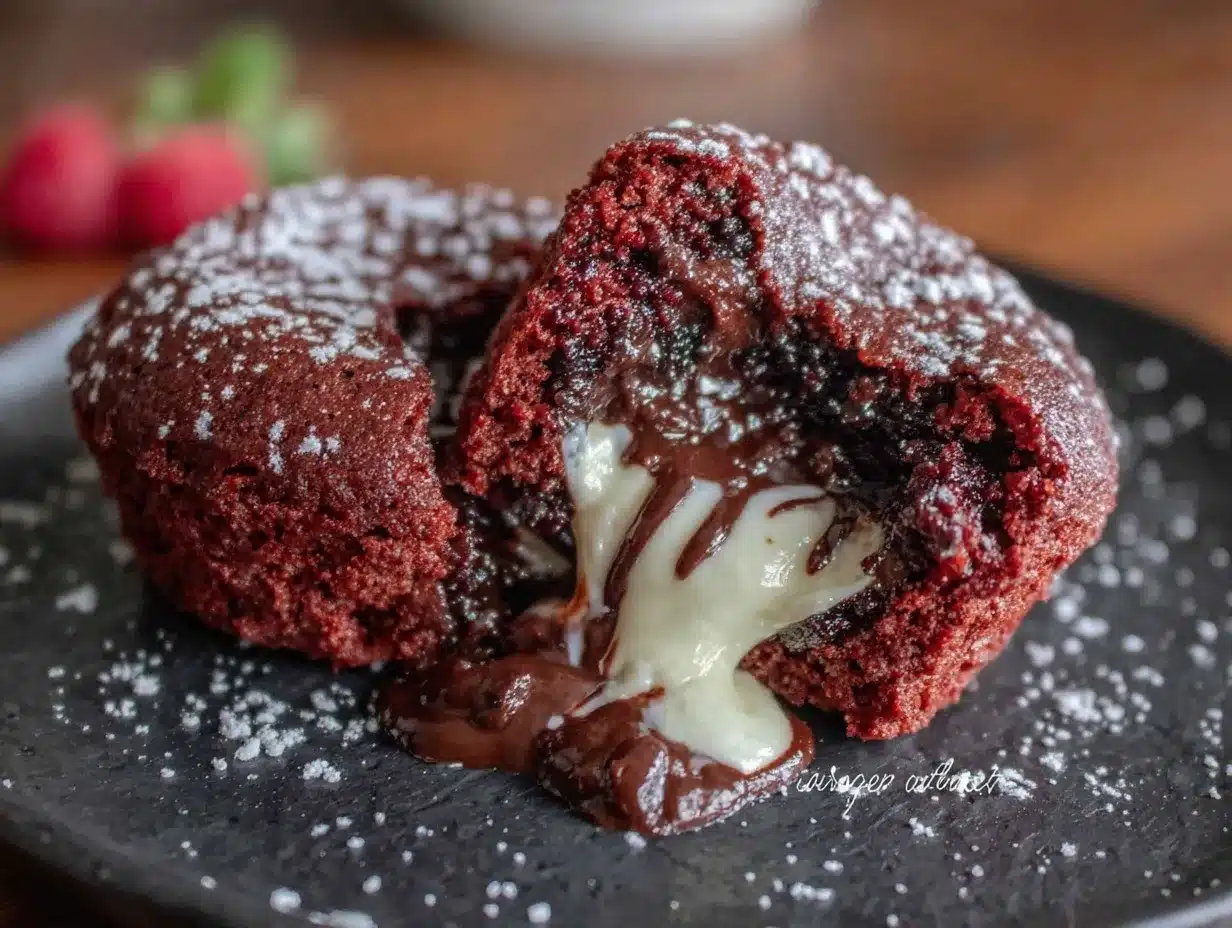
Let me tell you, the scent of rich cocoa mingling with a hint of tangy cream cheese wafting from my oven is enough to make anyone’s mouth water. The first time I baked these decadent red velvet chocolate lava cakes with cream cheese center, I was instantly hooked. You know that kind of moment where you pause, take a deep breath, and just smile because you realize you’re onto something truly special? That was it for me.
Years ago, when I was knee-high to a grasshopper, my grandma used to make the most luscious chocolate treats, but she never tried anything quite this indulgent. I stumbled on this recipe during a rainy weekend experiment, trying to recreate a dessert I’d seen in a fancy bakery window. Honestly, I wish I’d discovered it years ago because my family couldn’t stop sneaking these cakes off the cooling rack (and I can’t really blame them!).
These red velvet chocolate lava cakes are dangerously easy to whip up and provide pure, nostalgic comfort with a modern twist. Perfect for impressing guests or treating yourself after a hectic day, they brighten up any occasion—whether it’s a cozy date night or a festive holiday gathering. After testing this recipe multiple times (in the name of research, of course), it’s become a staple for family get-togethers and gifting. You’re going to want to bookmark this one.
Why You’ll Love This Recipe
Honestly, this decadent red velvet chocolate lava cakes recipe with cream cheese center is a winner for so many reasons. Having tested it extensively, here’s why it stands out:
- Quick & Easy: Comes together in under 30 minutes, perfect for busy weeknights or last-minute cravings.
- Simple Ingredients: No fancy grocery trips needed; you likely already have everything in your kitchen.
- Perfect for Any Occasion: Great for date nights, potlucks, holiday mornings, or just because you deserve a treat.
- Crowd-Pleaser: Always gets rave reviews from kids and adults alike—those gooey centers are irresistible.
- Unbelievably Delicious: The combination of red velvet’s subtle cocoa flavor with the molten chocolate and tangy cream cheese filling is next-level comfort food.
This recipe isn’t just another lava cake—it’s the one where the cream cheese center adds that extra surprise, making it feel like a cozy hug in dessert form. The balance of flavors and textures is just right, and the technique is foolproof, so you get molten magic every single time. Trust me, this is comfort food reimagined—with soul, simplicity, and a bit of flair.
What Ingredients You Will Need
This recipe uses simple, wholesome ingredients to deliver bold flavor and satisfying texture without the fuss. Most are pantry staples, with a few fresh additions for that perfect cream cheese center.
- For the Cake Batter:
- Unsalted butter, 1/2 cup (113g), melted (adds richness and smoothness)
- Granulated sugar, 3/4 cup (150g)
- Large eggs, 2, room temperature
- All-purpose flour, 1/2 cup (65g)
- Cocoa powder, 2 tablespoons (unsweetened, for that subtle chocolate depth)
- Red food coloring, 1 tablespoon (liquid or gel works fine)
- Vanilla extract, 1 teaspoon
- Salt, 1/4 teaspoon (balances sweetness)
- For the Cream Cheese Center:
- Cream cheese, 4 ounces (113g), softened (I recommend Philadelphia for smooth texture)
- Powdered sugar, 1/4 cup (30g)
- Vanilla extract, 1/2 teaspoon
- Extras:
- Butter or non-stick spray for greasing ramekins
- Optional: powdered sugar for dusting after baking
If you want a gluten-free version, swap the all-purpose flour for almond flour or a gluten-free blend. For a dairy-free option, try coconut cream cheese and dairy-free butter alternatives. In summer, you could even add fresh raspberries inside for a fruity surprise!
Equipment Needed
- 4 to 6 ramekins (6-ounce or 180 ml size work best)—these little guys create the perfect portion and help with even baking.
- Mixing bowls: one large for batter, one small for cream cheese filling.
- Electric mixer or whisk (I personally reach for my handheld mixer for the cream cheese filling to get it super smooth).
- Measuring cups and spoons—accurate measurements are key for lava cakes.
- Spatula for folding batter gently.
- Baking sheet to hold ramekins while they bake.
If you don’t have ramekins, you can use small oven-safe mugs or custard cups, but baking times might vary slightly. For budget-friendly ramekins, check second-hand shops or discount stores—they last forever with proper care! Just remember to grease them well to avoid sticking.
Preparation Method
- Preheat and Prep (5 minutes): Preheat your oven to 425°F (220°C). Generously butter or spray the ramekins and place them on a baking sheet for easy handling.
- Make the Cream Cheese Center (5 minutes): In a small bowl, beat together 4 ounces (113g) softened cream cheese, 1/4 cup (30g) powdered sugar, and 1/2 teaspoon vanilla extract until smooth and creamy. Use a hand mixer or whisk. Set aside.
- Prepare the Batter (10 minutes): In a large bowl, whisk together 1/2 cup (113g) melted unsalted butter and 3/4 cup (150g) granulated sugar until combined. Add 2 large eggs, one at a time, beating well after each addition. Stir in 1 tablespoon red food coloring and 1 teaspoon vanilla extract.
- Combine Dry Ingredients (2 minutes): Sift together 1/2 cup (65g) all-purpose flour, 2 tablespoons cocoa powder, and 1/4 teaspoon salt. Gradually fold the dry ingredients into the wet batter using a spatula, being careful not to overmix. The batter should be thick and smooth with a vibrant red hue.
- Assemble Lava Cakes (5 minutes): Spoon a small dollop (about 1 tablespoon) of batter into the bottom of each ramekin. Add a heaping teaspoon of the cream cheese filling in the center, then cover with more batter until the ramekin is about 3/4 full. Smooth the tops gently.
- Bake (12-14 minutes): Place the baking sheet with ramekins in the oven. Bake until the edges are set but the center is still soft—watch closely! The top should look slightly puffed but not cracked. A toothpick inserted near the edge should come out clean; the center will be molten.
- Cool and Serve (5 minutes): Let the cakes cool in the ramekins for 5 minutes. Run a knife around the edges to loosen, then carefully invert each cake onto a plate. Dust with powdered sugar if desired and serve warm for that ooey-gooey experience.
Pro tip: If your ramekins are on the shallow side, reduce baking time by a minute or two. The key is to catch that molten center before it fully sets. I’ve learned from experience that ovens vary, so keep a close eye starting at 11 minutes.
Cooking Tips & Techniques
Getting that perfect molten center can be a bit tricky, but here’s what I’ve learned from baking these decadent red velvet chocolate lava cakes:
- Don’t overmix the batter: Gently folding the flour mixture keeps the texture tender and light. Overmixing leads to dense cakes.
- Softened cream cheese is a must: If it’s too cold, the filling won’t be smooth and might clump inside the cake.
- Grease ramekins well: Butter and a light dusting of cocoa powder or flour prevents sticking and helps with easy release.
- Use an oven thermometer: Oven temps can be off, and lava cakes are sensitive to heat. Accurate temperature means consistent results.
- Watch the baking time: Start checking at 11 minutes. The cakes continue to cook a bit after coming out, so pull them when edges are firm but centers jiggle slightly.
- Multitask by prepping your cream cheese center ahead: This speeds things up and helps keep the workflow smooth.
One of my early fails was baking too long, ending up with cakey centers instead of that luscious lava flow. Trust the timing, and don’t be tempted to peek too often—it can cause the cakes to deflate. Patience here really pays off!
Variations & Adaptations
You can easily customize these decadent red velvet chocolate lava cakes with cream cheese center to suit different tastes or dietary needs. Here are some ideas:
- Vegan version: Use vegan butter, flax eggs (2 tablespoons ground flaxseed + 6 tablespoons water), and dairy-free cream cheese. Baking time might be slightly longer.
- Flavor twists: Add a teaspoon of instant espresso powder to the batter for a mocha kick, or swirl in some raspberry jam with the cream cheese filling for a fruity surprise.
- Gluten-free: Swap all-purpose flour with almond flour or a gluten-free baking blend. The texture will be a bit denser but still delicious.
- Cooking method: Try these in a silicone muffin pan if ramekins aren’t handy, just watch baking times carefully.
- Personal variation: I once added chopped white chocolate into the cream cheese center for an extra melty, sweet hit—dangerously good!
Serving & Storage Suggestions
Serve these lava cakes warm straight from the oven for the best molten experience. A scoop of vanilla ice cream or a dollop of whipped cream pairs perfectly, cutting through the richness just right. Dusting with powdered sugar adds a pretty finishing touch that’s Pinterest-worthy.
If you’re preparing ahead, you can refrigerate the assembled cakes (in ramekins) for up to 24 hours before baking. Just add a couple extra minutes to the baking time. For leftovers, cover tightly and store in the fridge for up to 2 days.
To reheat, pop them in a preheated 350°F (175°C) oven for about 6-8 minutes until warmed through. Avoid the microwave if possible—it tends to make the cake rubbery and ruins that luscious texture.
Flavors often deepen after resting a bit, so if you can, let the cakes sit 5 minutes after baking for the cream cheese center to meld beautifully with the red velvet batter.
Nutritional Information & Benefits
Each decadent red velvet chocolate lava cake with cream cheese center contains approximately:
| Nutrient | Amount per serving |
|---|---|
| Calories | 320 kcal |
| Fat | 22g |
| Saturated Fat | 12g |
| Carbohydrates | 28g |
| Sugars | 22g |
| Protein | 5g |
The cream cheese adds a bit of protein and calcium, while the cocoa powder offers antioxidants. This isn’t a low-calorie dessert, but it’s a treat that feels indulgent with familiar, straightforward ingredients. It’s gluten-containing by default but can be adapted for gluten-free diets. Contains dairy and eggs, so not suitable for those with related allergies.
From a wellness standpoint, I appreciate that it uses real butter and cream cheese, avoiding overly processed substitutes. Balance is key—enjoy in moderation, and savor every bite!
Conclusion
So there you have it—decadent red velvet chocolate lava cakes with cream cheese center that are easy to make and utterly irresistible. Whether you want to impress guests, satisfy a chocolate craving, or just treat yourself, this recipe hits every note.
Feel free to customize it to your liking—swap ingredients, add flavors, or tweak sweetness. That’s the beauty of homemade desserts! Personally, these cakes remind me of cozy evenings with family, the kind of dessert that brings everyone to the table with smiles.
Give it a try, and I’d love to hear how yours turned out. Leave a comment, share your twists, or ask questions. This recipe is one I’m proud to share, and I hope it brings as much joy to your kitchen as it does to mine. Happy baking!
Frequently Asked Questions
Can I make these lava cakes ahead of time?
Yes! You can assemble the cakes in ramekins, cover, and refrigerate for up to 24 hours before baking. Just add a minute or two to the baking time when ready to bake.
What if I don’t have ramekins?
Small oven-safe mugs or custard cups work as substitutes. Baking time may vary slightly, so keep an eye on them starting at 11 minutes.
How do I know when the lava cakes are done?
The edges should be set and the center slightly soft and jiggly. A toothpick inserted near the edge should come out clean; the middle will remain molten.
Can I freeze these lava cakes?
Yes, after baking and cooling, wrap them tightly and freeze for up to 2 months. Thaw in the fridge overnight, then reheat in the oven before serving.
Is there a dairy-free version of this recipe?
Absolutely! Use vegan butter, dairy-free cream cheese, and flax eggs instead of regular eggs. Baking time may be a little longer, so watch closely.
Pin This Recipe!
Decadent Red Velvet Chocolate Lava Cakes Recipe with Cream Cheese Center Easy and Perfect
These decadent red velvet chocolate lava cakes feature a rich cocoa flavor with a tangy cream cheese center, perfect for any occasion and easy to make in under 30 minutes.
- Prep Time: 22 minutes
- Cook Time: 12-14 minutes
- Total Time: 34-36 minutes
- Yield: 4 to 6 servings 1x
- Category: Dessert
- Cuisine: American
Ingredients
- 1/2 cup (113g) unsalted butter, melted
- 3/4 cup (150g) granulated sugar
- 2 large eggs, room temperature
- 1/2 cup (65g) all-purpose flour
- 2 tablespoons unsweetened cocoa powder
- 1 tablespoon red food coloring (liquid or gel)
- 1 teaspoon vanilla extract
- 1/4 teaspoon salt
- 4 ounces (113g) cream cheese, softened
- 1/4 cup (30g) powdered sugar
- 1/2 teaspoon vanilla extract
- Butter or non-stick spray for greasing ramekins
- Optional: powdered sugar for dusting after baking
Instructions
- Preheat your oven to 425°F (220°C). Generously butter or spray the ramekins and place them on a baking sheet.
- In a small bowl, beat together softened cream cheese, powdered sugar, and vanilla extract until smooth and creamy. Set aside.
- In a large bowl, whisk melted butter and granulated sugar until combined. Add eggs one at a time, beating well after each addition. Stir in red food coloring and vanilla extract.
- Sift together flour, cocoa powder, and salt. Gradually fold dry ingredients into wet batter using a spatula, being careful not to overmix.
- Spoon about 1 tablespoon of batter into the bottom of each ramekin. Add a heaping teaspoon of cream cheese filling in the center, then cover with more batter until ramekin is about 3/4 full. Smooth tops gently.
- Bake for 12-14 minutes until edges are set but center is still soft and slightly jiggly. A toothpick near the edge should come out clean.
- Let cakes cool in ramekins for 5 minutes. Run a knife around edges to loosen, then invert onto plates. Dust with powdered sugar if desired and serve warm.
Notes
Do not overmix the batter to keep cakes tender. Use softened cream cheese for smooth filling. Grease ramekins well to prevent sticking. Use an oven thermometer for accurate temperature. Start checking cakes at 11 minutes to catch molten center. Cakes can be assembled ahead and refrigerated up to 24 hours before baking; add extra baking time then. For gluten-free, substitute flour with almond or gluten-free blend. For dairy-free, use vegan butter and dairy-free cream cheese.
Nutrition
- Serving Size: 1 lava cake
- Calories: 320
- Sugar: 22
- Fat: 22
- Saturated Fat: 12
- Carbohydrates: 28
- Protein: 5
Keywords: red velvet lava cake, chocolate lava cake, cream cheese lava cake, easy dessert, molten chocolate cake, red velvet dessert


