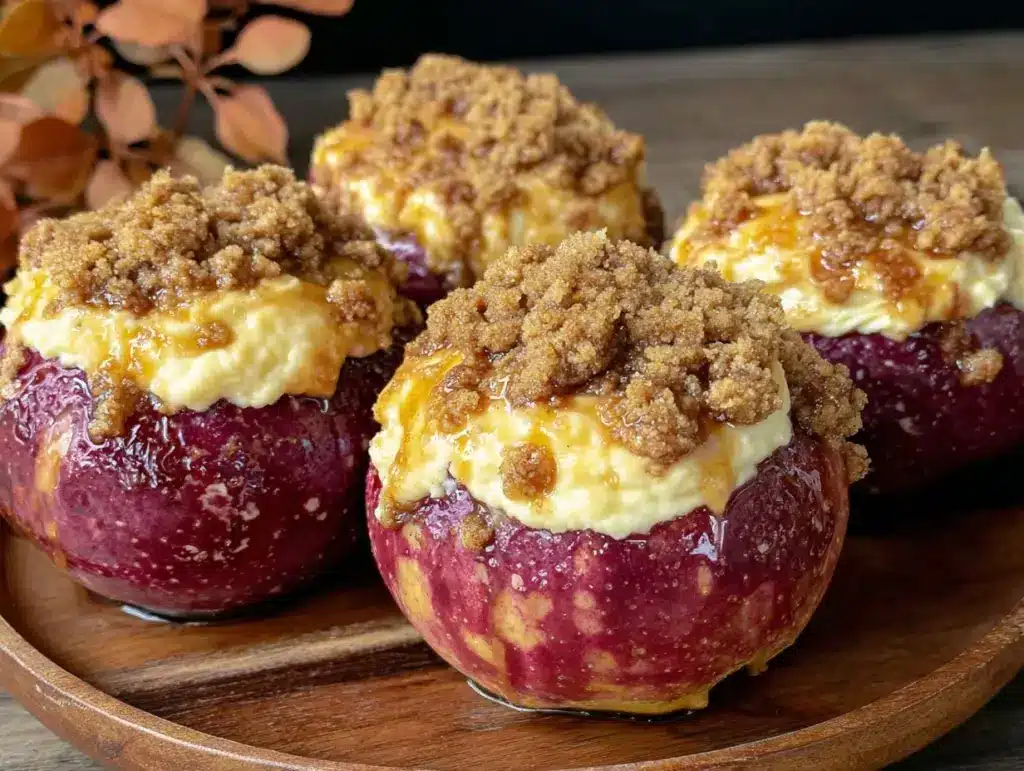
Let me set the scene for you: the comforting scent of cinnamon, brown sugar, and apples drifting from my oven, swirling together in a way that makes you stop mid-task and just breathe it all in. The first time I made these Creamy Cinnamon Roll Cheesecake Stuffed Baked Apples, I remember standing in my kitchen, spoon in hand, watching the golden juices bubble around each apple like little pools of autumn magic. It was one of those rare moments you want to bottle up—the kind that feels like a warm hug from the inside out.
Honestly, I stumbled onto this recipe years ago when I was knee-high to a grasshopper, helping my grandma prep apples for her famous pie. Fast forward to a rainy Saturday (you know, the kind when you just want something sweet and cozy), I found myself craving cinnamon rolls, cheesecake, and baked apples—all at once. So, I decided to mash them together. And wow, I wish I’d done it sooner!
My family couldn’t stop sneaking bites straight from the pan—my youngest even tried to convince me that “one apple doesn’t count as dessert.” (Nice try, kid!) Whether it’s a chilly fall evening or you’re looking to brighten up your Pinterest board with a show-stopping treat, these stuffed apples are dangerously easy and deliver pure, nostalgic comfort. The creamy cheesecake filling with swirls of cinnamon roll flavor tucked inside tender apples? It’s honestly something special.
I tested this recipe more times than I care to admit (in the name of research, of course), and now it’s a staple at our family gatherings, perfect for gifting, and guaranteed to make anyone who tastes it smile. If you’re after an easy fall dessert that feels like a hug and tastes like a dream, you’re going to want to bookmark this one.
Why You’ll Love This Recipe
- Quick & Easy: Ready in about an hour, so you can satisfy those cinnamon roll cravings without spending all afternoon in the kitchen.
- Simple Ingredients: No fancy grocery runs—chances are, you already have everything you need.
- Perfect for Fall Gatherings: These apples are a hit at potlucks, holiday dinners, or even a cozy brunch with friends.
- Crowd-Pleaser: Both kids and adults go wild for the creamy cheesecake surprise inside each apple.
- Unbelievably Delicious: The combination of tender baked apple, creamy cinnamon roll cheesecake, and gooey brown sugar sauce is pure comfort food.
What sets these Creamy Cinnamon Roll Cheesecake Stuffed Baked Apples apart? For me, it’s the way the tangy cream cheese filling gets whipped with cinnamon and a touch of vanilla, then tucked inside apples that bake up soft but never mushy. There’s a secret: a sprinkle of cinnamon sugar inside the apple before adding the filling. It creates a caramel-y layer you honestly need to taste to believe.
This isn’t just a baked apple—it’s a cinnamon roll, a cheesecake, and your childhood favorite, all in one neat package. It’s the kind of dessert that makes you pause after the first bite, close your eyes, and just savor. If you want something impressive but stress-free, or you’re just tired of the same old apple crisp, this recipe is your new best friend. Trust me, it’s a game-changer for fall baking!
What Ingredients You Will Need
This recipe uses simple, wholesome ingredients to deliver bold flavor and that dreamy, creamy texture—no fuss, just pure autumn vibes. Most of these are pantry staples, and a few seasonal stars make it extra special.
- For the Apples:
- 6 large baking apples (such as Honeycrisp, Fuji, or Granny Smith—choose firm apples that hold up well)
- Juice of 1/2 lemon (keeps apples bright and adds a little zing)
- For the Cinnamon Roll Cheesecake Filling:
- 8 oz (225 g) cream cheese, softened (full fat for creaminess, or use light if you prefer)
- 1/4 cup (60 ml) sour cream or Greek yogurt (adds tang and richness)
- 1 large egg, room temperature
- 1/3 cup (65 g) granulated sugar
- 1 1/2 tsp ground cinnamon
- 1/2 tsp pure vanilla extract
- 1/4 tsp salt
- For the Cinnamon Sugar Swirl:
- 2 tbsp (25 g) brown sugar
- 1 tsp ground cinnamon
- For the Topping:
- 2 tbsp (30 g) unsalted butter, melted
- 1/4 cup (30 g) chopped pecans or walnuts (optional, for crunch)
- Extra cinnamon sugar for sprinkling
- For the Cream Cheese Glaze:
- 2 oz (60 g) cream cheese, softened
- 1/4 cup (30 g) powdered sugar
- 1-2 tbsp (15-30 ml) milk (use dairy-free milk if needed)
- Pinch of cinnamon
Ingredient tips: I swear by Philadelphia cream cheese for the silkiest filling. If you need this gluten-free, you’re already set—no flour here! You can swap sour cream for plain Greek yogurt or use coconut yogurt for a dairy-free twist. For apples, Honeycrisp brings the best balance of sweetness and texture, but Granny Smith works if you like things a bit tart.
Substitutions: Use coconut sugar instead of brown sugar for a refined sugar-free version. Pecans and walnuts add a lovely crunch, but skip them for nut allergies. If you want to go low-carb, swap the sugar for your favorite granulated sweetener (I’ve tried Swerve and it works).
In summer—try swapping apples for ripe peaches. The cinnamon roll cheesecake magic still works!
Equipment Needed
- Sharp paring knife (for coring and hollowing apples)
- Apple corer or melon baller (optional, makes hollowing easier)
- Mixing bowl (medium-sized for the filling)
- Hand mixer or stand mixer (for silky cheesecake texture)
- Baking dish (9×13-inch or any dish that fits your apples snugly)
- Measuring cups and spoons (accuracy matters for the filling!)
- Small bowl (for cinnamon sugar)
- Spatula or spoon (for stuffing apples)
- Aluminum foil (to tent, prevents over-browning)
If you don’t have an apple corer, a regular spoon or melon baller works fine—just be gentle and don’t go overboard. I’ve used a Pyrex baking dish for years, but any oven-safe dish that holds the apples upright does the trick. Budget tip: Dollar store mixers get the job done if you don’t have a stand mixer. Just clean your apple tools right after use—sticky cinnamon sugar is no joke to scrub off the next day!
Preparation Method
- Preheat & Prep: Set your oven to 350°F (175°C). Grease your baking dish lightly with butter or nonstick spray.
- Core the Apples: Slice off the top 1/2 inch of each apple. Using a paring knife or melon baller, carefully scoop out the core and some flesh, leaving about 1/2 inch thick walls. Don’t pierce the bottom! (If you do, patch with a little apple piece. I’ve been there.) Rub the inside of each apple with lemon juice to prevent browning.
- Mix Cinnamon Sugar: In a small bowl, combine 2 tbsp brown sugar and 1 tsp cinnamon.
- Sprinkle & Swirl: Sprinkle a little cinnamon sugar inside each apple. Swirl it around—this forms a sweet caramel base.
- Make the Cheesecake Filling: Beat together 8 oz cream cheese, 1/4 cup sour cream or yogurt, 1/3 cup sugar, 1 large egg, 1 1/2 tsp cinnamon, 1/2 tsp vanilla, and 1/4 tsp salt. Mix until creamy and smooth, about 2-3 minutes. (If it looks grainy, keep mixing—cold cream cheese is the usual culprit.)
- Stuff the Apples: Spoon the cheesecake filling into each apple, filling almost to the top. Don’t overstuff—it will puff slightly as it bakes.
- Topping Time: Drizzle melted butter over each stuffed apple. Sprinkle with chopped nuts and extra cinnamon sugar, if using.
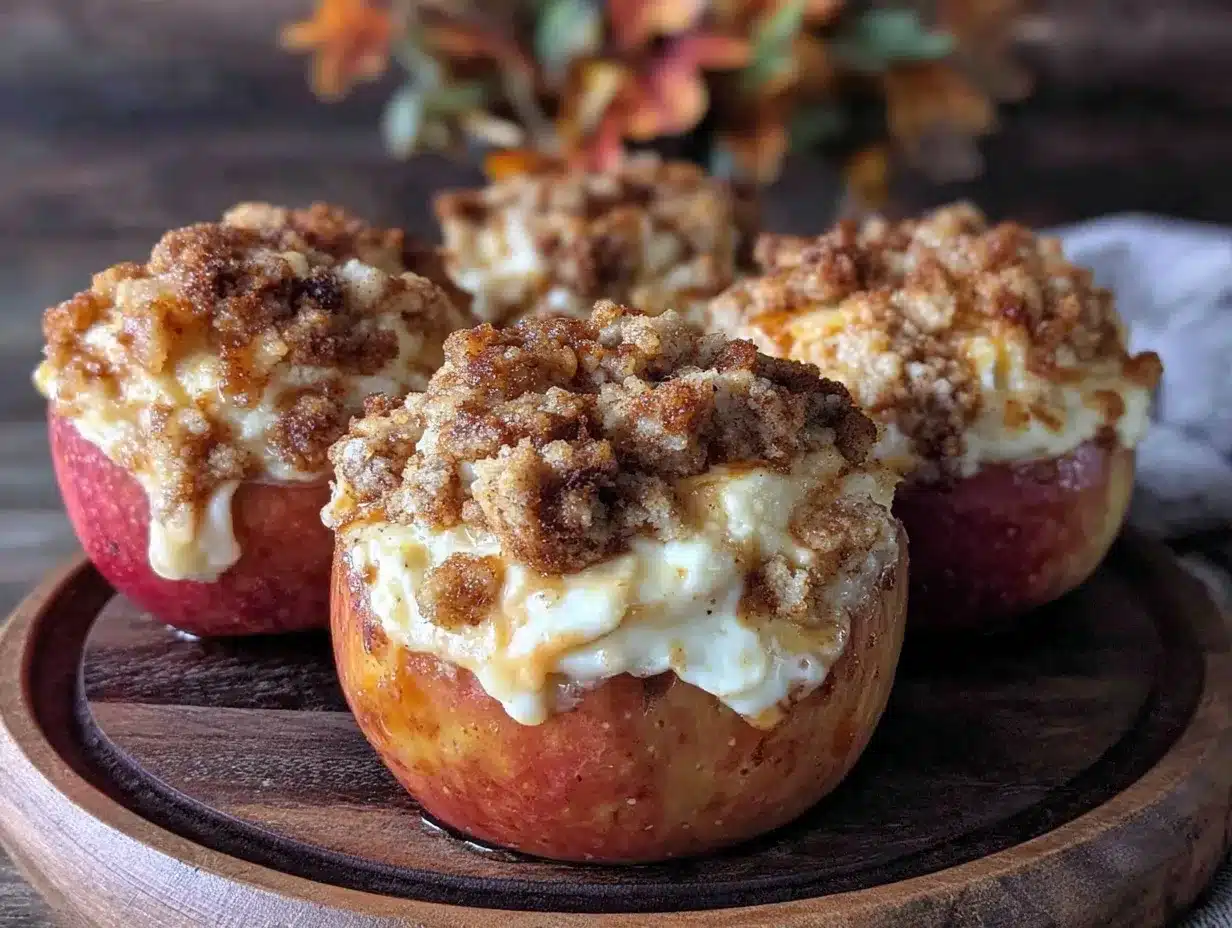
- Bake: Cover loosely with foil and bake for 30 minutes. Remove foil and bake another 15-20 minutes, until apples are tender and filling is set (a knife poked into the filling should come out mostly clean). Juices should be bubbling and apples soft but not collapsed.
- Cool: Let apples cool in the pan for 10-15 minutes before moving. They’re piping hot—trust me, I’ve burned my tongue more than once.
- Make the Glaze: Beat together 2 oz cream cheese, 1/4 cup powdered sugar, 1-2 tbsp milk, and a pinch of cinnamon until smooth. Drizzle over warm apples.
- Serve: Scoop apples onto plates, spoon over some pan juices, and enjoy while warm!
Notes: If apples are extra large, you may want to bake a bit longer. If the filling cracks, don’t worry—it’ll still taste amazing, and the glaze hides any imperfections. Sensory cue: Apples should smell deeply cinnamon-y and feel soft to a gentle poke. For the quickest prep, hollow apples while your oven preheats and whip up the filling as you go.
Cooking Tips & Techniques
Here’s what I’ve learned after a few baking mishaps and a lot of trial and error:
- Choose the Right Apples: Firm, slightly tart apples like Honeycrisp or Granny Smith hold their shape and balance the sweetness.
- Don’t Overstuff: Filling expands a bit in the oven. If you pile it up, it’ll spill out (makes for messy but tasty apples!).
- Foil Tenting: Covering with foil keeps the tops from over-browning and lets the apples steam gently. Remove foil halfway for that golden finish.
- Mix Cheesecake Filling Well: Softened cream cheese is key—cold blocks lead to lumps. If you’re in a rush, microwave cream cheese in 10-second bursts.
- Multitasking: Prep apples while the oven heats, and blend your filling while you’re working. Saves you a good 10 minutes.
- Check for Doneness: Apples should be fork-tender but not collapsing. If you poke the cheesecake and it’s still liquid, bake a bit longer. If it’s just slightly wobbly, you’re good.
I once tried using Red Delicious apples (because that’s all I had)—they turned mushy and collapsed. Lesson learned: stick with baking apples. If your filling cracks, don’t panic—the glaze covers everything! Consistency tip: Use room temperature ingredients and measure carefully. These little habits make for perfect stuffed apples every time.
Variations & Adaptations
Whether you have dietary restrictions, different fruit on hand, or just want to play with flavors, this recipe is super flexible.
- Gluten-Free & Dairy-Free: Use coconut yogurt and dairy-free cream cheese for the filling. Stick with coconut sugar and skip the nuts if there are allergies.
- Seasonal Fruit Swap: Substitute ripe pears or peaches for apples in summer. The cheesecake filling works beautifully with both!
- Flavor Boosts: Add orange zest to the filling for a citrusy twist, or stir in a handful of mini chocolate chips for extra decadence.
- Different Cooking Methods: Try baking apples in the air fryer at 325°F (160°C) for 15-18 minutes (watch closely—they bake fast!).
- Nut-Free: Skip the pecans/walnuts and add sunflower seeds or just use extra cinnamon sugar.
Personal tweak: I once added a spoonful of apple butter to the filling—oh boy, it ramped up the apple pie vibes! If you’re all about classic cinnamon rolls, a little drizzle of maple syrup after baking is magic. Basically, make these your own and have fun experimenting.
Serving & Storage Suggestions
Serve these Creamy Cinnamon Roll Cheesecake Stuffed Baked Apples warm, fresh from the oven. A drizzle of cream cheese glaze and a sprinkle of extra cinnamon sugar make them picture-perfect (hello, Pinterest!).
- Presentation: Place apples on a platter, spoon over pan juices, and garnish with a dusting of powdered sugar or a few chopped nuts. They’re beautiful enough for holiday dinners or casual brunches.
- Pairings: Try with a scoop of vanilla ice cream or a dollop of whipped cream. Hot apple cider or chai tea are perfect partners.
- Storage: Refrigerate leftovers in an airtight container for up to 3 days. Apples may soften further but remain delicious.
- Freezing: Freeze baked, unglazed apples for up to 2 months. Thaw overnight in the fridge and reheat gently in the oven at 325°F (160°C) for 10-15 minutes.
- Reheating: Warm in the microwave for 30-45 seconds or in the oven at 350°F (175°C) until heated through.
Flavor note: The cinnamon roll cheesecake flavors get even better after a day—honestly, leftovers might be my favorite part. Just don’t forget the glaze!
Nutritional Information & Benefits
Each stuffed apple (with glaze and nuts) provides approximately:
- Calories: 250-300
- Protein: 4g
- Carbs: 35g
- Fat: 12g
- Fiber: 4g
Health highlights: Apples add fiber, vitamin C, and antioxidants. Cream cheese and yogurt offer calcium and protein, while cinnamon helps regulate blood sugar and adds anti-inflammatory benefits.
Dietary notes: Naturally gluten-free. Easily adaptable to dairy-free and nut-free. Contains egg and dairy—swap out as needed for allergies. From a wellness perspective, this dessert feels indulgent yet balanced, with plenty of good-for-you ingredients!
Conclusion
These Creamy Cinnamon Roll Cheesecake Stuffed Baked Apples are more than just a dessert—they’re a little piece of fall, wrapped up in sweet, creamy comfort. Whether you’re baking for a crowd or just want something cozy for yourself, you’ll love how easy and satisfying this recipe is.
Feel free to swap apples, play with flavors, or tweak the filling to fit your tastes. That’s the beauty of a recipe like this—you can make it your own every time.
Honestly, this dessert never fails to brighten my day or bring smiles at the dinner table. If you try it, I’d love to hear how you make it your own! Drop a comment below, share your creations, or tag your photos. Go ahead and bookmark this recipe—your fall baking just found a new favorite. Happy baking, friends!
Frequently Asked Questions
Can I make Creamy Cinnamon Roll Cheesecake Stuffed Baked Apples ahead of time?
Yes! You can prep the apples and cheesecake filling the day before, refrigerate them, and bake just before serving. Leftovers also reheat beautifully in the oven or microwave.
What are the best apples for this recipe?
Firm baking apples like Honeycrisp, Fuji, or Granny Smith work best. They hold their shape and balance the sweetness of the filling.
Can I make this recipe dairy-free?
You can! Substitute dairy-free cream cheese, coconut yogurt, and non-dairy milk. The flavors stay delicious, and the texture is still creamy.
Is this recipe gluten-free?
Absolutely—there’s no flour in this recipe. Just check your labels on cream cheese and yogurt if you’re extra sensitive.
How do I prevent the apples from collapsing or becoming mushy?
Choose firm apples and don’t overbake. If you’re unsure, start checking for doneness at 40 minutes. Apples should be tender but not falling apart.
Pin This Recipe!
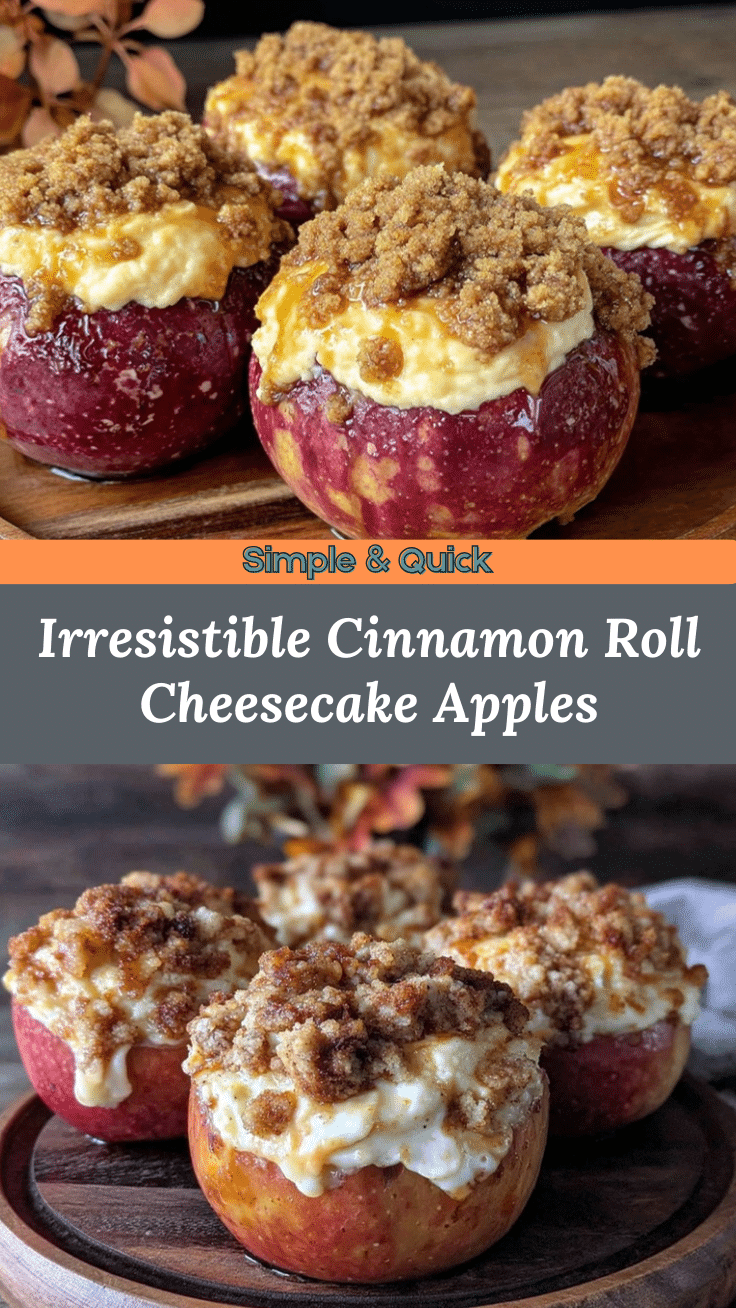
Creamy Cinnamon Roll Cheesecake Stuffed Baked Apples

Tender baked apples stuffed with a creamy cinnamon roll cheesecake filling, topped with a buttery cinnamon sugar swirl and finished with a luscious cream cheese glaze. This easy fall dessert is comforting, crowd-pleasing, and naturally gluten-free.
- Prep Time: 20 minutes
- Cook Time: 45-50 minutes
- Total Time: 1 hour 10 minutes
- Yield: 6 servings 1x
- Category: Dessert
- Cuisine: American
Ingredients
- 6 large baking apples (Honeycrisp, Fuji, or Granny Smith)
- Juice of 1/2 lemon
- 8 oz cream cheese, softened
- 1/4 cup sour cream or Greek yogurt
- 1 large egg, room temperature
- 1/3 cup granulated sugar
- 1 1/2 tsp ground cinnamon
- 1/2 tsp pure vanilla extract
- 1/4 tsp salt
- 2 tbsp brown sugar
- 1 tsp ground cinnamon
- 2 tbsp unsalted butter, melted
- 1/4 cup chopped pecans or walnuts (optional)
- Extra cinnamon sugar for sprinkling
- 2 oz cream cheese, softened
- 1/4 cup powdered sugar
- 1–2 tbsp milk (dairy or non-dairy)
- Pinch of cinnamon
Instructions
- Preheat oven to 350°F (175°C) and lightly grease a baking dish.
- Slice off the top 1/2 inch of each apple. Core and hollow apples, leaving about 1/2 inch thick walls. Rub inside with lemon juice.
- Mix 2 tbsp brown sugar and 1 tsp cinnamon in a small bowl.
- Sprinkle some cinnamon sugar inside each apple and swirl to coat.
- In a mixing bowl, beat together 8 oz cream cheese, 1/4 cup sour cream or yogurt, 1/3 cup sugar, 1 large egg, 1 1/2 tsp cinnamon, 1/2 tsp vanilla, and 1/4 tsp salt until smooth.
- Spoon cheesecake filling into each apple, filling almost to the top.
- Drizzle melted butter over apples. Sprinkle with chopped nuts and extra cinnamon sugar if desired.
- Cover loosely with foil and bake for 30 minutes. Remove foil and bake another 15-20 minutes, until apples are tender and filling is set.
- Let apples cool in the pan for 10-15 minutes.
- Beat together 2 oz cream cheese, 1/4 cup powdered sugar, 1-2 tbsp milk, and a pinch of cinnamon until smooth. Drizzle glaze over warm apples.
- Serve warm, spooning over pan juices.
Notes
Use firm baking apples for best texture. Don’t overstuff apples as filling expands. Tent with foil to prevent over-browning. Easily adaptable to dairy-free and nut-free diets. Apples can be prepped ahead and baked before serving. Leftovers taste even better the next day.
Nutrition
- Serving Size: 1 stuffed apple
- Calories: 275
- Sugar: 28
- Sodium: 180
- Fat: 12
- Saturated Fat: 6
- Carbohydrates: 35
- Fiber: 4
- Protein: 4
Keywords: baked apples, cheesecake stuffed apples, cinnamon roll apples, fall dessert, gluten-free dessert, easy apple recipe, autumn baking, stuffed apples, cinnamon sugar, cream cheese glaze