Let me paint you a picture: the deep, spicy aroma of gingerbread mixing with creamy eggnog fills the kitchen, and suddenly, it feels like Christmas morning—even if it’s only December 1st. The first time I baked these Eggnog Gingerbread Thumbprint Cookies, I was hit with a rush of nostalgia so strong I had to pause and just take it all in. That scent—the mix of ginger, nutmeg, and cinnamon, with that unmistakable holiday sweetness—takes me straight back to my grandma’s tiny kitchen, when I was knee-high to a grasshopper, waiting impatiently for the timer to ding.
Honestly, these cookies are dangerously easy to whip up, and they’ve become my secret weapon for holiday gatherings. The moment I set a tray of them on the counter, my family starts circling like cookie sharks. My youngest can’t help but sneak them off the cooling rack (and, let’s face it, neither can I). There’s something about the creamy eggnog filling nestled inside a chewy gingerbread thumbprint that just feels like pure, nostalgic comfort. I wish I’d discovered this combo years ago—it’s the kind of treat that brightens up your Pinterest cookie board and brings a little extra magic to any holiday spread.
I stumbled upon this recipe during a snowy weekend, trying to recreate the flavors from an old church bake sale. After a few (okay, more like five) rounds of tweaking in the name of research, these cookies became a staple for family gifting and cozy December nights. The texture is spot-on, the flavors are bold yet balanced, and it’s honestly the best excuse to open that carton of eggnog you’ve been saving for something special. If you’re looking for a recipe that feels like a warm hug and looks beautiful on your Christmas cookie platter, you’re going to want to bookmark these Eggnog Gingerbread Thumbprint Cookies. Trust me, they’re holiday magic—tested, tasted, and totally loved.
Why You’ll Love This Recipe
Over the years, I’ve baked more Christmas cookies than I can count, but these Eggnog Gingerbread Thumbprint Cookies always end up stealing the show. After testing dozens of batches (and eating way too many in the name of cookie science), I can say with confidence that this recipe delivers every single time. Here’s why you’ll love it as much as my family does:
- Quick & Easy: These cookies come together in under 45 minutes, including baking and filling—perfect for busy holiday schedules or last-minute cravings.
- Simple Ingredients: No need for fancy specialty items; most ingredients are pantry staples, and you probably have everything on hand already.
- Perfect for Christmas Gatherings: Whether it’s a cookie exchange, family brunch, or festive office party, these cookies fit right in and always get rave reviews.
- Crowd-Pleaser: Both kids and adults love the chewy gingerbread base and the creamy eggnog center—seriously, these disappear fast!
- Unbelievably Delicious: The balance of warm spices and cool eggnog is next-level comfort food, with a texture that’s soft yet sturdy enough for gifting.
What sets this recipe apart? Well, it’s the way the gingerbread dough is spiced just right—not too sharp, not too sweet. You get the deep molasses flavor you want, but it doesn’t overshadow the eggnog filling. And speaking of that filling, a quick blend of cream cheese and real eggnog gives it a rich, custard-like vibe—so much better than plain icing, trust me. I’ve tried swapping in low-carb flour and experimenting with homemade spice blends, and no matter what, the cookies always turn out delicious. They’re forgiving, flexible, and just plain fun.
This isn’t just a good cookie—it’s the kind you reach for when you want to close your eyes after the first bite and disappear into holiday memories. It’s comfort food, but made a little lighter, a little faster, and with the same soul-soothing satisfaction. You can impress guests (without breaking a sweat), surprise your family, or honestly just treat yourself on a chilly evening. That’s why these Eggnog Gingerbread Thumbprint Cookies are a must for any Christmas baking lineup!
What Ingredients You Will Need
This recipe uses simple, wholesome ingredients to deliver bold flavor and satisfying texture without any fuss. I love that most ingredients are pantry staples, and you can tweak things as needed for dietary needs or personal taste. Here’s what you’ll need for your Eggnog Gingerbread Thumbprint Cookies:
- For the Gingerbread Cookie Dough:
- 2 1/4 cups (280g) all-purpose flour (use gluten-free blend if needed)
- 1/2 teaspoon baking soda
- 1/4 teaspoon salt
- 2 teaspoons ground ginger
- 1 1/2 teaspoons ground cinnamon
- 1/2 teaspoon ground cloves
- 1/4 teaspoon ground nutmeg
- 1/2 cup (115g) unsalted butter, softened (dairy-free butter works too)
- 1/2 cup (100g) brown sugar, packed
- 1/3 cup (80ml) molasses (use unsulphured for best flavor)
- 1 large egg, room temperature
- 1 teaspoon pure vanilla extract
- For the Eggnog Cream Cheese Filling:
- 4 ounces (115g) cream cheese, softened (use dairy-free cream cheese if needed)
- 3 tablespoons (45ml) eggnog (homemade or store-bought, your choice)
- 1/2 cup (60g) powdered sugar
- 1/4 teaspoon ground nutmeg (for extra holiday flavor)
- 1/2 teaspoon vanilla extract
- For Decorating (Optional):
- Extra ground nutmeg or cinnamon, for dusting
- Festive sprinkles or crushed candy canes
I recommend King Arthur Flour for the cookie dough—it makes for a consistent, tender crumb. If you’re making these for someone with allergies, swap the dairy for coconut-based alternatives, and use a certified gluten-free flour blend. For the eggnog, I like to use a classic, full-fat version for richness, but lighter or vegan eggnog works too (just check for sweetness). In summer, you could swap the filling for lemon curd, but for Christmas, nothing beats that creamy eggnog center.
Ingredient substitutions are simple: use almond flour for gluten-free, coconut sugar for a deeper molasses flavor, or skip the sprinkles for a more grown-up look. These Eggnog Gingerbread Thumbprint Cookies play nice with nearly any pantry!
Equipment Needed
Baking these Eggnog Gingerbread Thumbprint Cookies doesn’t require a ton of fancy gear—just a few basics and a couple of nice-to-have tools if you want to make things easier.
- Large mixing bowls (at least two—one for dry, one for wet ingredients)
- Measuring cups and spoons (I use OXO brand—they’re sturdy and last forever)
- Electric mixer or stand mixer (hand whisk works if you’re feeling strong)
- Rubber spatula (for scraping every last bit of dough)
- Baking sheet (heavy-duty for even browning)
- Parchment paper or silicone baking mat (makes cleanup a breeze)
- Small spoon or your thumb (for making the thumbprints—kids love this part!)
- Wire cooling rack
- Small bowl for mixing the filling
- Optional: piping bag for neat filling or a zip-top bag with the corner snipped off
If you don’t have a stand mixer, don’t worry—an electric hand mixer works just fine. I’ve made these with nothing but a sturdy wooden spoon and a little elbow grease, and the results are still delicious. For baking sheets, check that they’re not warped; otherwise, the cookies might slide around. If you use a silicone mat, just give it a quick wipe between batches to avoid sticking. Budget-friendly tools work just as well—my grandma’s old mixing bowl still gets the job done!
Preparation Method

Ready to bake some holiday magic? Follow these step-by-step instructions for perfect Eggnog Gingerbread Thumbprint Cookies every time:
- Prep the Oven and Baking Sheet: Preheat your oven to 350°F (175°C). Line a baking sheet with parchment paper or a silicone baking mat. This keeps the cookies from sticking and makes cleanup easy.
- Mix Dry Ingredients: In a large bowl, whisk together 2 1/4 cups (280g) flour, 1/2 tsp baking soda, 1/4 tsp salt, 2 tsp ginger, 1 1/2 tsp cinnamon, 1/2 tsp cloves, and 1/4 tsp nutmeg. Set aside. The spice blend should smell warm and festive!
- Cream Butter and Sugar: In another bowl, beat 1/2 cup (115g) butter until smooth. Add 1/2 cup (100g) brown sugar and beat until fluffy and light in color, about 2-3 minutes. Scrape down the sides as needed.
- Add Wet Ingredients: Beat in 1/3 cup (80ml) molasses, 1 large egg, and 1 tsp vanilla extract until well combined. The mixture will look dark and glossy.
- Combine Wet and Dry: Gradually add the dry ingredients to the wet mixture, mixing until just combined. Don’t overmix—stop as soon as no streaks remain. Dough should be soft but not sticky; if it feels too wet, add 1-2 tbsp flour.
- Form Cookies: Scoop out 1 tbsp portions of dough (about 20g each) and roll into balls. Place them 2 inches apart on the prepared baking sheet.
- Create Thumbprints: Use your thumb or the back of a small spoon to gently press an indentation in the center of each cookie. If the dough cracks, just pinch the edges gently to repair—no stress!
- Bake: Bake for 10-12 minutes, until the edges are set and the tops look slightly cracked. The cookies will still be soft; they firm up as they cool.
- Cool: Remove from the oven and let cookies cool on the baking sheet for 5 minutes, then transfer to a wire rack to cool completely. If the indentations puffed up, gently press them again while warm.
- Make Eggnog Filling: In a small bowl, beat 4 oz (115g) cream cheese until smooth. Add 3 tbsp (45ml) eggnog, 1/2 cup (60g) powdered sugar, 1/4 tsp nutmeg, and 1/2 tsp vanilla. Beat until creamy and thick—about 1 minute. Filling should be spreadable, not runny.
- Fill Thumbprints: Spoon or pipe about 1 tsp of the eggnog filling into each cooled cookie indentation. Don’t overfill, or it’ll spill over the sides (learned this the hard way!).
- Decorate: Sprinkle with extra nutmeg, cinnamon, or festive sprinkles if desired. Let the filling set for 10 minutes before serving or storing.
Tip: If the dough is too sticky to handle, chill it for 15 minutes in the fridge. For even baking, rotate your tray halfway through. The cookies are done when they look puffed and the edges have a slight crisp. If you’re multitasking, mix the filling while the cookies bake—makes everything flow smoothly. Trust your nose—the house will smell amazing when they’re just right!
Cooking Tips & Techniques
As someone who’s baked these Eggnog Gingerbread Thumbprint Cookies more times than I care to admit, here are my tried-and-true tips for cookie success:
- Don’t Overbake: These cookies should be soft and chewy. Pull them from the oven when the edges are firm but the centers still look a little underdone—they’ll finish setting as they cool.
- Spice Balance: Taste your spice mix before adding it to the dough. Some brands of ginger or cinnamon are stronger than others, so adjust to your preference. If you love extra ginger zing, add a pinch more!
- Thumbprint Technique: Use a lightly floured thumb or the back of a teaspoon to make the indentations. If the dough cracks, just pinch it back together. Imperfect cookies are more charming anyway.
- Filling Consistency: The eggnog cream cheese filling should be thick enough to hold its shape but soft enough to pipe or spoon easily. If it’s too runny, add a little more powdered sugar.
- Cookie Size: Keep the dough balls uniform in size for even baking. I use a small cookie scoop for quick portioning—so much easier!
- Personal Failures: Once, I tried to fill the cookies before they cooled, and the filling melted everywhere. Always let them cool completely first. Also, don’t skip the parchment paper—the molasses makes these cookies sticky.
- Multitasking: Make the filling while the cookies bake, and prep your decorations while they cool. Saves time and keeps things moving.
- Consistency: If making a double batch, bake one tray at a time. Crowding the oven leads to uneven results.
These little tricks and lessons learned the hard way are what make baking so much fun. With a bit of attention to detail, you’ll have perfect Eggnog Gingerbread Thumbprint Cookies every time!
Variations & Adaptations
One of the best things about Eggnog Gingerbread Thumbprint Cookies is how easy it is to tweak the recipe to suit different tastes and dietary needs. Here are a few variations I’ve tried (and loved):
- Gluten-Free: Substitute the all-purpose flour with a 1:1 gluten-free baking mix. The cookies stay chewy and delicious—no one will guess they’re gluten-free!
- Vegan: Use dairy-free butter and cream cheese, and swap the egg for a flaxseed egg (1 tbsp ground flaxseed mixed with 2.5 tbsp water). Choose a vegan eggnog for the filling. The flavor is still totally festive!
- Flavor Swaps: For a twist, use maple syrup instead of molasses, or fill the thumbprints with lemon curd in the spring and pumpkin butter in the fall. If you love spice, add a pinch of black pepper for a subtle heat.
- Cooking Methods: These cookies bake best in a conventional oven, but you can use a convection setting—just reduce baking time by a minute or two. For a crispier cookie, bake for 1-2 minutes longer.
- Allergen Substitutions: For nut allergies, skip any nutmeg garnish and use a safe, nut-free eggnog. Dairy allergies? Coconut-based substitutes work great.
My favorite personal adaptation is swapping the eggnog filling for a spiced white chocolate ganache—decadent and perfect for adults who want something extra special. Feel free to play with the spices, fillings, and decorations to make these cookies truly your own!
Serving & Storage Suggestions
Eggnog Gingerbread Thumbprint Cookies are best served fresh, at room temperature, with the filling set and the flavors in full bloom. I love to arrange them on a festive platter, dusted with a little extra nutmeg or some sparkly sprinkles. They’re a perfect partner for a mug of hot cocoa, a glass of holiday punch, or (you guessed it) a tall glass of eggnog.
For storing, place the cookies in an airtight container with wax paper between layers. They’ll keep at room temperature for up to 3 days. If you’re planning ahead, store the cookies unfrosted, and add the eggnog filling just before serving for best texture. You can also freeze the baked cookies (without filling) for up to a month—thaw overnight and fill them fresh. To reheat, just let them come to room temperature; avoid microwaving, as the filling may melt.
Honestly, these cookies get even better after a day—the spices deepen, and the gingerbread gets a bit chewier. Perfect for gifting, party trays, or sneaking with your morning coffee!
Nutritional Information & Benefits
Each Eggnog Gingerbread Thumbprint Cookie contains approximately 110 calories, 4g fat, 17g carbohydrates, and 2g protein (based on average ingredients and a 20-cookie batch). They’re naturally nut-free, and can easily be adapted for gluten-free or dairy-free diets.
Ginger and cinnamon add more than just flavor—they contain antioxidants and are known for their anti-inflammatory benefits. The eggnog filling offers a little calcium, and if you use coconut sugar or a lower-sugar eggnog, you can keep things lighter. Just watch for dairy and gluten if you’re sensitive. I love that these cookies let you indulge in holiday flavors while still keeping portions reasonable—one or two is all you need for that festive feeling.
From my wellness perspective, holiday treats like these are all about balance and joy. Enjoy a cookie, savor the flavor, and share with friends!
Conclusion
If you’re hunting for a Christmas cookie that’s both eye-catching and melt-in-your-mouth delicious, these Eggnog Gingerbread Thumbprint Cookies are worth every minute. They bring together everything we love about the holidays—spicy gingerbread, creamy eggnog, and the kind of cozy nostalgia you get from baking with family.
Don’t be afraid to customize the recipe to suit your own tastes or dietary needs. Swap out the spices, try a new filling, or add your favorite festive toppings. That’s the beauty of holiday baking—it’s all about making memories and sharing joy.
Personally, I love this recipe because it’s easy, forgiving, and always a hit with everyone who tries it. If you bake a batch, I’d love to hear how they turn out! Drop a comment, share your photos on Pinterest, or let me know your favorite twist. Happy holiday baking—and may your cookie jar never be empty!
Frequently Asked Questions
Can I make Eggnog Gingerbread Thumbprint Cookies ahead of time?
Absolutely! You can bake the cookies a day or two in advance and store them in an airtight container. For best results, add the eggnog filling just before serving.
What’s the best way to make the thumbprint indentation?
I like to use my thumb or the back of a small spoon. If the dough cracks, just gently pinch it together—no need for perfect shapes.
Can I freeze these cookies?
Yes! Freeze the baked cookies without the filling for up to a month. Thaw at room temperature and fill them fresh before serving.
What can I use instead of eggnog for the filling?
If you’re not a fan of eggnog, try using vanilla or cinnamon-flavored milk, or swap in lemon curd or pumpkin butter for a seasonal twist.
Are these cookies safe for nut allergies?
Yes, the recipe is naturally nut-free. Just be sure to check your eggnog and decorations for hidden nuts if you’re baking for someone with allergies.
Pin This Recipe!
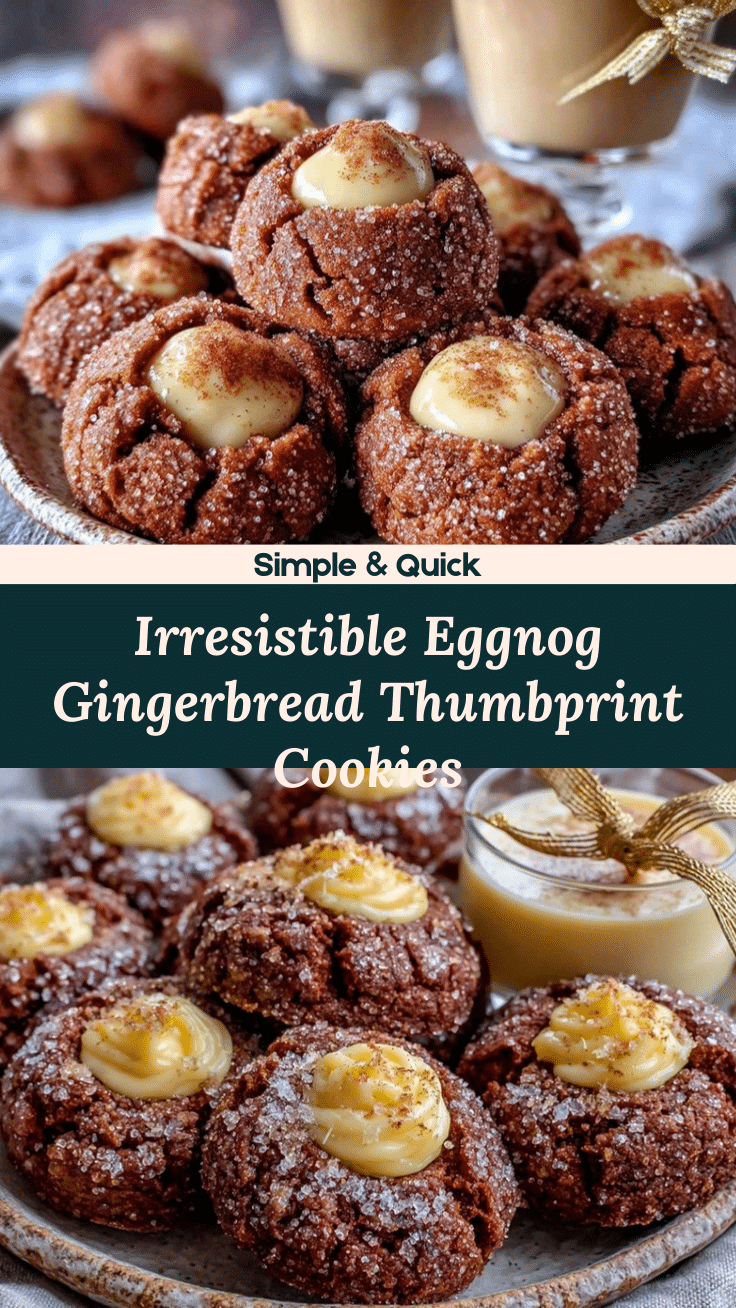
Eggnog Gingerbread Thumbprint Cookies

These festive thumbprint cookies feature a chewy, spiced gingerbread base filled with creamy eggnog cream cheese, making them a nostalgic and crowd-pleasing treat for any holiday gathering. Quick to prepare and easy to customize, they’re perfect for Christmas cookie trays and gifting.
- Prep Time: 20 minutes
- Cook Time: 12 minutes
- Total Time: 45 minutes
- Yield: 20 cookies 1x
- Category: Dessert
- Cuisine: American
Ingredients
- 2 1/4 cups all-purpose flour (or gluten-free blend)
- 1/2 teaspoon baking soda
- 1/4 teaspoon salt
- 2 teaspoons ground ginger
- 1 1/2 teaspoons ground cinnamon
- 1/2 teaspoon ground cloves
- 1/4 teaspoon ground nutmeg
- 1/2 cup unsalted butter, softened (or dairy-free butter)
- 1/2 cup brown sugar, packed
- 1/3 cup molasses (unsulphured)
- 1 large egg, room temperature
- 1 teaspoon pure vanilla extract
- 4 ounces cream cheese, softened (or dairy-free cream cheese)
- 3 tablespoons eggnog (homemade or store-bought)
- 1/2 cup powdered sugar
- 1/4 teaspoon ground nutmeg
- 1/2 teaspoon vanilla extract
- Extra ground nutmeg or cinnamon, for dusting (optional)
- Festive sprinkles or crushed candy canes (optional)
Instructions
- Preheat oven to 350°F (175°C). Line a baking sheet with parchment paper or a silicone baking mat.
- In a large bowl, whisk together flour, baking soda, salt, ginger, cinnamon, cloves, and nutmeg.
- In another bowl, beat butter until smooth. Add brown sugar and beat until fluffy and light, about 2-3 minutes.
- Beat in molasses, egg, and vanilla extract until well combined.
- Gradually add dry ingredients to wet mixture, mixing until just combined. If dough is too wet, add 1-2 tablespoons flour.
- Scoop 1 tablespoon portions of dough and roll into balls. Place 2 inches apart on prepared baking sheet.
- Use your thumb or the back of a small spoon to gently press an indentation in the center of each cookie.
- Bake for 10-12 minutes, until edges are set and tops look slightly cracked. Cookies will be soft and firm up as they cool.
- Remove from oven and let cookies cool on baking sheet for 5 minutes, then transfer to a wire rack to cool completely. If indentations puffed up, gently press them again while warm.
- In a small bowl, beat cream cheese until smooth. Add eggnog, powdered sugar, nutmeg, and vanilla extract. Beat until creamy and thick.
- Spoon or pipe about 1 teaspoon of eggnog filling into each cooled cookie indentation.
- Decorate with extra nutmeg, cinnamon, or festive sprinkles if desired. Let filling set for 10 minutes before serving or storing.
Notes
For best results, do not overbake—cookies should be soft and chewy. Chill dough for 15 minutes if too sticky. Make filling while cookies bake to save time. Store cookies in an airtight container for up to 3 days, or freeze unfrosted cookies for up to a month. Easily adapt for gluten-free or dairy-free diets.
Nutrition
- Serving Size: 1 cookie
- Calories: 110
- Sugar: 10
- Sodium: 70
- Fat: 4
- Saturated Fat: 2
- Carbohydrates: 17
- Fiber: 0.5
- Protein: 2
Keywords: eggnog cookies, gingerbread cookies, thumbprint cookies, Christmas cookies, holiday baking, festive dessert, nut-free cookies, easy Christmas recipe