“You know that moment when you open your fridge late at night, and all you find is some leftover rice and a jar of kimchi? Well, last Thursday night, that was me—standing in my kitchen with a half-empty bottle of gochujang and a stubborn craving for something spicy and comforting. I wasn’t planning on cooking anything fancy, honestly, but then I remembered a trick my friend Minji shared during one of our weekend chats. She whipped up this flavor-packed kimchi fried rice that tasted like a hug in a bowl. I gave it a shot, juggling the pan while my phone rang—classic multitasking disaster brewing, right? But somehow, that crispy fried egg on top pulled it all together. That night, I discovered how simple ingredients could turn into magic. This flavorful kimchi fried rice with gochujang and a crispy fried egg has since become my go-to for busy nights when I want something quick but unforgettable. Maybe you’ve been there, too—looking for that perfect blend of heat, tang, and crunch without a fuss. It’s not just another fried rice; it’s a little adventure in every bite, and I’m excited to share it with you.”
Why You’ll Love This Recipe
This recipe is a keeper, and here’s why:
- Quick & Easy: Ready in about 20 minutes—ideal for when you’re juggling a million things.
- Simple Ingredients: Uses pantry staples and that trusty jar of kimchi you might already have lurking in the fridge.
- Perfect for Weeknight Dinners: Comfort food that feels special but comes together fast.
- Crowd-Pleaser: Whether it’s picky eaters or spice lovers, this dish wins hearts every time.
- Unbelievably Delicious: The blend of tangy kimchi, savory gochujang, and that crispy egg creates a flavor combo that’s honestly hard to beat.
What sets this version apart? It’s the balance—gochujang adds a subtle sweetness and depth without overpowering the natural tang of the kimchi. Plus, frying the egg until the edges are golden and crispy adds a texture contrast that keeps each mouthful exciting. I tweak the seasoning just right, so it’s not too spicy but never bland. Honestly, it’s the kind of dish that makes you close your eyes and savor each bite. Whether you’re cooking for one or feeding a hungry crowd, this kimchi fried rice recipe feels like a little celebration of flavors every time.
What Ingredients You Will Need
This flavorful kimchi fried rice recipe uses simple, wholesome ingredients to create a satisfying, spicy meal without any fuss. Most of these are pantry staples, so you might not even need to shop. Here’s what you’ll gather:
- Cooked white rice (about 3 cups or 600 grams, preferably day-old for better texture)
- Kimchi (1 cup, chopped; I like the classic napa cabbage type from Mother-in-Law’s Kimchi brand for authentic taste)
- Gochujang (2 tablespoons; adjust based on your spice preference)
- Soy sauce (1 tablespoon, low sodium if possible)
- Sesame oil (1 teaspoon for flavor and 1 teaspoon for cooking)
- Vegetable oil (2 tablespoons, for frying)
- Garlic (2 cloves, minced; fresh garlic gives the best aroma)
- Green onions (2 stalks, sliced thinly; reserve some for garnish)
- Eggs (2 large, room temperature for best frying results)
- Sugar (a pinch, to balance kimchi’s acidity)
- Optional: toasted sesame seeds for garnish (adds crunch and nuttiness)
If you want to swap things up, cooked brown rice works well here, or even quinoa for a protein boost. For a vegan version, skip the eggs and add firm tofu cubes instead. And if you can’t find gochujang, a mix of chili paste and a touch of honey can stand in, but it won’t have quite the same depth. Just keep in mind that kimchi’s tang and the egg’s crispy edges are what really make this dish sing.
Equipment Needed
- Large non-stick skillet or wok: Essential for frying rice evenly without sticking. I’ve tried cast iron, but non-stick makes cleanup easier when dealing with sticky rice and eggs.
- Spatula or wooden spoon: For stirring and scraping the rice gently to avoid mushiness.
- Small bowl: To beat eggs and mix sauces.
- Sharp knife and cutting board: For chopping kimchi and slicing green onions.
- Paper towels: Handy for drying the pan between cooking the rice and frying eggs to get that perfect crisp.
If you don’t have a wok, a large frying pan works just as well. For frying the eggs, I recommend a smaller pan with sloped sides—makes flipping or sliding the eggs onto the rice easier. And a splatter guard can save you from a messy stove, trust me on that one. I keep a silicone spatula around for scraping the pan without scratching, and it’s been a game changer. Budget-wise, these are all pretty basic tools most kitchens have, so no need to splurge.
Preparation Method
- Prep your ingredients: Chop 1 cup of kimchi into bite-sized pieces and slice 2 green onions thinly, keeping some green parts for garnish. Mince 2 garlic cloves. Set aside.
This step takes about 5 minutes. - Heat the pan: Place your large non-stick skillet or wok over medium-high heat. Add 1 tablespoon vegetable oil and 1 teaspoon sesame oil for that toasty flavor. Let it warm for about 1 minute until shimmering but not smoking.
- Sauté aromatics: Toss in the minced garlic and the white parts of the green onions. Stir for 30 seconds until fragrant but not browned (burnt garlic turns bitter!).
- Add kimchi: Add chopped kimchi and cook for 3-4 minutes until it softens and the edges start to caramelize a bit—this is where the magic happens. Stir occasionally to prevent sticking. You might notice a tangy aroma filling your kitchen here.
- Mix sauces: In a small bowl, combine 2 tablespoons gochujang, 1 tablespoon soy sauce, and a pinch of sugar. Stir well until smooth.
- Incorporate sauces and rice: Pour the gochujang mixture over the kimchi. Stir to coat everything evenly. Then add 3 cups of cold cooked rice (break up any clumps with your hands beforehand). Stir gently but thoroughly to blend the rice and sauce. Cook for another 5 minutes, stirring every minute to let the rice absorb flavors and develop a slight crisp on the bottom. If the rice feels dry, add a splash of water or more sesame oil.
- Season and finish: Taste and adjust seasoning with a little more soy sauce or sugar if needed. Stir in the green parts of the green onion and turn off the heat.
- Fry the eggs: In a separate small pan, heat 1 tablespoon vegetable oil over medium heat. Crack 2 large eggs carefully and fry until the whites are crispy and golden at the edges but yolks still runny (about 2-3 minutes). Season lightly with salt.
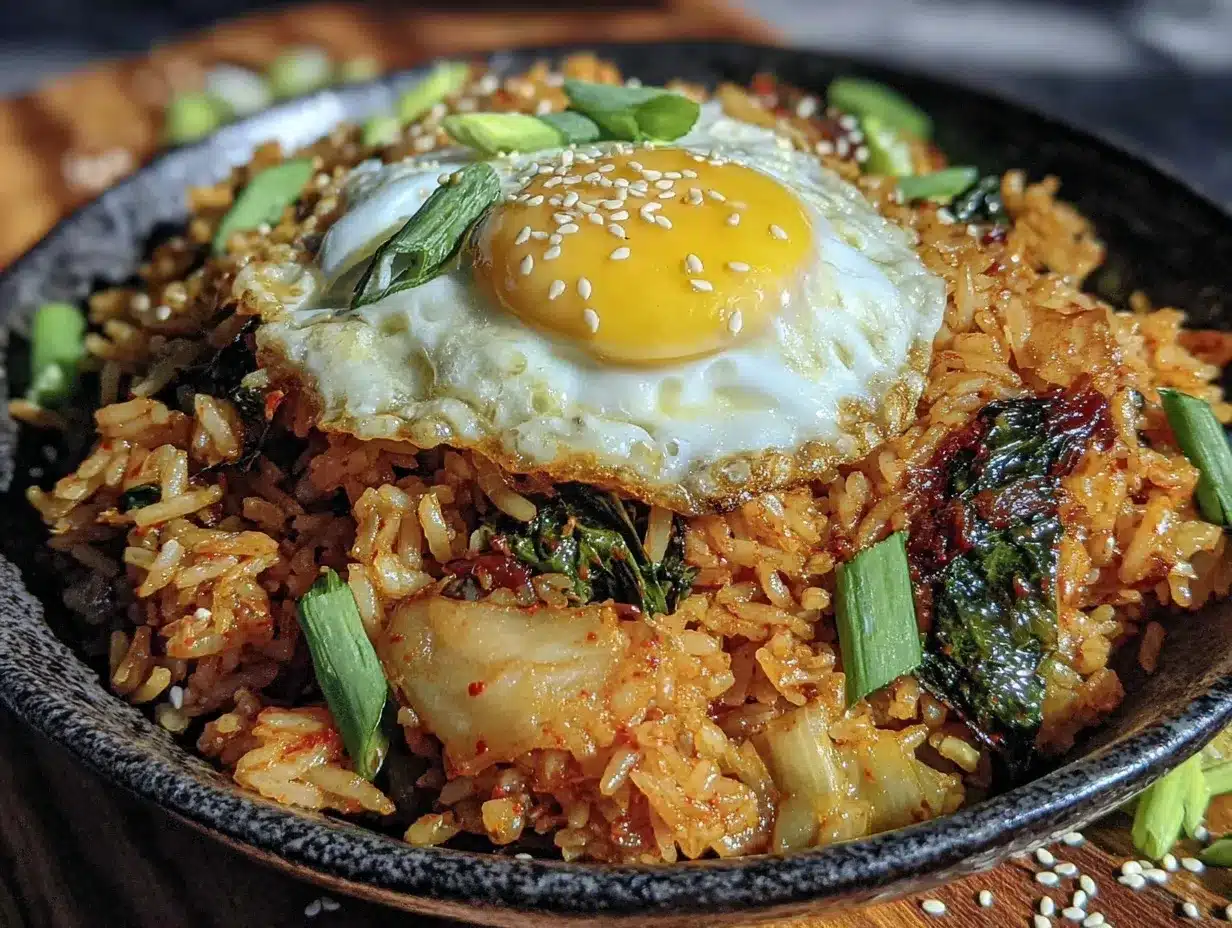
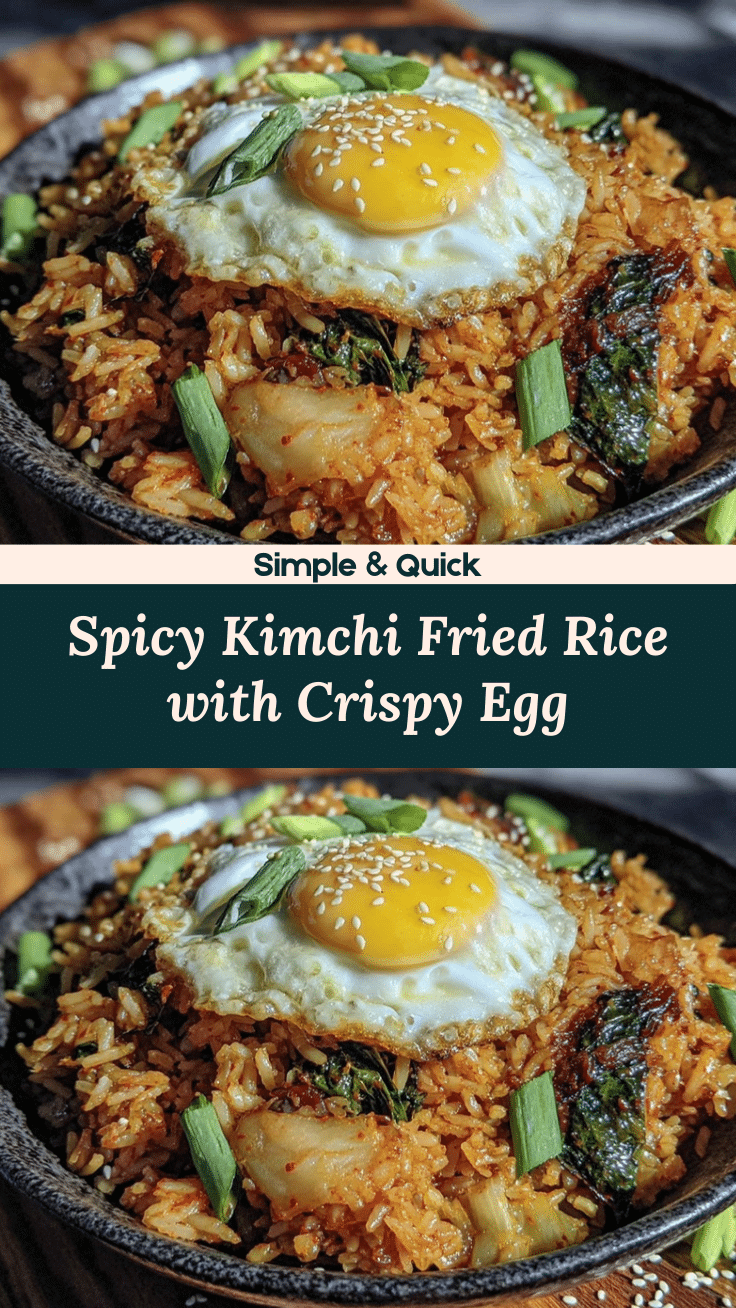
- Plate and garnish: Divide the kimchi fried rice into bowls, top each with a crispy fried egg, and sprinkle with toasted sesame seeds and remaining green onions. Serve immediately for best texture and flavor.
Pro tip: If your rice sticks too much, adding a bit more oil or making sure the rice is chilled before cooking helps keep things from turning mushy. Also, that crispy edge on the egg? Totally worth the extra attention. Don’t rush it!
Cooking Tips & Techniques
One thing I learned the hard way: fresh, hot rice doesn’t fry well—it turns gummy. That’s why day-old or chilled rice is your best friend here. If you only have freshly cooked rice, spread it on a tray and pop it in the fridge for 20-30 minutes before starting.
When cooking the kimchi, don’t rush the caramelizing step. Those browned bits add a subtle sweetness and depth that balance the spicy tang. Stir frequently but gently to avoid burning.
About the gochujang—start with 2 tablespoons, then adjust after tasting. It’s spicy but also sweet and savory, so you want that balance, not a chili bomb. I usually keep a little extra gochujang on the side for anyone who wants more heat at the table.
Frying the egg with crispy edges is easier if the oil is hot enough but not smoking. Use medium heat and resist the urge to flip the egg if you want that perfect runny yolk with crunch around the whites.
Multitasking tip: While the kimchi mixture cooks, prep your egg pan and ingredients to save time. This recipe flows well if you keep moving but avoid over-stirring the rice to preserve texture.
Finally, don’t skip the sesame oil—it’s a tiny ingredient but a big flavor player. Add it off the heat at the end to keep its aroma fresh and vibrant.
Variations & Adaptations
For those who want to mix things up, here are a few ideas:
- Protein boost: Add diced cooked chicken, shrimp, or tofu for a heartier meal. Toss these in after cooking the kimchi so they soak up the flavors.
- Spice level: For a milder version, reduce gochujang to 1 tablespoon and add a teaspoon of mild chili paste or paprika instead.
- Vegetarian or vegan: Skip the fried egg and swap soy sauce with tamari for gluten-free. Use coconut aminos if soy is off-limits.
- Seasonal twist: In warmer months, add fresh peas or julienned carrots for color and crunch. In winter, mix in sautéed mushrooms or kimchi with extra fermented depth.
- Cooking method: Try baking the rice mixture in a casserole dish topped with cheese for a fusion twist. Or press it into patties and pan-fry for kimchi rice cakes.
I once tried adding a splash of lime juice at the end for brightness—it was unexpected but refreshing! Feel free to customize based on what’s in your pantry or how adventurous you’re feeling.
Serving & Storage Suggestions
This kimchi fried rice is best served hot, straight from the pan. The crispy fried egg on top adds a perfect finishing touch that’s both visually appealing and delicious.
Pair it with simple sides like steamed greens, pickled cucumbers, or a light Asian-style salad to balance the richness. A cold glass of barley tea or a mild lager complements the spice beautifully.
If you have leftovers (which might not last long!), store them in an airtight container in the fridge for up to 2 days. Reheat gently in a skillet with a splash of water or oil to revive that slight crispiness.
For the fried egg, it’s best to cook fresh when serving; however, if you need to store, keep separately and reheat carefully to avoid rubbery whites. Flavors tend to deepen after a day, so leftovers can actually taste even better.
Nutritional Information & Benefits
Here’s a rough nutritional estimate per serving (serves 2):
| Calories | 450-500 kcal |
|---|---|
| Protein | 15-18 grams |
| Carbohydrates | 60-65 grams |
| Fat | 15-18 grams |
| Fiber | 3-4 grams |
Kimchi is a probiotic-rich fermented food, great for gut health and digestion. Gochujang provides capsaicin, which may boost metabolism. Eggs add high-quality protein and essential nutrients like choline. Using minimal oil keeps the fat content moderate, and the recipe can be easily modified for gluten-free or vegan diets.
Personally, I appreciate how this recipe balances indulgence with nutritional benefits—it’s comfort food that doesn’t leave me feeling sluggish or heavy. Plus, it’s a good way to get some fermented veggies into your diet without fuss.
Conclusion
Flavorful kimchi fried rice with gochujang and a crispy fried egg is proof that simple ingredients can make a memorable meal. Whether you’re short on time or just craving something with a little kick, this recipe delivers satisfying, balanced flavors with minimal effort. I love how it’s flexible enough to suit different tastes and easy to customize with whatever you have on hand.
Give it a try, experiment with the spice level, or add your favorite proteins and veggies. I’d love to hear how you make it your own—drop a comment or share your tweaks! Cooking should be fun and forgiving, and this recipe definitely brings both to the table.
So go on, treat yourself to a bowl of this delicious, comforting kimchi fried rice—you won’t regret it!
Frequently Asked Questions
Can I use freshly cooked rice for kimchi fried rice?
It’s best to use day-old or chilled rice to avoid mushiness, but if you only have fresh rice, spread it out to cool completely before cooking.
How spicy is this recipe?
The gochujang adds moderate heat and sweetness. You can adjust the amount to make it milder or spicier depending on your preference.
What can I use if I don’t have gochujang?
You can substitute with a mix of chili paste and a touch of honey or sugar, but the flavor won’t be quite the same.
Is this recipe gluten-free?
Yes, if you use gluten-free soy sauce or tamari and make sure your gochujang is gluten-free, this recipe works well for gluten-sensitive diets.
Can I make this recipe vegan?
Absolutely! Skip the fried egg and use tofu or extra veggies instead. Swap soy sauce with coconut aminos if avoiding soy.
Pin This Recipe!
Flavorful Kimchi Fried Rice Recipe with Gochujang and Crispy Fried Egg Made Easy
A quick and easy kimchi fried rice recipe featuring tangy kimchi, savory gochujang, and a crispy fried egg on top, perfect for busy weeknights and comfort food cravings.
- Prep Time: 5 minutes
- Cook Time: 15 minutes
- Total Time: 20 minutes
- Yield: 2 servings 1x
- Category: Main Course
- Cuisine: Korean
Ingredients
- 3 cups cooked white rice (preferably day-old)
- 1 cup kimchi, chopped
- 2 tablespoons gochujang (adjust to taste)
- 1 tablespoon soy sauce (low sodium preferred)
- 1 teaspoon sesame oil (for flavor)
- 1 teaspoon sesame oil (for cooking)
- 2 tablespoons vegetable oil (for frying)
- 2 cloves garlic, minced
- 2 stalks green onions, sliced thinly (reserve some for garnish)
- 2 large eggs, room temperature
- A pinch of sugar
- Optional: toasted sesame seeds for garnish
Instructions
- Chop 1 cup of kimchi into bite-sized pieces and slice 2 green onions thinly, keeping some green parts for garnish. Mince 2 garlic cloves. Set aside.
- Heat a large non-stick skillet or wok over medium-high heat. Add 1 tablespoon vegetable oil and 1 teaspoon sesame oil. Warm for about 1 minute until shimmering but not smoking.
- Add minced garlic and the white parts of the green onions. Stir for 30 seconds until fragrant but not browned.
- Add chopped kimchi and cook for 3-4 minutes until softened and slightly caramelized, stirring occasionally.
- In a small bowl, combine 2 tablespoons gochujang, 1 tablespoon soy sauce, and a pinch of sugar. Stir until smooth.
- Pour the gochujang mixture over the kimchi. Stir to coat evenly. Add 3 cups cold cooked rice, breaking up clumps with your hands beforehand. Stir gently but thoroughly to blend. Cook for another 5 minutes, stirring every minute to let rice absorb flavors and develop slight crispiness. Add a splash of water or more sesame oil if rice feels dry.
- Taste and adjust seasoning with more soy sauce or sugar if needed. Stir in the green parts of the green onions and turn off heat.
- In a separate small pan, heat 1 tablespoon vegetable oil over medium heat. Crack 2 large eggs and fry until whites are crispy and golden at edges but yolks remain runny (about 2-3 minutes). Season lightly with salt.
- Divide kimchi fried rice into bowls, top each with a crispy fried egg, and sprinkle with toasted sesame seeds and remaining green onions. Serve immediately.
Notes
Use day-old or chilled rice to avoid mushiness. Do not rush caramelizing kimchi for best flavor. Adjust gochujang to control spice level. Fry eggs on medium heat for crispy edges and runny yolks. Add sesame oil off heat to preserve aroma. For vegan version, omit eggs and add tofu. Leftovers keep well for up to 2 days in fridge; reheat gently with splash of water or oil.
Nutrition
- Serving Size: 1 bowl with 1 fried
- Calories: 475
- Sugar: 4
- Sodium: 700
- Fat: 16.5
- Saturated Fat: 3.5
- Carbohydrates: 62.5
- Fiber: 3.5
- Protein: 16.5
Keywords: kimchi fried rice, gochujang, crispy fried egg, quick dinner, Korean recipe, spicy fried rice, comfort food