“You know, I never thought setting up a grilled cheese station could turn into such a hit,” my friend Jamie confessed last Saturday night as we scrambled to get everything ready for our impromptu get-together. It all started when I found a slightly cracked, vintage cheese grater at a flea market on a sunny Thursday afternoon. I wasn’t even looking for cooking gear, but that little find sparked an idea. What if I could turn the humble grilled cheese into a party centerpiece, complete with a toppings bar that lets everyone customize their own mini sandwiches? Honestly, it sounded a bit over the top at first, but by the time the first batch came out golden and bubbling, I was hooked.
Setting up a Flavorful Mini Grilled Cheese Station with Gourmet Toppings Bar turned into more than just feeding a crowd; it was a way to gather everyone around the kitchen island, sharing laughs, passing plates, and building sandwiches exactly how they liked. The sizzle of butter hitting the pan, the smell of melting cheese mingling with fresh herbs, and the colorful array of toppings made the whole experience unforgettable. Maybe you’ve been there—looking for a fun, no-fuss way to entertain friends without spending hours in the kitchen. This idea kept me on my toes and was surprisingly easy to pull off. Plus, it gave me a chance to experiment with some unusual toppings I’d never tried before.
So, if you’ve ever wondered how to make a simple classic like grilled cheese feel fresh and exciting, this mini grilled cheese station with gourmet toppings might just be your new go-to. It’s casual, it’s customizable, and it’s downright delicious—plus, it makes for a lively party vibe that’s hard to beat. Let me tell you, once you try this, you’ll find yourself reaching for that vintage cheese grater at every gathering.
Why You’ll Love This Recipe
Setting up a Flavorful Mini Grilled Cheese Station with Gourmet Toppings Bar is honestly one of the easiest ways to wow your guests while keeping things relaxed. From my multiple trial runs (including a slightly burnt batch that taught me to watch the heat closely), I can say this setup is a winner for many reasons:
- Quick & Easy: The mini sandwiches cook in just minutes, so you’re not stuck waiting around. Perfect for busy nights or last-minute parties.
- Simple Ingredients: You likely have the basics already—bread, cheese, butter—and the toppings can be as fancy or as basic as you want.
- Perfect for Parties: Whether it’s a casual weekend hangout or a birthday bash, everyone loves building their own grilled cheese creations.
- Crowd-Pleaser: Kids and adults alike go nuts for this. I’ve had picky eaters devour multiple minis without a single complaint.
- Unbelievably Delicious: The combo of melty cheese, toasted bread, and gourmet toppings creates a flavor explosion in every bite.
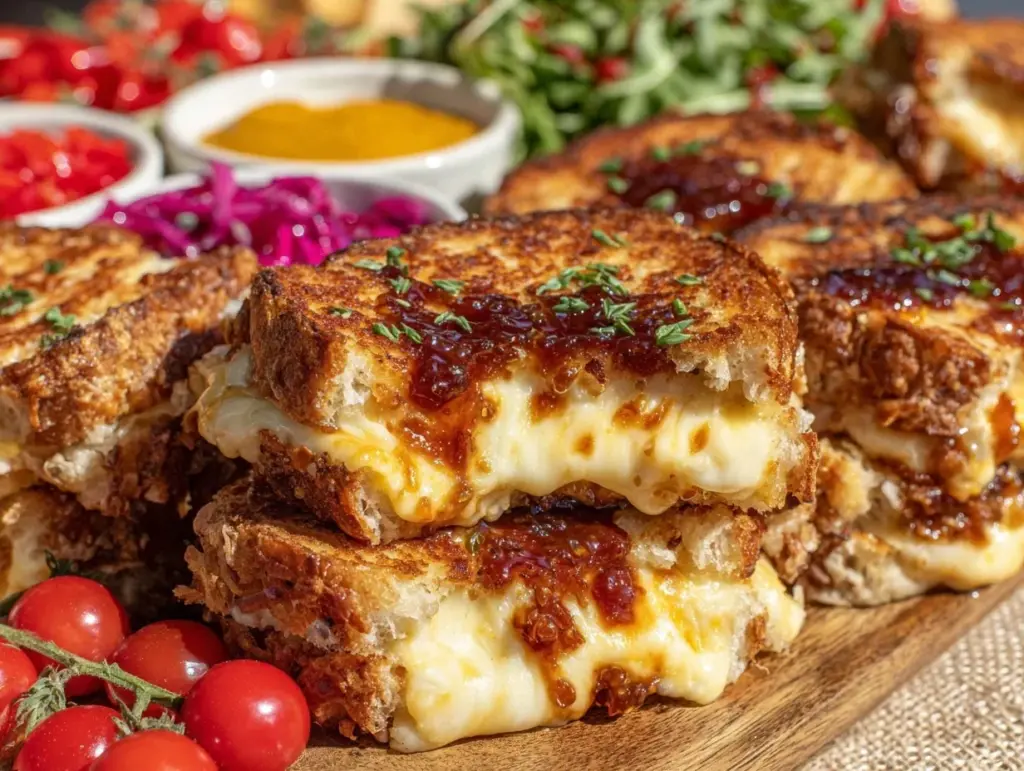
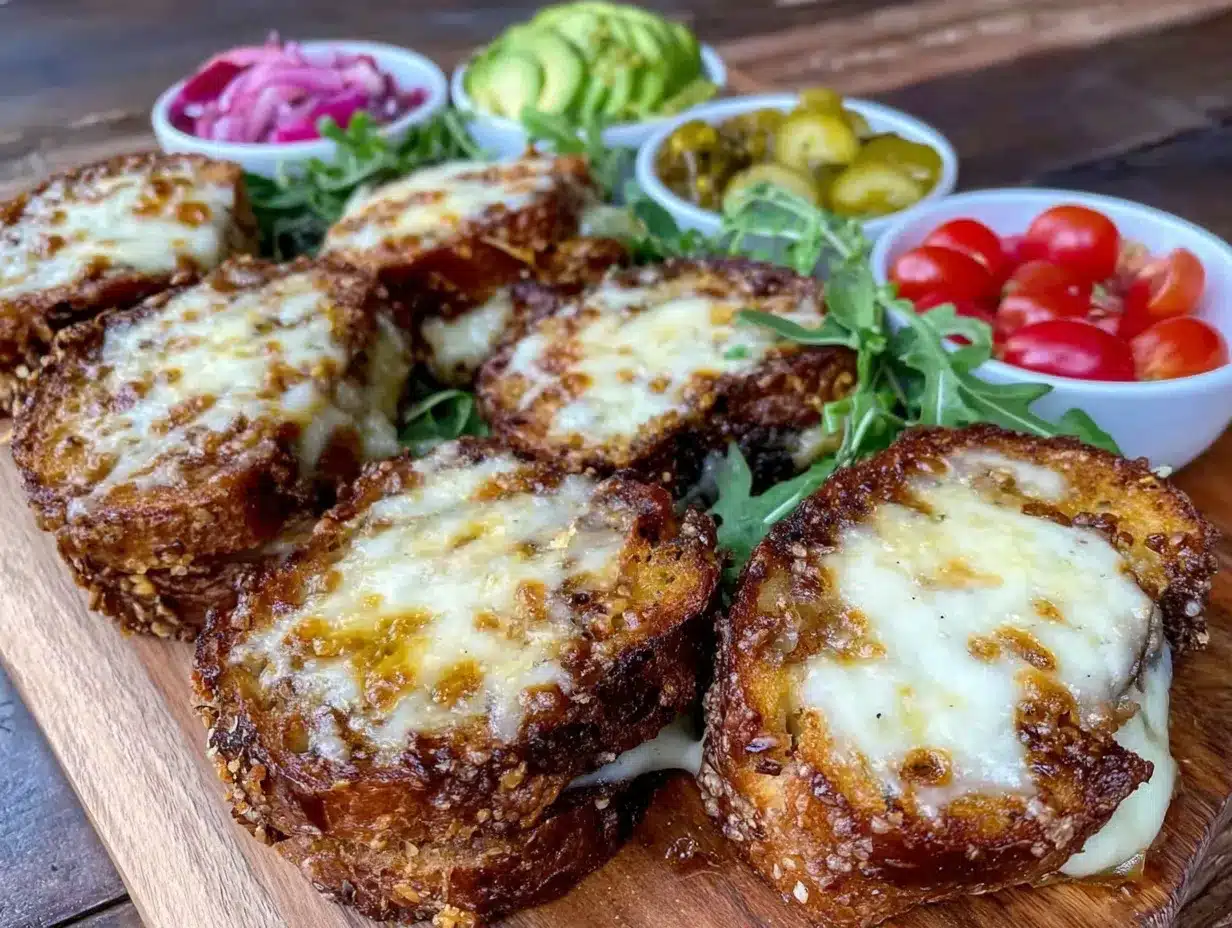
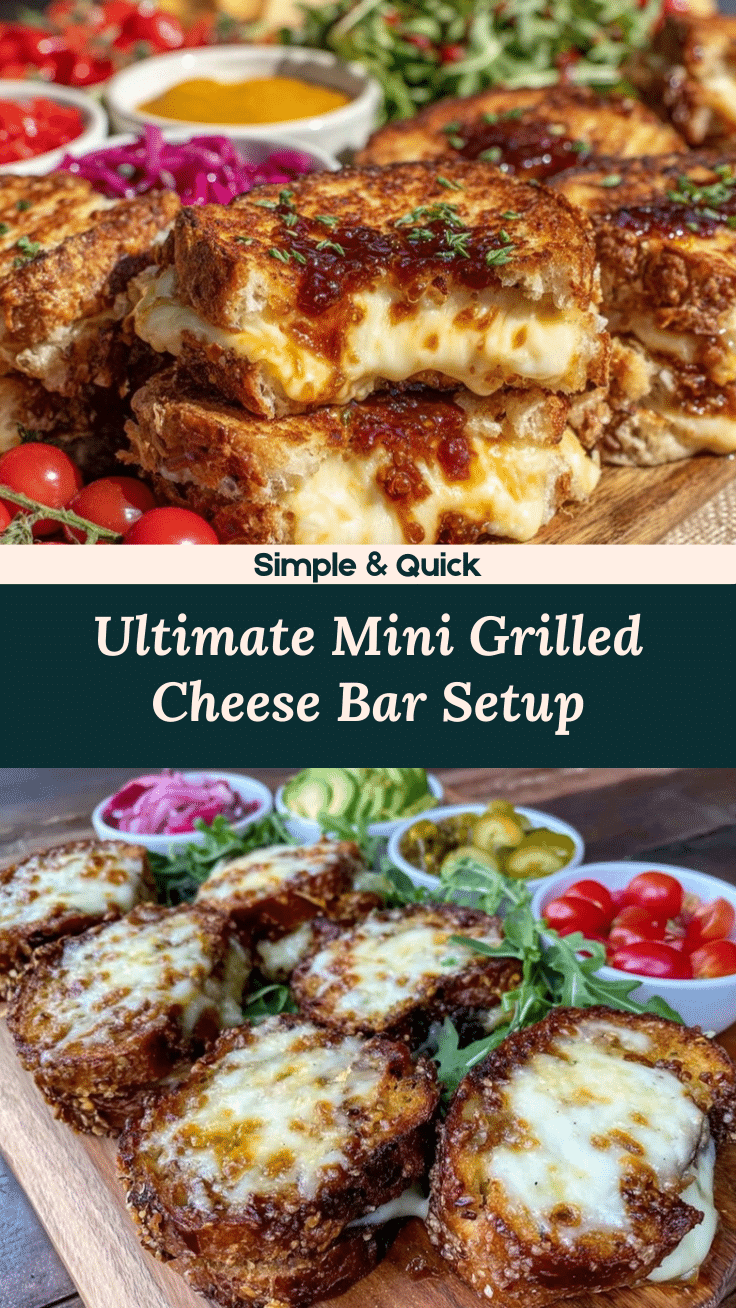
What really sets this recipe apart is the toppings bar. From tangy pickles to sweet caramelized onions, it turns grilled cheese into an interactive experience. I’ve tried everything from sharp aged cheddar with fig jam to creamy goat cheese with fresh basil, and every combo felt like a mini celebration. So if you want the comfort of grilled cheese with a twist that keeps everyone coming back for more, this is the way to go.
What Ingredients You Will Need
This recipe uses simple, wholesome ingredients to deliver bold flavor and satisfying texture without the fuss. Most are pantry staples, and the toppings can be seasonal or swapped out based on what you like or have on hand.
- For the Mini Grilled Cheese:
- White sandwich bread or sourdough, crusts trimmed (for neat mini sandwiches)
- Butter, unsalted, softened (for that perfect golden crust)
- Cheese varieties (I recommend sharp cheddar for classic flavor, Monterey Jack for meltiness, and Gruyère for a nutty touch)
- Gourmet Toppings Bar:
- Caramelized onions (adds sweetness and depth)
- Pickled jalapeños or banana peppers (for a spicy kick)
- Fresh basil or arugula leaves (adds freshness and color)
- Sun-dried tomatoes, chopped (intense flavor burst)
- Fig jam or honey (pairs beautifully with sharp cheeses)
- Crispy bacon bits or prosciutto slices (for salty crunch)
- Avocado slices or guacamole (creaminess and richness)
- Roasted red peppers (sweet and smoky)
- Olive tapenade or pesto (herby goodness)
- Pickles or cucumber slices (adds crunch and tang)
For the cheese, brands like Cabot or Tillamook have consistently delivered great melt and flavor for me. If you want a dairy-free option, vegan cheese slices melt surprisingly well nowadays—just watch your heat. Seasonal picks work too; in summer, fresh heirloom tomatoes are a nice swap for sun-dried.
Substitutions? No problem. Use gluten-free bread or almond flour bread for gluten-free guests. Swap regular butter with plant-based spread if needed. The toppings are flexible, so don’t hesitate to add your favorites.
Equipment Needed
- Non-stick skillet or griddle (a cast iron pan works wonders for even heat)
- Butter knife or silicone spatula (for spreading butter evenly)
- Small bowls or ramekins (to organize toppings neatly)
- Cutting board and sharp knife (for prepping toppings and slicing bread)
- Mini sandwich cutters (optional, but fun for uniform sizes)
- Serving platters or a tiered stand (to display toppings attractively)
If you don’t have a griddle, a large non-stick skillet is just fine—you’ll just need to work in batches. I used an inexpensive silicone spatula that survived multiple cheese meltdowns without sticking. For budget-friendly setups, keep the toppings simple and use small glass bowls from your kitchen stash. Maintenance tip: wipe your cast iron pan gently with a paper towel after use and avoid soap to keep it seasoned.
Preparation Method
- Prep Your Toppings (about 20 minutes): Chop and arrange all your toppings in small bowls. Caramelize onions ahead by slowly cooking thinly sliced onions in a little oil over low heat for about 20 minutes until golden and sweet. Set aside. Wash and dry fresh herbs and veggies thoroughly.
- Prepare the Bread and Cheese (10 minutes): Trim crusts off the bread if you want neat mini sandwiches. Slice cheese into manageable, melt-friendly pieces (about ¼ inch thick). If using multiple cheeses, layer them for complex flavor.
- Butter the Bread (5 minutes): Spread softened butter evenly on one side of each bread slice. This side will contact the pan and create that golden crust we love. Don’t skimp—more butter means better browning.
- Assemble Mini Sandwiches (10 minutes): Place cheese slices on the unbuttered side of half the bread slices. Add any toppings you want inside the sandwich (like caramelized onions or bacon). Top with remaining bread slices, butter side out.
- Cook the Mini Grilled Cheese (5-7 minutes per batch): Heat your skillet or griddle over medium heat. Place sandwiches carefully. Cook until the bottom is golden brown and cheese starts melting—about 3 to 4 minutes, then flip and cook another 3 minutes. Don’t press down hard; let the cheese melt naturally.
- Keep Warm and Serve (as you go): Transfer cooked minis to a warm plate or oven set to low (about 200°F / 95°C). Arrange the toppings bar nearby so guests can customize their sandwiches.
Quick tip: If your cheese isn’t melting fast enough, lower the heat slightly and cover the pan with a lid for a minute to trap heat. If you’re juggling many guests, cook sandwiches in batches and keep warm in the oven. The smell alone will get everyone excited!
Cooking Tips & Techniques
Getting that perfect grilled cheese texture isn’t just about cheese and bread; it’s about timing and heat management. Here are some tips I picked up after a few burnt batches and under-melted disappointments:
- Medium Heat is Key: Too high, and your bread burns before the cheese melts. Too low, and you get soggy bread. Medium heat gives a crispy crust and gooey center.
- Butter Before Toasting: Always butter the bread outside, not inside. This creates the classic golden crust and prevents sticking.
- Use Multiple Cheeses: Combining a melting cheese like mozzarella with a flavorful one like cheddar gives the best results for taste and texture.
- Don’t Overstuff: Overloading sandwiches can lead to uneven melting or falling apart. Keep toppings balanced for stability.
- Cover the Pan Briefly: If cheese is taking too long to melt, cover the pan with a lid for 30 seconds to trap heat.
- Multitasking: While the first batch cooks, prep more toppings or slice bread. This keeps the flow smooth and your guests happy.
- Cleaning Tip: Cheese can stick and burn on your pan. Clean gently after each use to maintain a non-stick surface.
Variations & Adaptations
This mini grilled cheese station is super adaptable. Here are some ways I’ve mixed it up depending on the occasion:
- Dietary: For gluten-free guests, use gluten-free bread or crisp lettuce leaves as a low-carb wrap alternative.
- Seasonal: Swap in roasted butternut squash or grilled peaches for a fall or summer vibe.
- Flavor Twists: Add a smear of spicy mustard or sriracha mayo inside the sandwich for a kick.
- Cooking Methods: Instead of pan-frying, try making these in an air fryer or sandwich press for convenience.
- Personal Favorite: I once added thin apple slices with sharp cheddar and a drizzle of honey—unexpected but absolutely delicious.
Feel free to experiment and tailor the toppings bar to your favorite flavors or dietary needs. That’s the fun of this setup—you make it yours.
Serving & Storage Suggestions
Serve these mini grilled cheese sandwiches hot off the skillet with the toppings bar laid out nearby. Guests can add fresh herbs, tangy pickles, or a dollop of fig jam right before eating. I like to arrange the sandwiches on a pretty platter with small tongs for easy grabbing.
If you have leftovers, wrap them tightly with foil or plastic wrap and store in the refrigerator for up to 2 days. To reheat, pop them in a toaster oven or skillet over low heat to bring back the crispy crust without drying out the cheese. Avoid microwaving if you can—the bread loses that lovely texture.
Flavors often develop when sandwiches sit for a bit, especially if you add toppings like pickles or jam. If you prepare the toppings ahead, let them come to room temperature before serving for the best taste.
Nutritional Information & Benefits
On average, one mini grilled cheese sandwich contains approximately:
| Calories | Fat | Carbohydrates | Protein |
|---|---|---|---|
| 150-180 kcal | 8-10g | 12-15g | 6-8g |
Key ingredients like cheese provide calcium and protein, important for bone health. Butter adds richness but can be moderated if preferred. Using whole grain or sourdough bread ups the fiber content. Many toppings, such as fresh herbs, roasted peppers, and avocado, pack in vitamins and antioxidants. For those watching carbs, swapping bread for lettuce wraps or low-carb bread works well.
Overall, this recipe balances indulgence with fresh, wholesome components. It’s a fun way to enjoy comfort food without feeling heavy, especially when you load up on nutrient-rich toppings.
Conclusion
The Flavorful Mini Grilled Cheese Station with Gourmet Toppings Bar is more than just a recipe—it’s a way to bring people together with simple, delicious food that everyone can customize. I love how it takes a familiar comfort classic and makes it fresh and interactive, perfect for parties or casual family dinners. Honestly, the first time I set it up, the kitchen buzzed with excitement and happy chatter, and that’s what keeps me coming back to this idea.
Give it a try, make it your own with your favorite toppings, and don’t be afraid to mix flavors. I’d love to hear how you customize your station—drop a comment or share your unique topping ideas. Here’s to many gooey, melty, perfectly toasted mini grilled cheese moments ahead!
FAQs
Can I prepare the toppings ahead of time?
Yes! Most toppings like caramelized onions, pickles, and chopped herbs can be prepped a day ahead and stored in the fridge. Just bring them to room temperature before serving.
What’s the best cheese for melting in mini grilled cheese sandwiches?
Cheeses like cheddar, Monterey Jack, mozzarella, and Gruyère melt beautifully. Combining a flavorful cheese with a melty one often gives the best texture and taste.
How do I keep the bread from getting soggy?
Butter the outside of the bread generously and cook on medium heat. Avoid overloading with wet toppings inside the sandwich, or add certain toppings fresh after cooking.
Can I make this recipe vegan or dairy-free?
Absolutely. Use plant-based butter and vegan cheese alternatives. For bread, check labels to ensure it’s dairy-free. The toppings bar can also be customized with vegan-friendly options.
What’s the best way to reheat leftover mini grilled cheese sandwiches?
Reheat in a toaster oven or on a skillet over low heat to restore crispiness. Avoid microwaving to prevent soggy bread.
Pin This Recipe!
Flavorful Mini Grilled Cheese Station with 10 Gourmet Toppings Ideas for Parties

A fun and customizable mini grilled cheese station perfect for parties, featuring a variety of gourmet toppings to create unique and delicious sandwiches.
- Prep Time: 35 minutes
- Cook Time: 5-7 minutes per batch
- Total Time: 40-45 minutes
- Yield: 12-16 mini sandwiches
- Category: Main Course
- Cuisine: American
Ingredients
- White sandwich bread or sourdough, crusts trimmed
- Butter, unsalted, softened
- Cheese varieties: sharp cheddar, Monterey Jack, Gruyère
- Caramelized onions
- Pickled jalapeños or banana peppers
- Fresh basil or arugula leaves
- Sun-dried tomatoes, chopped
- Fig jam or honey
- Crispy bacon bits or prosciutto slices
- Avocado slices or guacamole
- Roasted red peppers
- Olive tapenade or pesto
- Pickles or cucumber slices
Instructions
- Prep your toppings by chopping and arranging them in small bowls. Caramelize onions by cooking thinly sliced onions in a little oil over low heat for about 20 minutes until golden and sweet. Wash and dry fresh herbs and veggies thoroughly.
- Trim crusts off the bread if desired for neat mini sandwiches. Slice cheese into manageable, melt-friendly pieces about 1/4 inch thick. Layer multiple cheeses if using.
- Spread softened butter evenly on one side of each bread slice; this side will contact the pan.
- Place cheese slices on the unbuttered side of half the bread slices. Add desired toppings inside the sandwich. Top with remaining bread slices, butter side out.
- Heat a non-stick skillet or griddle over medium heat. Place sandwiches carefully and cook until the bottom is golden brown and cheese starts melting, about 3 to 4 minutes. Flip and cook another 3 minutes. Do not press down hard.
- Transfer cooked mini sandwiches to a warm plate or oven set to low (about 200°F). Arrange the toppings bar nearby for guests to customize their sandwiches.
Notes
Use medium heat to avoid burning bread before cheese melts. Butter the outside of bread generously for a golden crust. Cook sandwiches in batches and keep warm in a low oven. Cover pan briefly if cheese melts slowly. Clean pan gently after use to maintain non-stick surface. For gluten-free, use gluten-free bread or lettuce wraps. Vegan options include plant-based butter and vegan cheese.
Nutrition
- Serving Size: 1 mini grilled chees
- Calories: 150180
- Sugar: 24
- Sodium: 250350
- Fat: 810
- Saturated Fat: 45
- Carbohydrates: 1215
- Fiber: 23
- Protein: 68
Keywords: mini grilled cheese, grilled cheese station, party food, gourmet toppings, easy appetizers, customizable sandwiches