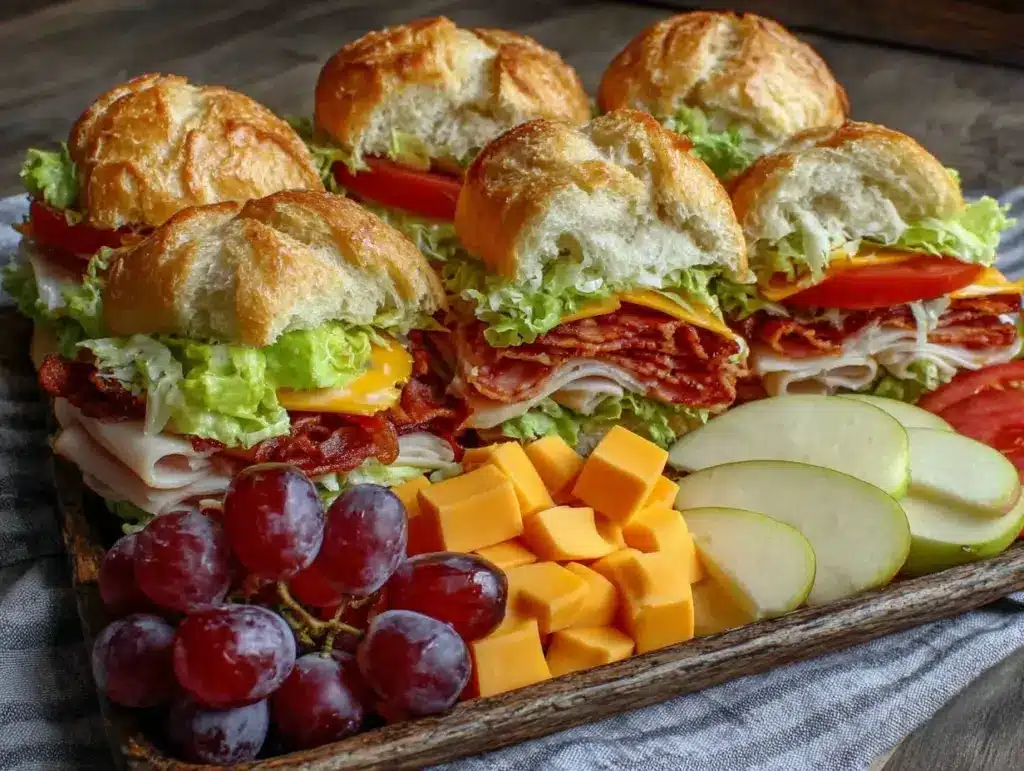
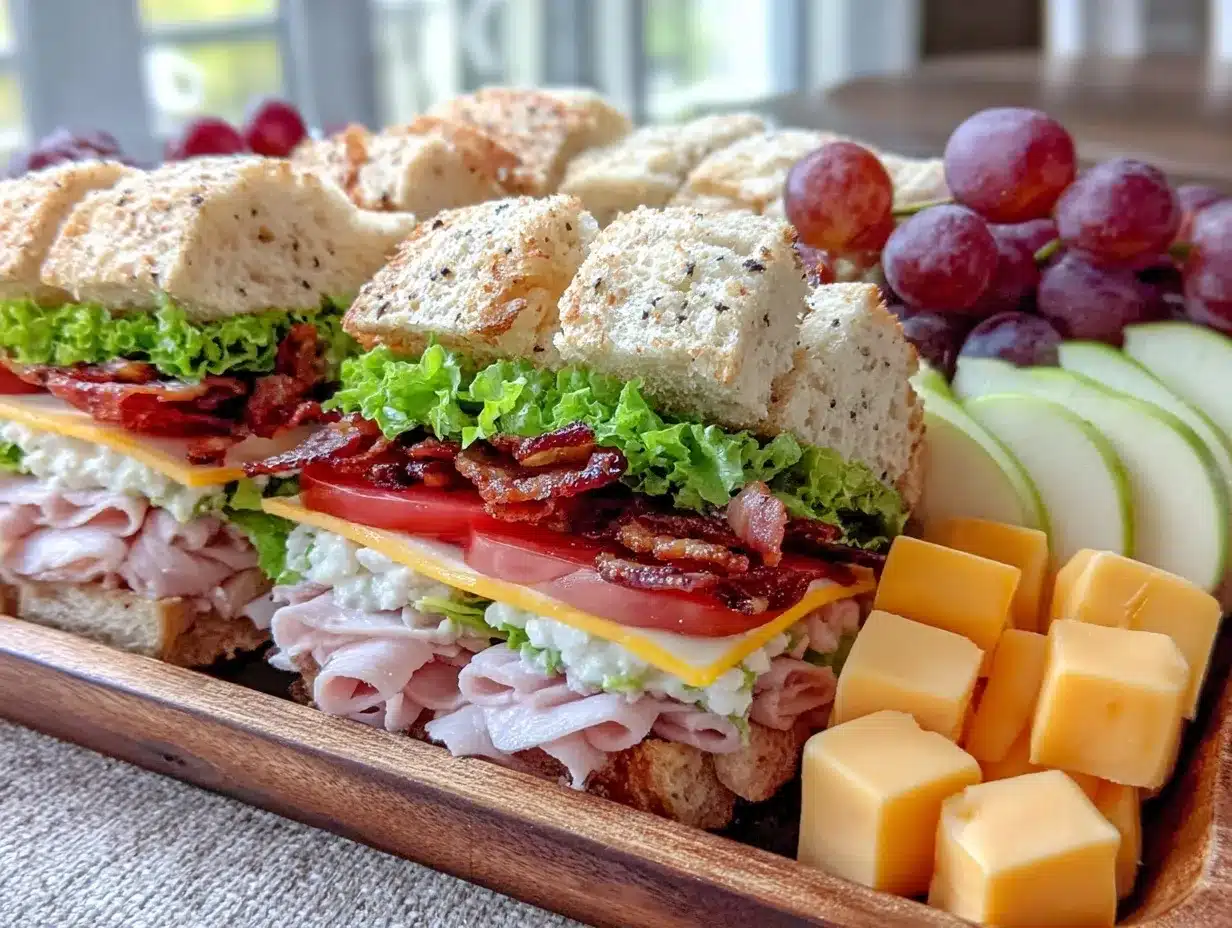
“You know that moment when you open the fridge after a long day and realize you forgot to pack your kid’s lunch? Yeah, that was me last Thursday. I was juggling a mountain of things, and all I had were random bits of leftovers and a half-eaten loaf of bread. So, I just started assembling whatever I could find, and honestly, it turned into one of the cutest, yummiest lunchbox snack charcuterie boards my kids have ever devoured. It wasn’t fancy, but there was something about those mini sandwiches nestled between colorful veggies and a handful of cheese cubes that made lunchtime feel like a party. And yes, I made a mess trying to cut those tiny sandwiches neatly—my toddler decided to “help.”
Maybe you’ve been there, staring blankly at your pantry, wondering how to make lunch exciting without hours of prep. This fresh lunchbox snack charcuterie board with mini sandwiches for kids is a total lifesaver. It’s one of those recipes that’s flexible, fun, and honestly, a little bit sneaky—because you can sneak in some healthy goodies without a hassle. Plus, it’s the kind of spread that makes kids look forward to their lunch, which (let’s face it) sometimes feels like a miracle.
What stuck with me after that chaotic day was how this simple idea keeps popping back into my weekly lunch routine. It’s such a straightforward way to offer variety and color, and the mini sandwiches? They’re the star of the show every single time. Whether it’s a quick school lunch or a snack for a busy afternoon, this charcuterie board has a place at our table.
Why You’ll Love This Recipe
This fresh lunchbox snack charcuterie board with mini sandwiches is not just cute; it’s a practical, tasty solution that makes packing lunch fun and stress-free. I’ve tested this with picky eaters and busy parents alike, and it always scores high.
- Quick & Easy: Ready in under 20 minutes, making it perfect for hectic mornings or last-minute lunch packing.
- Simple Ingredients: Uses common pantry staples and fresh produce you likely have on hand—no need to run to specialty stores.
- Perfect for School or Playdates: Healthy, portion-controlled, and easy for little hands to manage without creating a mess.
- Crowd-Pleaser: Kids love the mini sandwiches, and adults appreciate the balance of flavors and textures.
- Unbelievably Delicious: The combination of fresh veggies, creamy spreads, and soft bread is just right — not too dry, not too soggy.
What sets this lunchbox snack charcuterie board apart is the little touches—like using fun-shaped cookie cutters on the mini sandwiches or mixing in a variety of dips for extra flavor. It’s not just another sandwich; it’s a tiny, colorful adventure on a tray. Honestly, it’s the kind of lunch that makes you want to sneak a bite yourself.
What Ingredients You Will Need
This recipe uses simple, wholesome ingredients to deliver bold flavor and satisfying textures without fuss. Most are pantry or fridge staples, and substitutions are easy if you need to tweak for dietary preferences.
- For the Mini Sandwiches:
- Whole wheat sandwich bread, crusts removed (soft and kid-friendly)
- Cream cheese, softened (I recommend Philadelphia for smoothness)
- Thinly sliced deli turkey or chicken breast (look for nitrate-free options)
- Cheddar cheese slices, mild (can swap with dairy-free cheese if needed)
- Cucumber slices, thin (adds fresh crunch)
- Baby spinach leaves or lettuce
- Optional: Honey mustard or hummus spread for extra flavor
- Fresh Veggies & Fruits:
- Baby carrots (easy to grab and colorful)
- Cherry tomatoes, halved (sweet and juicy)
- Seedless grapes or apple slices (choose seasonal fruit for freshness)
- Snap peas or green beans (lightly steamed or raw for texture)
- Snack Additions:
- Cheese cubes (cheddar, mozzarella, or your kid’s favorite)
- Whole grain crackers (look for low-sodium varieties)
- Mini pretzels or rice cakes
- Olives or pickles (optional and kid-approved!)
- Dips & Extras:
- Ranch dressing or yogurt-based dip for veggies
- Small container of nut butter or sunflower seed butter (if allergy-friendly)
Feeling adventurous? In summer, swap cucumber for juicy watermelon cubes or add fresh berries for a sweet touch. And if your kiddo is dairy-free, swapping cream cheese for mashed avocado or hummus works beautifully. I once tried sunflower seed butter mini sandwiches on this board—total hit during allergy season!
Equipment Needed
- Sharp knife for slicing bread and veggies (a serrated bread knife is best)
- Cutting board (preferably separate boards for veggies and meats)
- Mini sandwich cutters or small cookie cutters (optional, but fun shapes make a difference!)
- Small containers or silicone cups for dips and spreads
- Lunchbox or compartmentalized container to keep items separated
- Small spoon or butter knife for spreading cream cheese or dips
If you don’t have mini sandwich cutters, no worries! I often just cut the sandwiches into small squares or triangles. A sharp knife and a little patience work just fine. For dips, little silicone muffin cups are my go-to—they’re reusable and easy to clean. Plus, they keep wet ingredients away from crunchy snacks, so nothing gets soggy.
Preparation Method
- Prepare the Mini Sandwiches (10 minutes): Lay out your sandwich bread slices. Spread a thin layer of cream cheese (about 1 tablespoon or 15g per slice) evenly on one side of each slice. Layer with deli turkey (2-3 thin slices per sandwich), a slice of cheddar cheese, a couple of cucumber slices, and baby spinach leaves. Top with another slice of bread.
- Cut into Mini Portions: Using a mini sandwich cutter or a sharp knife, cut each sandwich into small, bite-sized shapes—circles, stars, or simple squares. Aim for pieces about 2 inches (5 cm) wide, perfect for little hands.
- Wash and Prep Veggies and Fruits (5 minutes): Rinse all fresh produce under cold water. Halve cherry tomatoes, peel and slice apples thinly (toss with a little lemon juice to prevent browning), and trim snap peas if needed. Arrange baby carrots and grapes as-is.
- Assemble the Charcuterie Board: In your lunchbox or plate, create little sections for each food group. Place mini sandwiches grouped together, then add veggies and fruits in colorful clusters, followed by cheese cubes and crackers. Use small containers for dips and spreads, tucking them in snugly.
- Final Touches: Add any extras like olives or pickles in small portions. If you like, sprinkle a few mini pretzels or rice cakes for crunch. Close the lunchbox securely.
Pro tip: If packing ahead, keep wet ingredients like cucumber and spreads away from bread to prevent sogginess—stack sandwiches between parchment paper sheets if needed. Also, cutting sandwiches while the bread is slightly chilled helps keep them neat and less crumbly.
Cooking Tips & Techniques
Even though this recipe doesn’t require cooking, a few techniques make all the difference. First, when spreading cream cheese or any soft spread, use room temperature to avoid tearing the bread. I’ve learned the hard way that cold cream cheese chunks can ruin a sandwich’s texture.
Always remove crusts for younger kids—this simple step makes sandwiches easier to eat and more appealing. Using cookie cutters can turn a basic sandwich into a fun shape, which encourages kids to enjoy their food without fuss.
When choosing deli meats, go for the freshest, least processed options you can find. My local deli’s turkey breast tastes way better than pre-packaged slices, and you can ask them to slice it thinner or thicker depending on your kid’s preference.
Multitasking tip: While sandwiches chill in the fridge for a few minutes, prep the veggies and fruits. This keeps your workflow smooth and lunchbox packing swift.
One mistake I made early on was overloading sandwiches with too many fillings—kids often prefer simpler flavors. Stick to 2-3 ingredients per sandwich for the best results.
Variations & Adaptations
- Gluten-Free Version: Use gluten-free sandwich bread or wraps. Rice paper rolls filled with similar ingredients can be a fun twist.
- Vegetarian Option: Swap deli meat with hummus, avocado slices, or thinly sliced roasted veggies like bell peppers and zucchini.
- Seasonal Flavors: In fall, add apple slices with a smear of cinnamon-spiced cream cheese. Summer calls for fresh berries and cucumber ribbons.
- Different Cooking Methods: Try warming the mini sandwiches on a panini press to melt the cheese slightly—my kids love the warm, melty version on chilly days.
- Allergy-Friendly Adaptation: Substitute cream cheese with coconut yogurt or mashed banana if dairy is an issue. Use seed butter instead of nut butter for nut allergies.
Personally, I once swapped the turkey for smoked salmon and added dill cream cheese—fancy, right? My kids totally surprised me by loving it, so don’t be afraid to experiment!
Serving & Storage Suggestions
This lunchbox snack charcuterie board is best served fresh at room temperature. If you prepare it the night before, keep the sandwiches wrapped in parchment and store the whole lunchbox in the fridge. Take care to keep dips sealed tightly to prevent spills.
Pair this with a small bottle of water or a natural fruit juice box. For an afternoon snack, add a little homemade smoothie or a yogurt cup to round out the meal.
Leftover mini sandwiches can be wrapped tightly and frozen for up to a month—just thaw in the fridge overnight. Veggies are best fresh but snap peas and carrots can last a couple of days stored in airtight containers.
Reheating is optional—if you warm the sandwiches, skip the cold veggies or pack them separately. Over time, flavors meld nicely, especially when dips are involved, making leftovers surprisingly tasty the next day.
Nutritional Information & Benefits
Each fresh lunchbox snack charcuterie board offers a balanced mix of protein, fiber, vitamins, and healthy fats. The mini sandwiches provide lean protein and calcium, while the fresh veggies and fruits contribute essential vitamins and antioxidants.
This recipe is naturally low in added sugars and can be adapted to gluten-free, dairy-free, or vegetarian diets. The inclusion of fresh produce supports digestion and immunity, and the portioned snacks help prevent overeating.
Personally, I appreciate how this lunch feels wholesome without being overwhelming—it fits into busy family life and supports my kids’ energetic days.
Conclusion
This fresh lunchbox snack charcuterie board with mini sandwiches for kids is a simple, colorful way to make lunchtime exciting and nourishing. It’s flexible enough to suit your family’s tastes and easy enough to throw together, even on the busiest mornings. I love how it turns a regular lunch into a delightful experience, and I hope it brings the same joy and ease to your kitchen.
Feel free to swap ingredients based on what your kids love or what you have around. And please, share your own twists or favorite combos in the comments—I’d love to hear how you make this recipe your own. Here’s to stress-free, tasty lunches that kids actually look forward to!
Frequently Asked Questions
Can I prepare this lunchbox snack charcuterie board the night before?
Yes! Just keep the sandwiches wrapped in parchment paper and store everything in the fridge. Add fresh dips and crunchy veggies just before serving to keep them crisp.
What if my child doesn’t like cream cheese?
No problem! You can substitute cream cheese with hummus, mashed avocado, or a light spread of nut or seed butter depending on preferences and allergies.
How do I keep the mini sandwiches from getting soggy?
Spread the cream cheese or other spreads thinly and layer veggies like cucumber between cheese or meat to create a moisture barrier. Wrapping sandwiches in parchment helps too.
Are there good alternatives to deli meats for vegetarians?
Absolutely! Use roasted veggies, slices of cheese, hummus, or mashed beans for protein-packed, vegetarian-friendly sandwiches.
What’s the best way to pack dips and sauces for a lunchbox?
Small silicone cups or plastic containers with tight lids work great. Just make sure they’re sealed well to avoid leaks and keep dips separate from dry snacks.
Pin This Recipe!

Fresh Lunchbox Snack Charcuterie Board Easy Mini Sandwich Ideas for Kids

A quick and easy lunchbox snack charcuterie board featuring mini sandwiches, fresh veggies, fruits, cheese, and snacks, perfect for kids and busy parents.
- Prep Time: 15 minutes
- Cook Time: 0 minutes
- Total Time: 15 minutes
- Yield: 4 servings
- Category: Snack
- Cuisine: American
Ingredients
- Whole wheat sandwich bread, crusts removed
- Cream cheese, softened (about 1 tablespoon or 15g per slice)
- Thinly sliced deli turkey or chicken breast (nitrate-free if possible)
- Cheddar cheese slices, mild
- Cucumber slices, thin
- Baby spinach leaves or lettuce
- Optional: Honey mustard or hummus spread
- Baby carrots
- Cherry tomatoes, halved
- Seedless grapes or apple slices
- Snap peas or green beans (lightly steamed or raw)
- Cheese cubes (cheddar, mozzarella, or preferred)
- Whole grain crackers (low-sodium)
- Mini pretzels or rice cakes
- Olives or pickles (optional)
- Ranch dressing or yogurt-based dip
- Small container of nut butter or sunflower seed butter (if allergy-friendly)
Instructions
- Prepare the Mini Sandwiches (10 minutes): Lay out sandwich bread slices. Spread a thin layer of cream cheese evenly on one side of each slice. Layer with deli turkey (2-3 thin slices per sandwich), a slice of cheddar cheese, a couple of cucumber slices, and baby spinach leaves. Top with another slice of bread.
- Cut into Mini Portions: Using a mini sandwich cutter or a sharp knife, cut each sandwich into small, bite-sized shapes about 2 inches wide.
- Wash and Prep Veggies and Fruits (5 minutes): Rinse all fresh produce under cold water. Halve cherry tomatoes, peel and thinly slice apples (toss with lemon juice to prevent browning), and trim snap peas if needed. Arrange baby carrots and grapes as-is.
- Assemble the Charcuterie Board: In a lunchbox or plate, create sections for each food group. Place mini sandwiches grouped together, then add veggies and fruits in colorful clusters, followed by cheese cubes and crackers. Use small containers for dips and spreads.
- Final Touches: Add extras like olives or pickles in small portions. Sprinkle mini pretzels or rice cakes for crunch. Close the lunchbox securely.
Notes
Keep wet ingredients like cucumber and spreads away from bread to prevent sogginess by stacking sandwiches between parchment paper sheets. Use room temperature cream cheese for easier spreading. Remove crusts for younger kids. Use cookie cutters for fun shapes. Prepare the night before by wrapping sandwiches in parchment and refrigerating. Warm mini sandwiches on a panini press for a melty version. Substitute ingredients for dietary needs.
Nutrition
- Serving Size: One assembled lunchb
- Calories: 350
- Sugar: 6
- Sodium: 450
- Fat: 15
- Saturated Fat: 6
- Carbohydrates: 35
- Fiber: 5
- Protein: 18
Keywords: lunchbox, snack, charcuterie board, mini sandwiches, kids lunch, easy lunch, healthy snacks, quick lunch, school lunch, kid-friendly