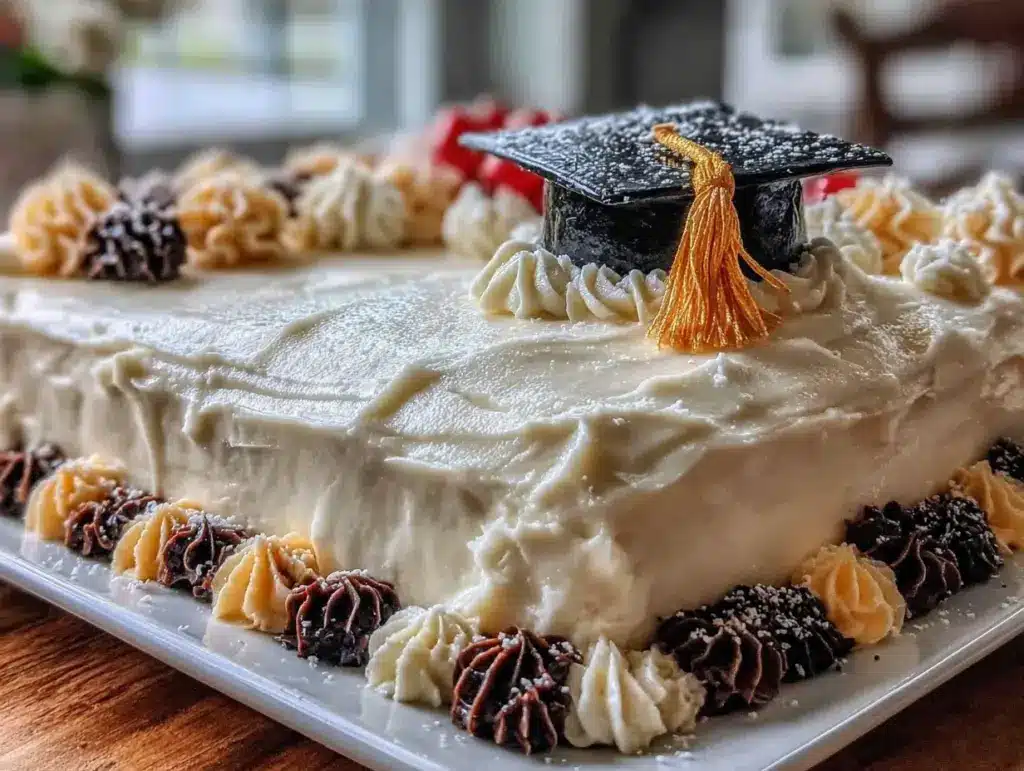
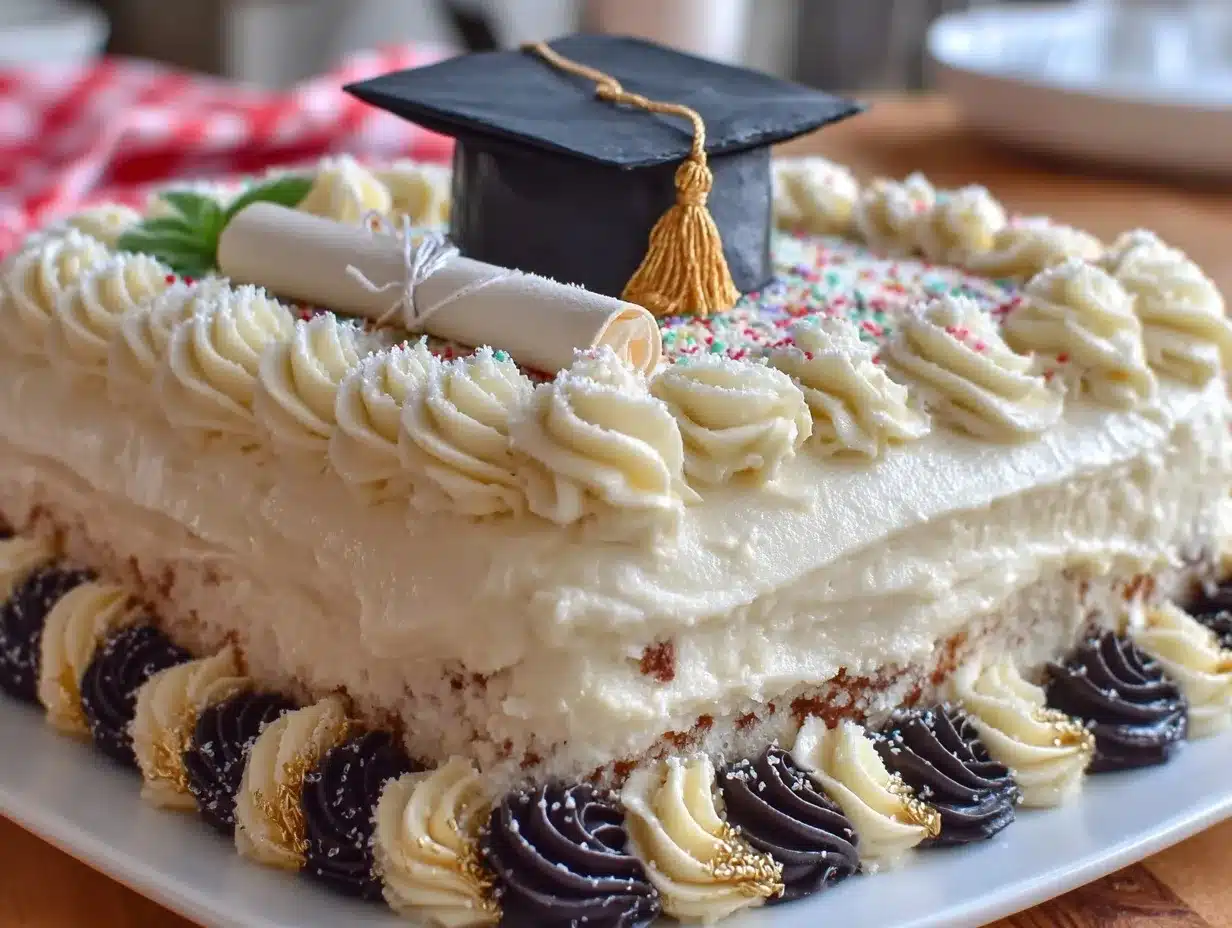
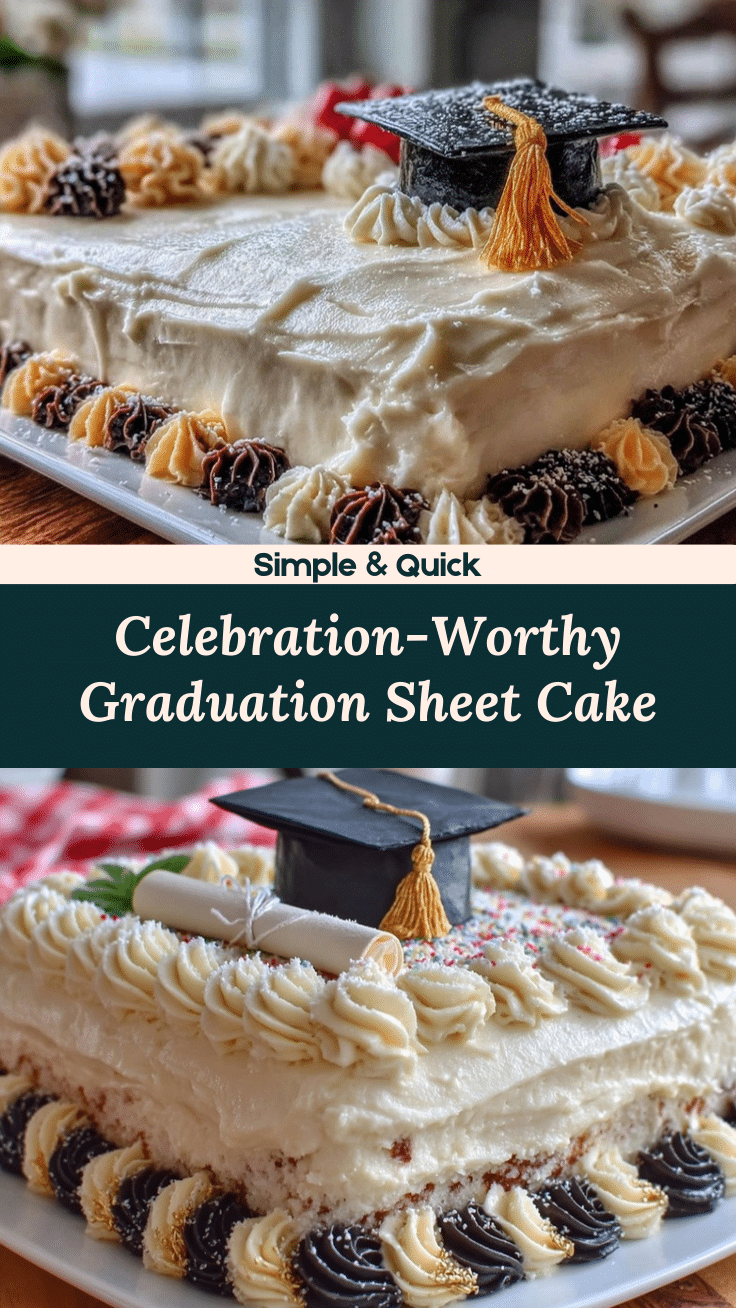
“You won’t believe how this cake came to be,” my neighbor chuckled as she handed me a slice of a massive, beautifully decorated sheet cake. It was late April, and I’d stopped by unannounced with my toddler in tow, hoping to borrow some sugar. Instead, I found myself caught up in the excitement of her son’s high school graduation party. The cake was impressive—not just any sheet cake but one sporting an elaborate cap and diploma design that had everyone talking.
Honestly, I hadn’t planned on baking a graduation cake this year. But after tasting that slice, I knew I had to try making my own version. I’m not going to lie; my first attempt was a bit of a mess—smudged frosting, lopsided decorations, and a dash of panic because I forgot the piping tips. Yet, after a couple of tries, I figured out how to create the perfect high school graduation sheet cake with a cap and diploma design that’s both fun and surprisingly easy to make at home.
Maybe you’ve been there—wanting to celebrate a milestone with a homemade cake but feeling overwhelmed by the decorating part. Let me tell you, this recipe isn’t just about cake; it’s about capturing that proud, joyful moment with a dessert that looks like it belongs in a party spread. It’s the kind of cake that gets kids buzzing and parents snapping pictures before anyone digs in.
Why You’ll Love This Recipe
After testing several frosting consistencies and cake textures, I can confidently say this recipe hits all the right notes. Here’s why you’ll want to keep this one in your celebration arsenal:
- Quick & Easy: Ready in under 2 hours from start to finish, perfect for last-minute party plans or sudden inspiration.
- Simple Ingredients: Uses pantry staples; no need for obscure baking supplies or fancy tools.
- Perfect for Graduation Parties: The cap and diploma design make it a standout centerpiece for high school celebrations.
- Crowd-Pleaser: Moist, tender cake with a balanced sweetness that appeals to both kids and adults.
- Unbelievably Delicious: The combo of rich vanilla cake and smooth buttercream frosting brings that nostalgic comfort every grad deserves.
What really sets this apart from other sheet cakes is the frosting technique I’ve refined—it’s easy to pipe a crisp, clean cap shape and diploma scroll that looks professionally done without hours of practice. Plus, you can customize colors to match school themes or personal favorites.
This cake isn’t just dessert; it’s a memory maker. It’s the kind of treat that’ll have your guests asking for the recipe (and maybe a little impressed that you made it yourself!).
What Ingredients You Will Need
This high school graduation sheet cake recipe uses simple, wholesome ingredients to deliver bold flavor and a satisfying texture without the fuss. Most are probably already in your kitchen, which makes this even better for last-minute celebrations.
- For the Cake:
- 2 ½ cups (310g) all-purpose flour, sifted (I prefer King Arthur for consistent results)
- 2 ½ tsp baking powder
- ½ tsp salt
- 1 cup (230g) unsalted butter, softened (use good-quality butter like Plugrá for richness)
- 1 ¾ cups (350g) granulated sugar
- 4 large eggs, room temperature
- 1 tbsp pure vanilla extract
- 1 cup (240ml) whole milk, room temperature (can swap with almond milk for dairy-free version)
- For the Buttercream Frosting:
- 1 cup (230g) unsalted butter, softened
- 4 cups (480g) powdered sugar, sifted
- 2-3 tbsp heavy cream or milk (add more for desired consistency)
- 1 tsp vanilla extract
- Pinch of salt
- For Decoration:
- Black gel food coloring (for cap)
- White gel food coloring (for diploma)
- Gold or silver edible glitter or gel (optional, for diploma accents)
- Piping bags and round and star tips
Pro tip: Look for firm, small-curd cottage cheese if you’re adapting this recipe for a creamier cake base—it won’t affect the decoration but adds moistness. In summer, fresh edible flowers can add a pretty touch around the edges for a fresh twist.
Equipment Needed
- 9×13-inch (23×33 cm) sheet pan – a sturdy metal pan gives even baking; I’ve tried glass but the metal works better for this recipe
- Electric mixer (stand or hand-held) for smooth batter and frosting
- Mixing bowls (medium and large)
- Rubber spatula for folding and scraping
- Piping bags and a set of piping tips – round tips (#3 or #5) and star tips (#16 or #21) for decoration details
- Offset spatula or butter knife for frosting smoothing
- Cooling rack to let the cake rest before decorating
If you don’t have piping bags, zip-top bags with a corner snipped off work just fine. For the piping tips, inexpensive plastic sets from the grocery store can do the trick if you’re just starting out. After a few uses, cleaning is easier if you soak them in warm soapy water right away.
Preparation Method
- Preheat and Prepare: Preheat your oven to 350°F (175°C). Grease the 9×13-inch sheet pan and line it with parchment paper, leaving an overhang for easy cake removal. This usually takes about 10 minutes.
- Mix Dry Ingredients: In a medium bowl, whisk together the sifted flour, baking powder, and salt. Set aside.
- Cream Butter and Sugar: In a large mixing bowl, beat the softened butter and granulated sugar on medium speed until light and fluffy—about 3-4 minutes. This step is key for a tender crumb.
- Add Eggs: Add eggs one at a time, beating well after each addition. Stir in the vanilla extract. The batter should be smooth and slightly glossy.
- Alternate Adding Dry Ingredients and Milk: With the mixer on low, add the dry ingredients in three parts alternating with milk in two parts, starting and ending with the flour mixture. Mix until just combined to avoid overworking the batter.
- Pour and Smooth: Pour the batter into the prepared pan and smooth the top with a spatula. Tap the pan gently on the counter to release any air bubbles. Bake for 35-40 minutes or until a toothpick inserted in the center comes out clean.
- Cool Completely: Let the cake cool in the pan for 15 minutes, then transfer to a wire rack to cool completely before frosting. You don’t want warm cake to melt the frosting.
- Prepare the Buttercream: Beat softened butter on medium speed until creamy. Gradually add powdered sugar, one cup at a time, mixing well between additions. Add vanilla, salt, and cream and beat until smooth and fluffy. Add more cream if frosting is too thick.
- Color the Frosting: Divide frosting into three parts: color one large portion black for the cap, one small portion white for the diploma, and leave some plain for the base frosting. Use gel food coloring for vibrant shades without changing consistency.
- Frost the Cake Base: Spread a thin crumb coat of plain frosting over the cake. Refrigerate for 20 minutes, then apply a final smooth layer. This creates a clean canvas for decorations.
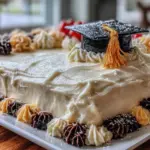
- Pipe the Cap and Diploma: For the cap, pipe a square shape with the black frosting near one corner. Use a round tip to add a cap button and a star tip for the tassel. For the diploma, pipe a rolled scroll shape with the white frosting and add details with the gold edible gel. Take your time here—practice on parchment paper if needed.
- Final Touches: Add any extra details like the graduate’s name or year using contrasting frosting colors. Chill the cake for another 15 minutes to set the decorations.
Cooking Tips & Techniques
Here are some nuggets I picked up while perfecting this graduation sheet cake:
- Don’t skip sifting the flour. It makes a noticeable difference in cake texture, keeping it light and airy.
- Room temperature ingredients matter. Cold eggs or milk can cause the batter to curdle, which isn’t the end of the world but can affect how the cake rises.
- Use gel food coloring. Liquid colors can thin your frosting and make it runny.
- Practice piping shapes on parchment. It saves you from frosting mishaps on the actual cake.
- Don’t overmix the batter. Stop as soon as ingredients combine to avoid a tough cake.
- Chill the cake between frosting layers. It helps create sharp edges and cleaner decoration lines.
- When piping the tassel, use a small star tip and quick flicking motions. It creates a fun texture that looks fancy but is easy to do.
Honestly, my first attempt looked like a toddler’s art project, but each try got better. You’ll find your rhythm, especially if you have a steady hand or a little patience.
Variations & Adaptations
Feeling adventurous or catering to different tastes? Here are some ways to make this cake your own:
- Flavor Variations: Swap vanilla extract for almond or lemon zest to give the cake a unique twist.
- Dairy-Free Option: Use coconut milk and dairy-free margarine in place of butter and milk; the frosting can be made with vegan shortening and powdered sugar.
- Chocolate Version: Replace ½ cup of flour with cocoa powder for a rich chocolate cake base that pairs beautifully with vanilla buttercream.
- Gluten-Free: Substitute all-purpose flour with a gluten-free blend like Bob’s Red Mill 1-to-1 Baking Flour. Add a teaspoon of xanthan gum if your blend doesn’t contain it.
- Alternative Decorations: Instead of piped caps and diplomas, use edible printed images or fondant cutouts for a different look.
Personally, I once tried a strawberry filling between cake layers and iced it with cream cheese frosting for a spring graduation party. It was a hit, though a little messier to frost!
Serving & Storage Suggestions
This cake tastes best at room temperature, so take it out of the fridge about 30 minutes before serving. The creamy buttercream softens up and the flavors open up nicely. It pairs wonderfully with a fresh fruit salad or a crisp lemonade to balance the sweetness.
Store leftovers in an airtight container in the refrigerator for up to 4 days. If you want to keep it longer, wrap the cake tightly in plastic wrap and aluminum foil, then freeze for up to 2 months. When ready to serve, thaw overnight in the fridge and bring to room temperature before slicing.
Reheating frosting-covered cakes isn’t recommended, but if you want to refresh the cake slightly, warm slices in the microwave for 10-15 seconds. Flavors tend to deepen after a day or two, so sometimes it’s worth waiting to dig in!
Nutritional Information & Benefits
One generous slice (about 1/12th of the cake) has roughly:
| Calories | 350-400 kcal |
|---|---|
| Fat | 18g |
| Carbohydrates | 50g |
| Protein | 4g |
| Sugar | 35g |
While this cake is a treat, it also provides some nutritional benefits thanks to wholesome butter and eggs supplying vitamin A and protein. Using real vanilla extract and quality butter adds flavor depth without artificial ingredients.
For those mindful of allergens, the recipe contains gluten, dairy, and eggs. The variations section offers alternatives for gluten-free and dairy-free needs.
From a wellness perspective, I love that this cake brings people together to celebrate milestones, which is just as important as what’s on the plate.
Conclusion
This high school graduation sheet cake with cap and diploma design is more than just a dessert—it’s a celebration you can create with your own hands. The recipe is straightforward, and the decorating steps are approachable even if you’re not a pro baker. I love how it brings smiles and a little sparkle to the party table.
Feel free to tweak the flavors or colors to make it truly yours. Maybe add the graduate’s name or school colors to personalize it even more. Honestly, once you get the hang of it, you’ll want to make this cake for every graduation in your life.
If you try this recipe, drop a comment below sharing your experience or any fun twists you tried. And hey, don’t forget to share it with someone who’s gearing up for their big day—it might just become their new favorite tradition!
Here’s to sweet celebrations and proud moments!
FAQs
Can I make this graduation sheet cake a day ahead?
Yes! Bake and frost the cake a day before your event. Keep it covered at room temperature or refrigerated and bring it to room temp before serving.
What if I don’t have piping bags or tips?
No worries! Use a zip-top plastic bag and snip a small corner for piping. You can also spread shapes freehand with a butter knife for a rustic look.
How do I prevent the frosting from melting in warm weather?
Use a frosting recipe with less butter and more powdered sugar, and refrigerate the cake until serving time. Avoid direct sunlight or hot rooms.
Can I freeze the cake after decorating?
Freezing decorated buttercream cakes is tricky but possible if tightly wrapped. Thaw slowly in the fridge to avoid condensation on frosting.
What are the best colors for the cap and diploma design?
Classic black for the cap and white for the diploma look great, but you can customize colors to match school themes or favorite shades for a personal touch.
Pin This Recipe!
Perfect High School Graduation Sheet Cake Recipe Easy Cap and Diploma Design Tutorial
A moist and tender vanilla sheet cake decorated with a fun and easy-to-pipe cap and diploma design, perfect for high school graduation celebrations.
- Prep Time: 20 minutes
- Cook Time: 40 minutes
- Total Time: 1 hour
- Yield: 12 servings 1x
- Category: Dessert
- Cuisine: American
Ingredients
- 2 ½ cups (310g) all-purpose flour, sifted
- 2 ½ tsp baking powder
- ½ tsp salt
- 1 cup (230g) unsalted butter, softened
- 1 ¾ cups (350g) granulated sugar
- 4 large eggs, room temperature
- 1 tbsp pure vanilla extract
- 1 cup (240ml) whole milk, room temperature
- 1 cup (230g) unsalted butter, softened (for frosting)
- 4 cups (480g) powdered sugar, sifted
- 2–3 tbsp heavy cream or milk
- 1 tsp vanilla extract (for frosting)
- Pinch of salt (for frosting)
- Black gel food coloring (for cap)
- White gel food coloring (for diploma)
- Gold or silver edible glitter or gel (optional, for diploma accents)
- Piping bags and round and star tips
Instructions
- Preheat oven to 350°F (175°C). Grease a 9×13-inch sheet pan and line with parchment paper, leaving an overhang.
- In a medium bowl, whisk together sifted flour, baking powder, and salt. Set aside.
- In a large bowl, beat softened butter and granulated sugar on medium speed until light and fluffy, about 3-4 minutes.
- Add eggs one at a time, beating well after each addition. Stir in vanilla extract.
- With mixer on low, add dry ingredients in three parts alternating with milk in two parts, starting and ending with flour mixture. Mix until just combined.
- Pour batter into prepared pan and smooth top with spatula. Tap pan gently to release air bubbles.
- Bake for 35-40 minutes or until a toothpick inserted in center comes out clean.
- Let cake cool in pan for 15 minutes, then transfer to wire rack to cool completely.
- For frosting, beat softened butter on medium speed until creamy. Gradually add powdered sugar, one cup at a time, mixing well between additions.
- Add vanilla, salt, and cream; beat until smooth and fluffy. Add more cream if frosting is too thick.
- Divide frosting into three parts: color one large portion black, one small portion white, and leave some plain.
- Spread a thin crumb coat of plain frosting over cake. Refrigerate 20 minutes, then apply a final smooth layer.
- Pipe the cap near one corner with black frosting using a square shape, add a cap button with round tip, and tassel with star tip.
- Pipe a rolled scroll diploma shape with white frosting and add gold edible gel details if desired.
- Add extra details like graduate’s name or year with contrasting frosting colors.
- Chill cake for another 15 minutes to set decorations before serving.
Notes
Use gel food coloring to avoid thinning frosting. Chill cake between frosting layers for sharp edges. Practice piping on parchment paper before decorating cake. Room temperature ingredients ensure better texture. Variations include dairy-free, gluten-free, chocolate, and alternative decorations.
Nutrition
- Serving Size: One slice (1/12th of
- Calories: 375
- Sugar: 35
- Fat: 18
- Carbohydrates: 50
- Protein: 4
Keywords: graduation cake, sheet cake, vanilla cake, buttercream frosting, cap and diploma cake, easy cake decoration, party cake