Introduction
Imagine the rich scent of vanilla and butter filling your kitchen as you pull a tray of golden mini cakes from the oven. The soft, pillowy texture, the delicate sweetness, and the endless possibilities for decoration—it’s the kind of baking magic that makes you stop and smile. These perfect mini cakes are not just desserts; they’re little bundles of joy that turn any celebration into something memorable.
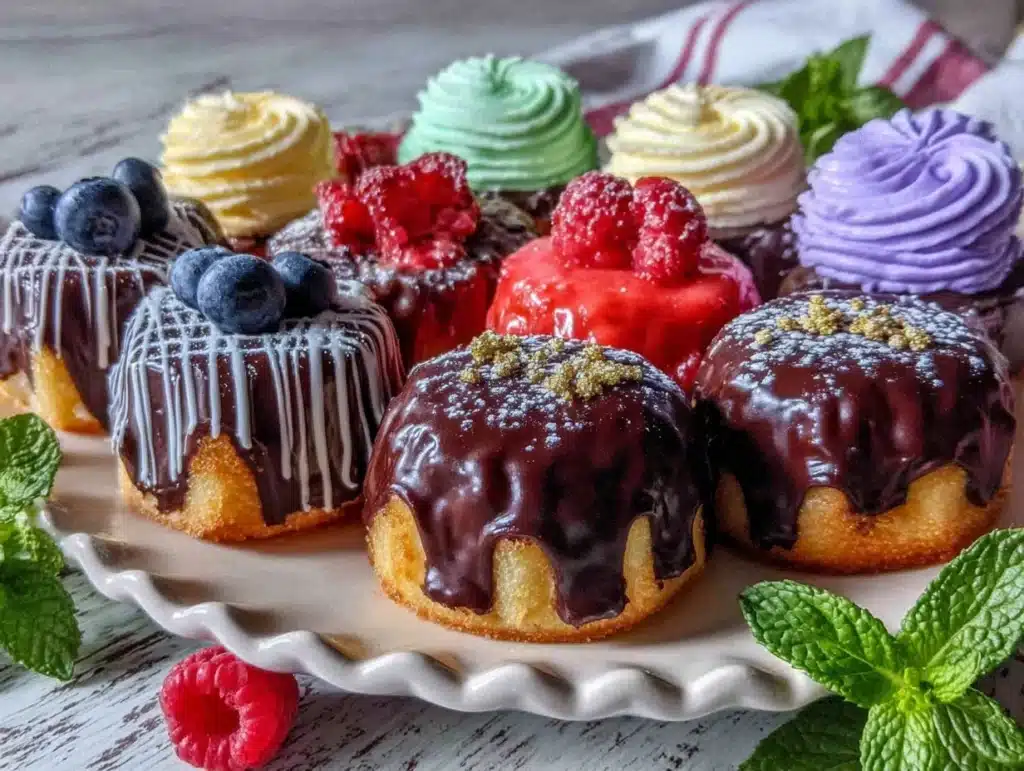
The first time I made these mini cakes was for my niece’s birthday party. I wanted something that was fun, bite-sized, and easy to decorate for little hands. When I presented a tray of these cuties, topped with colorful swirls of frosting and sprinkles, the kids’ eyes lit up. Even the adults couldn’t resist sneaking one (or maybe two). That’s when I knew I had stumbled upon a winner.
Now, these mini cakes have become a staple for birthdays, anniversaries, and even casual get-togethers. They’re ridiculously simple to make and can be dressed up or down depending on the occasion. Whether you’re hosting a fancy dinner party or just want to surprise your little ones with an after-school treat, this recipe will have you covered. Trust me—once you try them, you’ll keep coming back, because they truly feel like a hug in dessert form!
Why You’ll Love This Recipe
- Perfect for Any Celebration: Birthdays, anniversaries, baby showers, or even a casual Sunday brunch—these mini cakes are the ultimate crowd-pleaser.
- Easy to Make: You don’t need to be a pastry chef to whip these up. Just follow the simple steps, and you’ll have bakery-quality cakes in no time.
- Customizable: These mini cakes are like a blank canvas—add your favorite flavors, decorations, or even fillings to make them uniquely yours.
- Kid-Friendly: Perfect for little hands and big appetites, these mini cakes are fun to eat and even more fun to decorate.
- Made with Simple Ingredients: No fancy flours or hard-to-find items—everything can be found in your pantry or at your local grocery store.
What sets this recipe apart is its versatility. You can swap in gluten-free flour, experiment with flavors like lemon or almond, or even add a surprise filling like jam or chocolate ganache. They’re moist, tender, and just sweet enough to satisfy your dessert cravings without being overwhelming. Plus, they’re the kind of treat that makes people say, “Wow, you made these yourself?”
Whether you’re a seasoned baker or a newbie in the kitchen, this recipe is your ticket to creating something magical. Get ready to impress everyone at your next celebration!
What Ingredients You Will Need
This recipe uses simple, wholesome ingredients to create delicious mini cakes that are perfect for any occasion. Most of these items are pantry staples, and you can easily adapt them to suit your taste or dietary needs.
- All-purpose flour (or substitute with gluten-free flour for a gluten-free option)
- Granulated sugar
- Baking powder (helps the cakes rise perfectly)
- Salt (balances the sweetness)
- Unsalted butter, softened (for richness and moisture)
- Large eggs, room temperature (adds structure and richness)
- Whole milk, room temperature (or use almond milk for a dairy-free option)
- Pure vanilla extract (for that classic flavor)
- Powdered sugar (for the frosting)
- Heavy cream (makes the frosting fluffy and smooth)
- Food coloring (optional, for vibrant decorations)
- Sprinkles or other toppings (let your creativity shine!)
Feel free to experiment with flavors like almond extract, lemon zest, or even cocoa powder for chocolate mini cakes. If you have dietary restrictions, this recipe is easy to adapt with substitutions like plant-based milk or a sugar alternative.
Equipment Needed
To make these mini cakes, you don’t need an arsenal of fancy kitchen gadgets. Here’s what you’ll need:
- Mini cake pans or a muffin tin (if you don’t have mini cake pans, silicone molds work wonderfully).
- Mixing bowls: Preferably two—one for dry ingredients and one for wet ingredients.
- Electric mixer: For that perfectly smooth batter and fluffy frosting.
- Spatula: Great for folding ingredients or scraping every last bit of batter.
- Measuring cups and spoons: Accuracy is key when baking.
- Piping bags and tips: Optional, but they’ll help make your decorations look professional.
Pro tip: If you don’t have mini cake pans, a muffin tin is a lifesaver. Just line it with cupcake liners for easy removal and cleanup.
Preparation Method
- Preheat your oven to 350°F (175°C). Lightly grease your mini cake pans or line a muffin tin with cupcake liners.
- In a large bowl, whisk together 1 ¾ cups (220g) all-purpose flour, 1 cup (200g) granulated sugar, 2 teaspoons baking powder, and ½ teaspoon salt.
- In another bowl, beat ½ cup (115g) unsalted butter until creamy. Add 2 large eggs and beat until fully incorporated. Mix in 2 teaspoons pure vanilla extract.
- Gradually add the dry ingredients to the wet ingredients, alternating with ¾ cup (180ml) whole milk. Start and finish with the dry ingredients for best results.
- Mix until the batter is smooth, but be careful not to overmix—it should be just combined.
- Divide the batter evenly among the prepared pans or liners, filling each about ¾ full.
- Bake for 18-22 minutes, or until a toothpick inserted into the center comes out clean. The tops should be golden and slightly springy to the touch.
- Let the cakes cool in the pans for 5-10 minutes, then transfer them to a wire rack to cool completely.
- While the cakes are cooling, prepare the frosting. Beat 1 cup (240ml) heavy cream and ½ cup (65g) powdered sugar together until stiff peaks form. Add food coloring if desired.
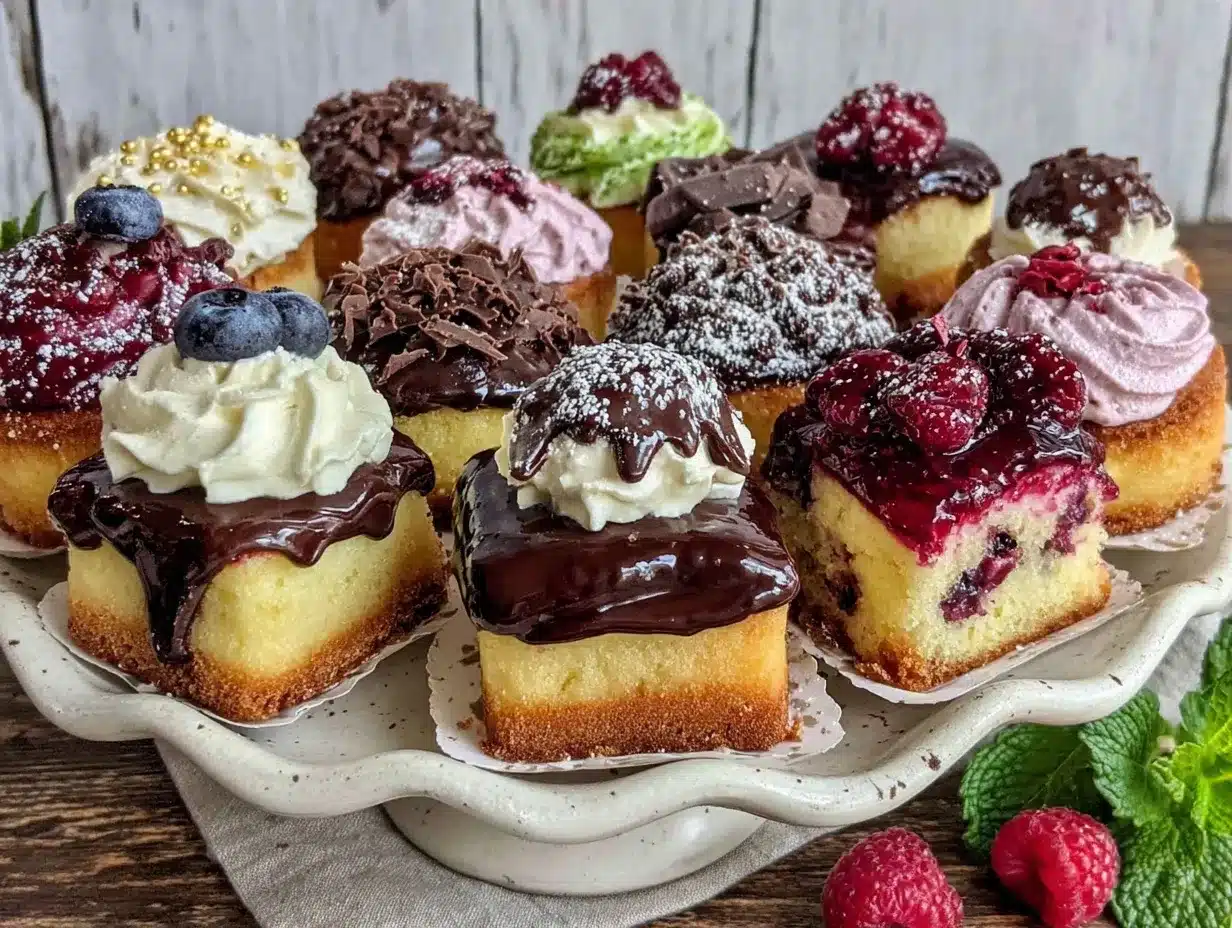
- Once the mini cakes are cooled, use a piping bag to decorate them with frosting. Add sprinkles or other toppings for a festive touch.
And there you have it—beautiful, delicious mini cakes ready to wow your guests!
Cooking Tips & Techniques
Making the perfect mini cakes is easier than you think, but here are some tips to ensure your success:
- Room temperature ingredients: Always use room-temperature eggs, milk, and butter. This helps the ingredients combine smoothly, resulting in a more tender crumb.
- Don’t overmix: Be careful not to overwork the batter. Overmixing can make the cakes dense rather than fluffy.
- Fill pans evenly: Use an ice cream scoop to portion out the batter evenly. This ensures all the cakes bake at the same rate.
- Test for doneness: Use a toothpick to check if the cakes are ready. If it comes out clean, they’re done; if it’s sticky, give them a few more minutes.
- Cool completely: Frosting warm cakes is a recipe for disaster (been there!). Let them cool completely to avoid melting your decorations.
With these tips, you’ll be making mini cakes like a pro in no time!
Variations & Adaptations
One of the best things about this recipe is how adaptable it is. Whether you’re catering to dietary restrictions or trying to match a party theme, here are some ideas:
- Chocolate Lover’s Delight: Swap out ½ cup (65g) of flour for cocoa powder and add chocolate chips for a rich and decadent treat.
- Gluten-Free Option: Use almond flour or a 1-to-1 gluten-free baking mix instead of all-purpose flour.
- Seasonal Twist: Add some lemon zest and a hint of almond extract for a fresh, summery flavor. Top with fresh berries for an extra pop.
- Dairy-Free Adaptation: Substitute the butter with coconut oil and the milk with your favorite plant-based milk.
- Hidden Surprise: Add a dollop of jam or a piece of chocolate in the center of each cake before baking for a delightful surprise.
Feel free to experiment—you might come up with your next signature mini cake recipe!
Serving & Storage Suggestions
Mini cakes are best served fresh and at room temperature. Arrange them on a pretty cake stand or plate for a stunning display. Pair them with a cup of coffee, tea, or even a glass of bubbly to elevate your celebration.
If you have leftovers (unlikely), store the cakes in an airtight container at room temperature for up to 3 days. For longer storage, wrap them individually in plastic wrap and freeze them for up to 3 months. When you’re ready to enjoy them again, simply thaw at room temperature or warm them briefly in the microwave.
Pro Tip: The flavors of these mini cakes become even richer after a day, making them a great make-ahead dessert option!
Nutritional Information & Benefits
While these mini cakes are certainly a treat, they’re made with real, wholesome ingredients. Here’s a general breakdown:
- Calories: Approximately 150 per mini cake
- Protein: 2g
- Carbohydrates: 20g
- Fats: 6g
These are great for portion control, making them a slightly lighter dessert option. The use of real butter and eggs provides richness, while the option to use gluten-free or dairy-free substitutes makes them accessible to a variety of diets.
And let’s not forget the emotional benefit—there’s something so uplifting about enjoying a beautifully decorated mini cake that’s just yours!
Conclusion
If you’re looking for a dessert that’s both simple and stunning, these perfect mini cakes are the answer. Whether you keep them classic with vanilla or get creative with flavors and decorations, they’re bound to be a hit at any celebration.
<ppersonally, baking="" because="" bite="" can="" customizable—you="" endlessly="" face="" for="" i="" into="" joy="" light="" like="" little="" love="" loved="" make="" making="" me="" nothing="" of="" one="" ones.="" own.
So what are you waiting for? Gather your ingredients, preheat your oven, and let’s get started! I’d love to hear how you make this recipe your own—share your creations in the comments below and don’t forget to pin this recipe for later!
FAQs
Can I make these mini cakes ahead of time?
Yes! You can bake the mini cakes and store them in an airtight container for up to 3 days. Frost them right before serving for the freshest taste.
Can I use a regular cake pan instead of mini cake pans?
Absolutely! Just adjust the baking time to around 25-30 minutes and test for doneness with a toothpick.
Can I freeze these mini cakes?
Yes, you can freeze them for up to 3 months. Wrap each cake tightly in plastic wrap and store in a freezer-safe container. Thaw at room temperature before serving.
What’s the best frosting for these mini cakes?
Whipped cream frosting is light and airy, but you can also use buttercream, cream cheese frosting, or even a simple glaze.
How do I make these mini cakes healthier?
You can use almond flour for a gluten-free option, replace sugar with a natural sweetener like honey, or use coconut oil instead of butter for a dairy-free twist.
Pin This Recipe!
Perfect Mini Cakes Recipe Easy Guide for Any Celebration

These perfect mini cakes are soft, pillowy, and endlessly customizable, making them ideal for any celebration or casual gathering.
- Prep Time: 15 minutes
- Cook Time: 22 minutes
- Total Time: 37 minutes
- Yield: 12 mini cakes 1x
- Category: Dessert
- Cuisine: American
Ingredients
- 1 ¾ cups (220g) all-purpose flour
- 1 cup (200g) granulated sugar
- 2 teaspoons baking powder
- ½ teaspoon salt
- ½ cup (115g) unsalted butter, softened
- 2 large eggs, room temperature
- ¾ cup (180ml) whole milk, room temperature
- 2 teaspoons pure vanilla extract
- 1 cup (240ml) heavy cream
- ½ cup (65g) powdered sugar
- Food coloring (optional)
- Sprinkles or other toppings
Instructions
- Preheat your oven to 350°F (175°C). Lightly grease your mini cake pans or line a muffin tin with cupcake liners.
- In a large bowl, whisk together all-purpose flour, granulated sugar, baking powder, and salt.
- In another bowl, beat unsalted butter until creamy. Add eggs and beat until fully incorporated. Mix in pure vanilla extract.
- Gradually add the dry ingredients to the wet ingredients, alternating with whole milk. Start and finish with the dry ingredients.
- Mix until the batter is smooth, but do not overmix.
- Divide the batter evenly among the prepared pans or liners, filling each about ¾ full.
- Bake for 18-22 minutes, or until a toothpick inserted into the center comes out clean. The tops should be golden and slightly springy to the touch.
- Let the cakes cool in the pans for 5-10 minutes, then transfer them to a wire rack to cool completely.
- Prepare the frosting by beating heavy cream and powdered sugar together until stiff peaks form. Add food coloring if desired.
- Decorate the cooled mini cakes with frosting using a piping bag. Add sprinkles or other toppings for a festive touch.
Notes
Use room-temperature ingredients for a tender crumb. Avoid overmixing the batter to keep the cakes fluffy. Cool completely before frosting to prevent melting.
Nutrition
- Serving Size: 1 mini cake
- Calories: 150
- Sugar: 15
- Sodium: 100
- Fat: 6
- Saturated Fat: 3.5
- Carbohydrates: 20
- Protein: 2
Keywords: mini cakes, dessert, celebration, easy recipe, customizable, kid-friendly, baking