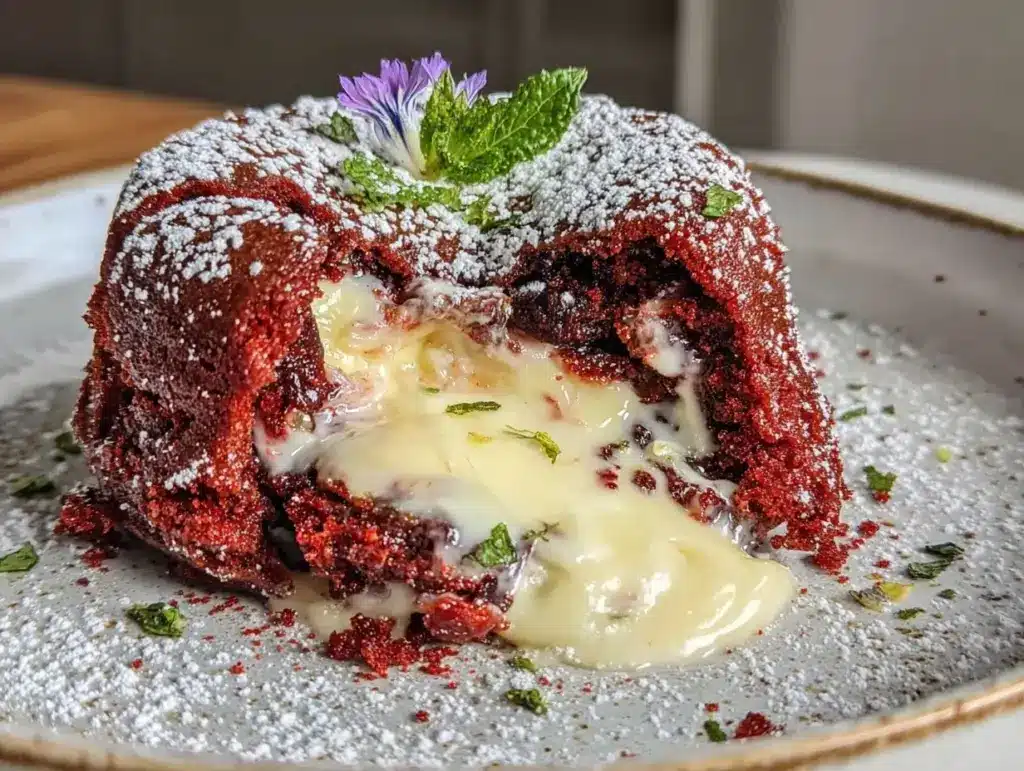
“Wait, did you just say molten lava cake with a white chocolate center?” That was my friend’s incredulous reaction the first time I brought this dessert over for a casual weekend hangout. Honestly, I didn’t expect much—it started as a bit of a kitchen experiment on a sleepy Sunday afternoon when I was craving something rich but didn’t want to fuss over complicated baking. The idea of marrying the deep, velvety flavors of red velvet cake with a molten core of creamy white chocolate sounded a little over the top at first, but hey, sometimes the best recipes come from just throwing things together and seeing what sticks.
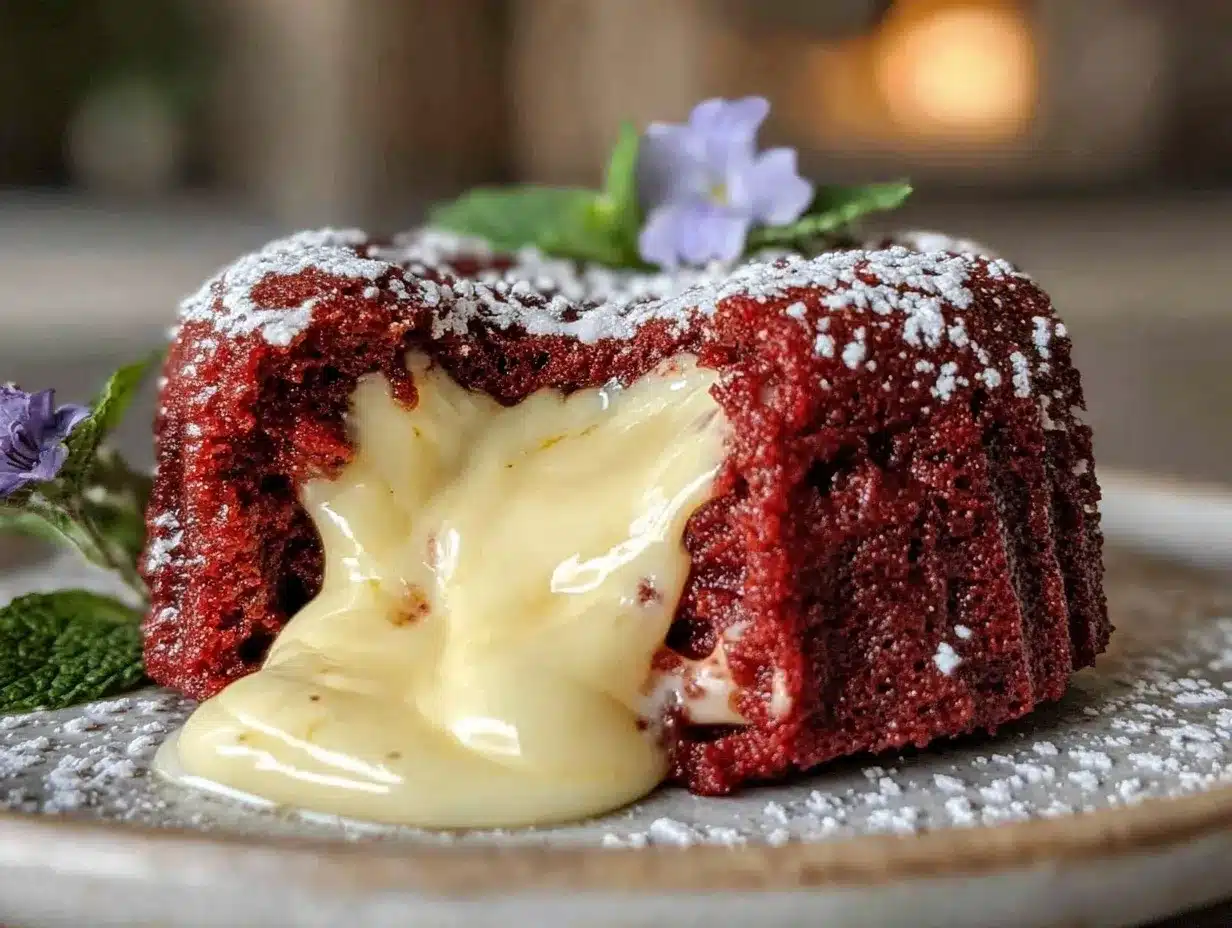
What I found was pure magic. The cake’s exterior has that tender crumb and subtle cocoa kick you know from classic red velvet, but the moment you cut into it, a warm, luscious pool of melted white chocolate oozes out like a secret treasure. The contrast is so dreamy—rich but balanced, indulgent yet comforting. I got hooked pretty quickly and ended up making this decadent red velvet molten lava cake with white chocolate center multiple times that week. It’s the kind of dessert that makes you pause, savor, and forget the chaos of the day.
Now, every time I bake this, I’m reminded of how sometimes the simplest kitchen moments turn into something unexpectedly special—and that’s why this recipe stuck around in my rotation. There’s just something about that molten center that feels like a little cozy celebration in every bite.
Why You’ll Love This Recipe
From my many attempts and tweaks, this decadent red velvet molten lava cake recipe with easy white chocolate center stands out for a bunch of reasons that go beyond just taste. Here’s what makes it a keeper:
- Quick & Easy: Ready in under 30 minutes, this dessert fits perfectly into busy weeknights or when you need an impressive finish without the headache.
- Simple Ingredients: No hunting down obscure baking supplies here—you’ll find everything in your pantry or local grocery store.
- Perfect for Special Occasions: Whether it’s a date night, holiday treat, or just a sweet pick-me-up, this cake fits the bill.
- Crowd-Pleaser: Kids, adults, picky eaters—you name it. Everyone seems to fall for that molten center.
- Unbelievably Delicious: The texture combo of moist red velvet crumb with that molten white chocolate is honestly next-level comfort food.
This isn’t just any molten lava cake. The trick is in the white chocolate center—it melts perfectly without becoming greasy or overpowering. Plus, the red velvet batter has just the right hint of cocoa and a touch of buttermilk tang, making it stand apart from the usual chocolate lava cakes you find floating around. The technique I use to fold the batter gently helps keep the cake tender and the edges beautifully baked while the center remains molten. It’s a little like that feeling when you bite into a warm Kentucky Sawdust Pie—unexpected layers, a bit of texture, but purely satisfying.
Honestly, it’s the kind of dessert that lingers in your mind long after the last bite. A perfect balance of indulgence and ease that I love having in my back pocket.
What Ingredients You Will Need
This recipe uses simple, wholesome ingredients to deliver bold flavor and that satisfying molten texture without fuss. Most are pantry staples, and substitutions are straightforward if needed.
- For the Red Velvet Cake Batter:
- All-purpose flour – 1 cup (125g) (I prefer King Arthur for consistent results)
- Cocoa powder (unsweetened) – 2 tablespoons (adds subtle chocolate depth)
- Baking powder – ½ teaspoon
- Salt – ¼ teaspoon
- Granulated sugar – ¾ cup (150g)
- Unsalted butter – 6 tablespoons (85g), melted and slightly cooled
- Large egg – 1, room temperature (helps with structure)
- Buttermilk – ½ cup (120ml), room temperature (adds moisture and tang)
- Vanilla extract – 1 teaspoon
- Red food coloring – 1 tablespoon (liquid or gel works)
- White vinegar – 1 teaspoon (reacts with baking soda for lift)
- Baking soda – ½ teaspoon
- For the White Chocolate Center:
- White chocolate bar or high-quality chips – 4 ounces (115g), cut into small chunks (I recommend Ghirardelli for smooth melt)
Ingredient tips: If you don’t have buttermilk, mix ½ cup milk with 1 teaspoon lemon juice and let it sit 5 minutes. For a dairy-free option, swap butter with coconut oil and buttermilk with almond milk plus lemon juice. Feel free to experiment with natural beet juice instead of food coloring for a subtle earthiness.
Equipment Needed
- Ramekins or small oven-safe baking dishes (4 to 6 ounces / 120-180 ml capacity each)
- Mixing bowls – one medium and one small
- Whisk and rubber spatula for folding
- Measuring cups and spoons
- Electric mixer or hand whisk (optional but speeds things up)
- Baking sheet to hold ramekins in the oven
- Cooling rack
Don’t have ramekins? Small ovenproof coffee cups or even muffin tins with foil liners can work in a pinch. I’ve tried silicone molds, but they don’t always give the same crisp edges. When caring for ramekins, I find soaking immediately after use makes cleanup easier, especially with melted chocolate involved. For budget-friendly options, thrift stores often have perfectly good ceramic ramekins.
Preparation Method
- Preheat and prep: Preheat your oven to 425°F (220°C). Lightly butter four ramekins and dust with cocoa powder to prevent sticking and add a subtle chocolate touch. Set them on a baking sheet for easy handling.
- Mix dry ingredients: In a medium bowl, sift together 1 cup (125g) all-purpose flour, 2 tablespoons cocoa powder, ½ teaspoon baking powder, and ¼ teaspoon salt. This ensures no lumps and a tender crumb.
- Combine wet ingredients: In another bowl, whisk ¾ cup (150g) granulated sugar with 6 tablespoons (85g) melted butter until smooth. Add 1 large egg and beat lightly. Stir in ½ cup (120ml) buttermilk, 1 teaspoon vanilla extract, and 1 tablespoon red food coloring until the color is uniform.
- Activate leaveners: Add 1 teaspoon white vinegar and ½ teaspoon baking soda to the wet mixture. You’ll see it fizz briefly — that’s the lift happening!
- Fold wet and dry: Gradually add the dry ingredients to the wet, folding gently with a spatula. Don’t overmix; just combine until no streaks remain. The batter will be thick but smooth.
- Fill ramekins: Spoon about 2 tablespoons of batter into each ramekin, then nestle about 1 ounce (28g) of white chocolate chunks in the center. Cover with more batter to fill each ramekin roughly ¾ full. This layering creates the molten core.
- Bake: Place the baking sheet with ramekins in the oven and bake for 12-14 minutes. Look for edges that are set and springy but a slightly jiggly center. Overbaking will lose the molten effect.
- Cool briefly and serve: Let the cakes rest for 2 minutes before running a knife around edges to loosen. Invert onto plates or serve straight in the ramekins for a rustic look. The molten white chocolate will flow when cut into.
Pro tip: Timing is everything here—set a timer and check at 12 minutes. If the center still looks too raw, give it 1-2 more minutes, but not more than 14. You want that perfect lava texture, not a solid center. I learned this the hard way after rushing and ending up with a dense cake instead of gooey bliss.
Cooking Tips & Techniques
One thing I discovered is that the type of white chocolate matters. Lower-quality chips can sometimes seize or remain grainy when melted inside the cake, so I always reach for good-quality bars chopped finely. That way, the center melts smoothly and evenly.
Also, folding the batter gently keeps the texture tender. When I first tried beating the batter vigorously, the cakes came out tougher—lesson learned. Treat the batter like a delicate soufflé.
Another tip: butter and cocoa powder your ramekins well. This step helps the edges crisp just right, giving you a nice contrast to the soft center. Skipping this means the cakes stick and don’t release cleanly, which is a bummer when you’re aiming for that pretty presentation.
Timing your oven is crucial. I often set a little kitchen timer and peek through the oven window rather than opening the door. Even a small temperature drop affects the lava effect.
Lastly, multitasking while baking can save time. While the cakes bake, I usually start prepping a quick whipped cream or scoop some vanilla ice cream to serve alongside—because, honestly, who doesn’t love that creamy-cold contrast? It reminds me a bit of how I like to serve my brown butter strawberry peach pie with a scoop of vanilla bean ice cream for that extra touch.
Variations & Adaptations
This decadent red velvet molten lava cake is pretty flexible if you want to mix things up. Here are some ideas:
- Dark Chocolate Center: Swap the white chocolate chunks for bittersweet or semi-sweet chocolate for a richer, more intense molten core.
- Berry Twist: Add a spoonful of raspberry jam or fresh raspberries in the center with the white chocolate for a tart contrast that cuts through the richness.
- Gluten-Free: Use a 1:1 gluten-free baking flour blend instead of all-purpose flour to make this cake safe for gluten-sensitive friends without sacrificing texture.
- Vegan Version: Replace butter with coconut oil, egg with flax egg (1 tablespoon flaxseed meal + 3 tablespoons water), and buttermilk with almond milk plus lemon juice. Use dairy-free white chocolate chips.
- Spiced Red Velvet: Add ½ teaspoon ground cinnamon or a pinch of cayenne to the batter for subtle warmth and unexpected depth.
Personally, I’ve tried adding a dash of espresso powder to the batter once, which enhanced the cocoa notes beautifully without making the cake taste like coffee. It was a fun little twist for a cozy night in.
Serving & Storage Suggestions
This cake shines best served warm, straight out of the oven, so the white chocolate center is molten and flowing. I like to plate it with a light dusting of powdered sugar and a dollop of freshly whipped cream or a scoop of vanilla ice cream. The cold creaminess against the warm cake is pure bliss.
For a little extra flair, fresh raspberries or a drizzle of raspberry coulis pairs wonderfully with the red velvet flavor. If you’re hosting, try serving alongside a cup of rich coffee or a creamy hot chocolate to complete the indulgent vibe.
Leftovers can be stored covered in the fridge for up to 2 days. Reheat gently in the microwave for about 20 seconds to bring back the molten effect, though it won’t be as perfect as fresh from the oven. Avoid reheating too long or the center will solidify.
Interestingly, letting the cakes cool completely before refrigerating allows the flavors to meld and deepen, turning the cake more fudgy and dense—still delicious, just a different experience. If you want to prepare ahead, you can assemble the ramekins and freeze them before baking. Thaw slightly and bake as directed, adding a couple extra minutes.
Nutritional Information & Benefits
An average serving of this decadent red velvet molten lava cake clocks in around 350-400 calories depending on portion size. The white chocolate adds richness and sugar, so it’s definitely a treat to enjoy mindfully.
Key ingredients like cocoa powder bring antioxidants, while buttermilk adds calcium and protein. Using real butter (in moderation) contributes to flavor and texture but can be swapped for plant-based fats if preferred. This dessert is naturally gluten-containing unless you adapt the flour.
For those watching allergens, keep in mind it contains dairy, egg, and gluten unless modified. I appreciate that this cake offers a way to indulge without complicated ingredients or preservatives, making it a satisfying homemade option that feels a bit special but still approachable.
Conclusion
This decadent red velvet molten lava cake with white chocolate center is a recipe I keep coming back to because it balances ease, elegance, and pure comfort perfectly. It’s fun to make, impressive to serve, and genuinely delicious with its melty core and tender crumb. I hope you’ll tinker with it, add your own twists, and find that same little joy I do every time I bake it.
Whether you’re making it for a cozy night in, a special occasion, or just because you deserve a sweet moment, this recipe is a reliable go-to that delivers smiles. If you try it, I’d love to hear how you make it your own—drop a comment or share your favorite variation!
Happy baking, and here’s to many gooey, joyful bites ahead!
FAQs
How long should I bake the red velvet molten lava cake?
Bake for 12-14 minutes at 425°F (220°C). The edges should be set and springy, with a slightly jiggly center to keep the molten texture.
Can I prepare these cakes ahead of time?
Yes! Assemble the cakes in ramekins and freeze before baking. When ready, thaw slightly and bake, adding a couple of extra minutes to the baking time.
What if I don’t have white chocolate for the center?
You can substitute with semi-sweet or dark chocolate chunks for a different but equally delicious molten center.
Can I make this recipe gluten-free?
Absolutely. Use a 1:1 gluten-free baking flour blend instead of all-purpose flour, and the cake will turn out just as moist and tender.
How do I prevent the cakes from sticking to the ramekins?
Be sure to generously butter and dust the ramekins with cocoa powder before adding the batter. This step helps the cakes release cleanly after baking.
Pin This Recipe!
Decadent Red Velvet Molten Lava Cake Recipe with Easy White Chocolate Center
A rich and indulgent red velvet molten lava cake featuring a warm, luscious white chocolate center that oozes out when cut. Quick and easy to make, perfect for special occasions or a comforting treat.
- Prep Time: 10 minutes
- Cook Time: 14 minutes
- Total Time: 24 minutes
- Yield: 4 servings 1x
- Category: Dessert
- Cuisine: American
Ingredients
- 1 cup (125g) all-purpose flour
- 2 tablespoons unsweetened cocoa powder
- 1/2 teaspoon baking powder
- 1/4 teaspoon salt
- 3/4 cup (150g) granulated sugar
- 6 tablespoons (85g) unsalted butter, melted and slightly cooled
- 1 large egg, room temperature
- 1/2 cup (120ml) buttermilk, room temperature
- 1 teaspoon vanilla extract
- 1 tablespoon red food coloring (liquid or gel)
- 1 teaspoon white vinegar
- 1/2 teaspoon baking soda
- 4 ounces (115g) white chocolate bar or high-quality chips, cut into small chunks
Instructions
- Preheat your oven to 425°F (220°C). Lightly butter four ramekins and dust with cocoa powder to prevent sticking. Place ramekins on a baking sheet.
- In a medium bowl, sift together the flour, cocoa powder, baking powder, and salt.
- In another bowl, whisk together the sugar and melted butter until smooth. Add the egg and beat lightly.
- Stir in the buttermilk, vanilla extract, and red food coloring until uniform in color.
- Add the white vinegar and baking soda to the wet mixture and mix briefly until it fizzes.
- Gradually fold the dry ingredients into the wet ingredients gently with a spatula until just combined and smooth.
- Spoon about 2 tablespoons of batter into each ramekin. Nestle about 1 ounce (28g) of white chocolate chunks in the center of each.
- Cover the white chocolate with more batter to fill each ramekin about 3/4 full.
- Bake for 12-14 minutes until the edges are set and springy but the center is slightly jiggly.
- Let the cakes rest for 2 minutes. Run a knife around the edges to loosen and invert onto plates or serve in ramekins.
- Serve warm to enjoy the molten white chocolate center.
Notes
Use good-quality white chocolate bars chopped finely for a smooth molten center. Butter and dust ramekins with cocoa powder to prevent sticking and achieve crisp edges. Timing is crucial; check at 12 minutes and do not overbake to maintain the molten core. You can prepare cakes ahead by assembling and freezing, then bake with extra time. Serve warm with whipped cream or vanilla ice cream for best experience.
Nutrition
- Serving Size: 1 cake (1 ramekin)
- Calories: 375
- Sugar: 30
- Sodium: 220
- Fat: 20
- Saturated Fat: 12
- Carbohydrates: 45
- Fiber: 2
- Protein: 5
Keywords: red velvet, molten lava cake, white chocolate, dessert, easy recipe, quick dessert, special occasion, chocolate cake


