“You really don’t have to be a bread wizard to pull off this one,” my friend said the first time I mentioned trying sourdough bread. Honestly, I was skeptical. I mean, sourdough? That intimidating tangy loaf everyone raves about but looks like a science project for home bakers? I wasn’t convinced. But one night, after a particularly chaotic day juggling work and family, I found myself rummaging through my pantry, desperate for something comforting yet simple to make. That’s when I stumbled upon an old jar of sourdough starter I’d forgotten about. A quick search later, and I landed on this easy no-knead overnight sourdough bread recipe for beginners.
What hooked me was the “no-knead” part—because who has time or energy to wrestle with dough after a long day? The idea of mixing, letting the dough rest overnight, then waking up to a ready-to-bake loaf felt like magic. I gave it a shot, expecting a crumbly flop, but instead, I woke up to the smell of a golden, crusty loaf that was soft and wonderfully tangy inside. That first bite? Honestly, it was one of those rare kitchen wins that felt like a warm hug.
Since then, this easy no-knead overnight sourdough bread has become my go-to whenever I want fresh bread without fuss. It’s strangely meditative, too—letting the dough ferment slowly while I sleep, then baking it off the next day. Plus, it’s beginner-friendly, so if you’re new to sourdough or bread baking in general, you won’t feel overwhelmed. I promise it’s a recipe that quietly builds confidence and rewards patience. No fancy equipment, no intimidating steps, just a simple loaf that tastes way better than you’d expect.
And between you and me, it’s a great conversation starter whenever I bring it along to a brunch or casual get-together—kind of like how I once brought that creamy peanut butter French silk pie that stole the show without breaking a sweat.
Why You’ll Love This Recipe
From my experience testing and tweaking this easy no-knead overnight sourdough bread recipe, I can confidently say it’s one of the most approachable ways to enjoy homemade sourdough without the usual intimidation. Here’s why it stands out:
- Quick & Easy: The active hands-on time is just about 10 minutes. The dough does all the work overnight, perfect for busy folks who want fresh bread without babysitting dough.
- Simple Ingredients: No need for exotic flour or additives — just flour, water, salt, and your trusty sourdough starter. I usually recommend using King Arthur flour for a reliable crumb.
- Perfect for Beginners: This recipe skips kneading and complicated shaping, making it great for those new to sourdough or bread baking.
- Crowd-Pleaser: Whether you’re serving it with breakfast or alongside a cozy dinner, it’s always met with compliments. I once paired it with a creamy jalapeño popper mac and cheese and it was a hit!
- Unbelievably Delicious: The natural fermentation gives it that signature tang, while the no-knead method keeps the crumb soft and the crust perfectly crisp.
What makes this particular recipe different? It’s the overnight fermentation that gently develops flavor without needing multiple feedings or complex timing. The dough is forgiving, so even if you leave it a little longer, the loaf still turns out great. Plus, you don’t need any special bread pans—just a Dutch oven or a heavy pot you already have.
This bread feels like a little act of self-care—simple, hands-off, but incredibly satisfying. It’s the kind of recipe you’ll want to keep making just to appreciate the slow, comforting rhythm of bread baking.
What Ingredients You Will Need
This recipe calls for straightforward, wholesome ingredients that come together to create that classic sourdough flavor and texture. Each one plays a role in building the structure, taste, and crust without fuss.
- Active Sourdough Starter (about 100g / 3.5 oz) – bubbly and fed within the last 6-12 hours (I use a 100% hydration starter, which means equal parts flour and water by weight)
- Unbleached All-Purpose Flour (450g / 3 2/3 cups) – the base of our dough. You can substitute with bread flour for a chewier texture or whole wheat for a nuttier flavor.
- Water (350g / 1 1/2 cups), lukewarm – hydrates the dough and controls fermentation speed. Filtered water works best if your tap is heavily chlorinated.
- Sea Salt (10g / 2 teaspoons) – essential for flavor and strengthening the gluten network. I prefer fine sea salt for even distribution.
Optional add-ins or substitutions:
- For a gluten-free twist, try swapping the flour with a gluten-free blend, though the texture will be different and less chewy.
- Use unbleached whole wheat flour for half the flour amount if you want a heartier loaf.
- To add a hint of sweetness, a teaspoon of honey or malt syrup can be mixed in.
If you’re looking for a great sourdough starter brand or culture advice, I find that homemade starters often give the best flavor, but for beginners, brands like King Arthur’s sourdough starter culture or local bakery starters can be a solid place to start.
Equipment Needed
- Large Mixing Bowl: A 5-quart or larger bowl works best for mixing and fermenting the dough comfortably.
- Kitchen Scale: Weighing ingredients is key for consistent sourdough results. If you don’t have one, measuring cups can work, but expect some variation.
- Dutch Oven or Heavy Oven-Safe Pot: This traps steam and helps create that crisp crust. A 5 to 6-quart size fits a standard loaf.
- Bench Scraper or Spatula: Handy for folding the dough and scraping bowl sides.
- Clean Kitchen Towel or Plastic Wrap: For covering the dough during the long fermentation.
Alternatives:
- If you don’t have a Dutch oven, use a heavy baking sheet with a metal bowl or foil tent over the loaf to trap steam.
- For folding, clean hands work just fine if you don’t have a bench scraper.
Personally, investing in a quality kitchen scale transformed my baking; it’s a small tool with huge payoff. And Dutch ovens? They’re not just for bread—think about roasting veggies or making stews.
Preparation Method
- Mix Your Dough (10 minutes)
In your large bowl, combine 100g (3.5 oz) of active sourdough starter with 350g (1 1/2 cups) lukewarm water. Stir gently to dissolve the starter. Add 450g (3 2/3 cups) unbleached all-purpose flour and 10g (2 teaspoons) sea salt. Mix everything with a spoon or your hand until no dry flour remains and the dough forms a shaggy ball. It will be sticky, and that’s exactly how it should be.
Tip: Don’t worry about kneading here; the long fermentation will do that job. - First Rise: Bulk Fermentation (12-18 hours, overnight)
Cover the bowl loosely with a clean kitchen towel or plastic wrap. Leave it on your countertop overnight, ideally around 68°F (20°C). The dough will slowly ferment and rise. It may look bubbly and puffed in the morning—this is good!
Note: If your kitchen is warmer, check the dough earlier to avoid over-proofing. - Shape the Dough (10 minutes)
Sprinkle a clean surface with flour. Gently turn the dough out onto it. Using floured hands, fold the edges into the center a couple of times to create tension on the surface. Shape it into a tight ball. Let the dough rest for 30 minutes, uncovered, to relax the gluten. - Final Proof (1-2 hours)
Place the dough seam-side down in a well-floured kitchen towel or proofing basket if you have one. Cover and let it rise until it passes the “poke test” (a gentle poke springs back slowly but leaves a slight indentation). This usually takes 1 to 2 hours depending on room temperature. - Preheat the Oven (30 minutes before baking)
About 30 minutes before baking, place your Dutch oven with the lid inside the oven and preheat to 450°F (230°C). This step is crucial for a crusty bake. - Bake the Bread (45 minutes)
Carefully remove the hot Dutch oven from the oven. Place the dough inside (seam side up or down, depending on your shaping), cover with the lid, and bake for 30 minutes. Then, remove the lid and bake an additional 15 minutes to brown the crust deeply.
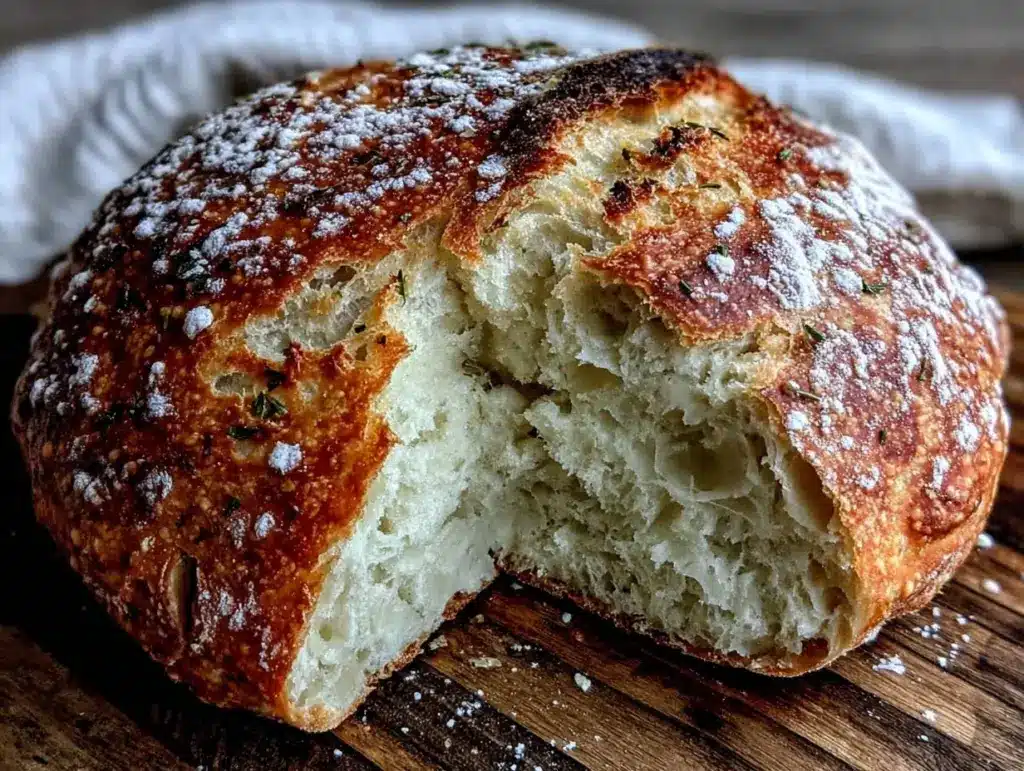
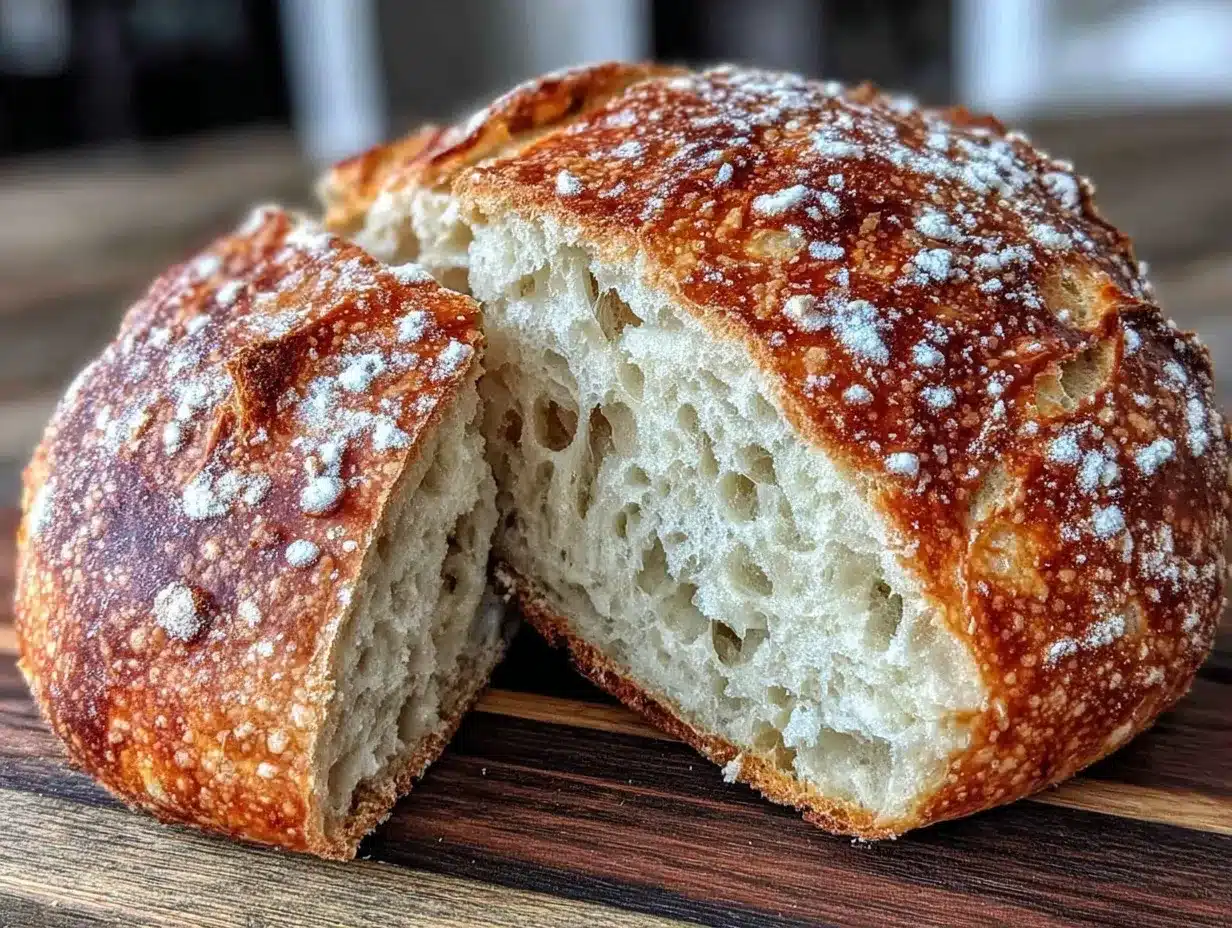
Watch for: A golden-brown crust with a hollow sound when tapped means it’s done. - Cool Before Slicing (At least 1 hour)
Transfer the bread to a wire rack and let it cool completely. I know it’s tempting to slice right away, but cooling lets the crumb set properly.
When I first tried this, I skipped the cooling and ended up with a gummy loaf—lesson learned! Patience really pays off here.
Cooking Tips & Techniques
Sourdough baking might seem complicated, but this recipe strips it down to basics. Here are some tips to keep your loaf perfect:
- Use a bubbly starter: Your starter should have doubled and be full of bubbles before mixing. A sluggish starter leads to a flat loaf.
- Don’t rush fermentation: The slow overnight rise develops flavor and gluten strength. If your kitchen is cold, allow more time.
- Flour your hands generously: Sticky dough is tricky. Dust your hands and surface liberally to avoid frustration during shaping.
- Preheat the Dutch oven well: This step creates steam that’s key for a crusty exterior. I’ve tried baking on a plain baking sheet, but the crust isn’t the same.
- Watch your dough, not the clock: Use the poke test to check readiness rather than strict timing for proofing.
- Practice makes perfect: My first few loaves looked rustic and uneven, but each time I learned more about dough feel and timing.
One time I accidentally left the dough fermenting for nearly 24 hours—it was overproofed but still edible! Adjustments like shortening the final proof or reducing water can help if your dough feels too slack.
Variations & Adaptations
While this easy no-knead overnight sourdough bread recipe is great as-is, I love mixing it up to suit different moods and seasons.
- Whole Wheat Variation: Swap half the all-purpose flour with whole wheat flour for a nuttier, denser loaf. It adds fiber and a richer flavor.
- Herbed Loaf: Add 1-2 tablespoons of fresh rosemary, thyme, or garlic powder into the dough for an aromatic twist that pairs wonderfully with savory dishes like jalapeño popper cornbread casserole.
- Seeded Crunch: Press sesame, sunflower, or pumpkin seeds onto the dough surface before baking for extra texture and nutrients.
- Gluten-Free Option: Use a gluten-free flour blend and add xanthan gum to help with structure, though expect a different crumb and texture.
- Faster Fermentation: Use warm water (around 80°F / 27°C) to speed up fermentation if you’re short on time, but watch closely to avoid overproofing.
I once tried incorporating dried olives and rosemary — it was unexpectedly delicious and made the loaf perfect for a simple appetizer with cheese and wine.
Serving & Storage Suggestions
This sourdough bread is best enjoyed fresh, but it also keeps well and can be stored smartly.
- Serving: Slice it thinly for sandwiches or thicker for toast. Toasting brings out the tang even more, especially with a slather of butter or jam.
- Pairings: It’s fantastic alongside soups, stews, or creamy dips. I like serving it with a hearty bowl of chili or alongside soft cheeses for brunch.
- Storage: Keep the loaf in a paper bag at room temperature for 2-3 days to maintain crust crispness. For longer storage, slice and freeze in airtight bags.
- Reheating: Toast slices directly from the freezer or warm the whole loaf wrapped in foil at 350°F (175°C) for 10-15 minutes to refresh the crust.
- Flavor Development: Leftover bread can taste even better the next day as the sourdough tang deepens, making it perfect for toast or bread pudding.
Nutritional Information & Benefits
This easy no-knead overnight sourdough bread offers more than just comfort. One slice (about 60g) roughly contains:
| Nutrient | Amount |
|---|---|
| Calories | 150 kcal |
| Carbohydrates | 30g |
| Protein | 5g |
| Fat | 1g |
| Fiber | 1-2g (depending on flour choice) |
Sourdough fermentation naturally breaks down gluten and increases nutrient availability, making it easier on digestion compared to regular bread. The natural acids and bacteria can also contribute to a healthier gut biome.
For those with gluten sensitivity (not celiac disease), sourdough might be more tolerable due to the fermentation process. Just remember this bread is not gluten-free unless you adapt the recipe.
In my experience, swapping out processed breads for homemade sourdough has been a small but meaningful step toward mindful eating and enjoying food made with intention.
Conclusion
This easy no-knead overnight sourdough bread recipe is a quiet game-changer for anyone who’s wanted to bake real bread without the fuss or fear. It’s forgiving, simple, and delivers a loaf you’ll be proud to pull from your oven again and again. I love how it fits so naturally into my rhythm—mix it at night, bake it in the morning, and enjoy fresh bread with minimal effort.
Feel free to tweak the flour types or add your favorite herbs to make it your own. For a touch of sweetness or a savory punch, small changes can turn this basic loaf into something truly special. And hey, if you’re craving something sweet alongside your crusty bread, why not try pairing it with a slice of brown butter strawberry peach pie for a perfect balance?
Go slow, trust the process, and enjoy the magic of bread baking. I can’t wait to hear how your first loaf turns out!
FAQs
How active should my sourdough starter be for this recipe?
Your starter should be bubbly, doubled in size, and smell pleasantly tangy or fruity. Feed it 6-12 hours before mixing your dough for best results.
Can I make this bread without a Dutch oven?
Yes, you can use a heavy baking sheet and cover the dough with a metal bowl or foil to trap steam, but a Dutch oven gives a better crust.
How long can I store the baked sourdough bread?
Keep it in a paper bag at room temperature for 2-3 days. For longer storage, slice and freeze it in airtight bags.
What’s the best way to know if my dough is ready to bake?
Use the poke test: gently press the dough with your finger; it should spring back slowly but leave a slight indentation.
Can I add seeds or herbs to this recipe?
Absolutely! Fold in seeds or herbs during mixing or press them onto the dough surface before baking for extra flavor and texture.
Pin This Recipe!

Easy No-Knead Overnight Sourdough Bread Recipe for Beginners to Bake Perfect Loaf
A beginner-friendly, no-knead sourdough bread recipe that requires minimal hands-on time and yields a crusty, tangy loaf with a soft crumb. Perfect for busy bakers who want fresh homemade bread with simple ingredients and overnight fermentation.
- Prep Time: 10 minutes
- Cook Time: 45 minutes
- Total Time: 13 hours 55 minutes to 19 hours 55 minutes
- Yield: 1 loaf (about 1.5 lbs) 1x
- Category: Bread
- Cuisine: American
Ingredients
- 100g (3.5 oz) active sourdough starter, bubbly and fed within the last 6-12 hours
- 450g (3 2/3 cups) unbleached all-purpose flour (can substitute bread flour or whole wheat flour)
- 350g (1 1/2 cups) lukewarm water
- 10g (2 teaspoons) sea salt
Instructions
- Mix Your Dough (10 minutes): In a large bowl, combine 100g (3.5 oz) active sourdough starter with 350g (1 1/2 cups) lukewarm water. Stir gently to dissolve the starter. Add 450g (3 2/3 cups) unbleached all-purpose flour and 10g (2 teaspoons) sea salt. Mix until no dry flour remains and dough forms a sticky shaggy ball.
- First Rise: Bulk Fermentation (12-18 hours, overnight): Cover the bowl loosely with a clean kitchen towel or plastic wrap. Leave on countertop at about 68°F (20°C) overnight until dough is bubbly and puffed.
- Shape the Dough (10 minutes): Sprinkle a clean surface with flour. Turn dough out and fold edges into center a couple of times to create tension. Shape into a tight ball. Let rest uncovered for 30 minutes.
- Final Proof (1-2 hours): Place dough seam-side down in a well-floured kitchen towel or proofing basket. Cover and let rise until it passes the poke test (springs back slowly but leaves slight indentation).
- Preheat the Oven (30 minutes before baking): Place Dutch oven with lid inside oven and preheat to 450°F (230°C).
- Bake the Bread (45 minutes): Remove hot Dutch oven carefully. Place dough inside, cover with lid, bake 30 minutes. Remove lid and bake additional 15 minutes until crust is golden brown and sounds hollow when tapped.
- Cool Before Slicing (At least 1 hour): Transfer bread to wire rack and cool completely before slicing.
Notes
Use a bubbly, active starter fed 6-12 hours before mixing. Do not rush fermentation; slow overnight rise develops flavor and gluten strength. Flour hands and surface liberally to handle sticky dough. Preheat Dutch oven well to create steam for crust. Use poke test to check dough readiness. Cool bread completely before slicing to avoid gummy crumb. Variations include whole wheat flour substitution, adding herbs or seeds, and gluten-free flour blends with xanthan gum.
Nutrition
- Serving Size: 1 slice (about 60g)
- Calories: 150
- Sodium: 400
- Fat: 1
- Carbohydrates: 30
- Fiber: 1.5
- Protein: 5
Keywords: sourdough bread, no-knead bread, overnight bread, easy sourdough, beginner bread recipe, homemade bread, crusty bread, tangy bread


